The MGA With An Attitude
BONNET LATCH STUCK - BD-101D
At 11:15 PM 12/4/2006 -0500, Bob Figenskau wrote:
>"The latch does pull, but we have no release. Any suggestions are welcome."
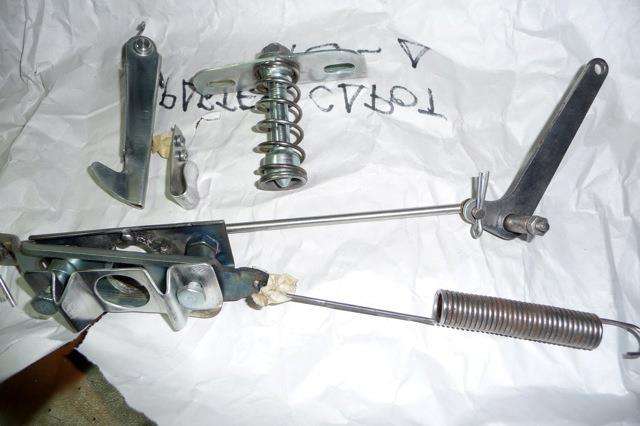
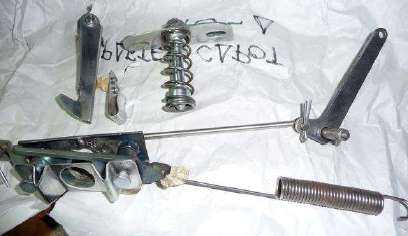
The most common cause of stuck bonnet latch is a misaligned latch pin. The pin has a tapered nose and large shoulder. When a misaligned pin is forced through the guide plate it will bend off center a bit, then snap back straight to have the shoulder caught beneath the guide plate. The hole in the bottom guide plate also has a short extended wall on the side. If the latch pin is adjusted slightly long as well as being misaligned, and the bonnet is pressed down with vigor to over-travel a bit, the shoulder on the pin could be caught below the short wall on the bottom guide plate.
The first order of business is to recruit a helper to pull and hold the release rod while you fiddle up front. Or you can pull the release rod and secure it in the drawn position with a pair of locking pliers (Vice-Grip) against the back of the bulkhead. If interference of the latch pin is not too great, sometimes you can press down on the bonnet and release it suddenly to get it to pop up (but don't count on it).
The solution to releasing the latch depends some on the direction of misalignment. If the latch pin is a bit too far forward you may be able to stick a thin metal rod through the grille to push the pin back enough to release. If the latch pin is a bit too far back a hook formed on the end of a metal rod may work to pull the pin forward a bit. For a few minutes of work you can make a special tool for all occasions. Weld a flat washer on a steel rod about 30 degrees out of plane from the axis of the rod. With this you reach through the grille to capture the tip of the latch pin and pull or push or nudge in any direction to unhook the shoulder.
On 8/31/2021, Mark Lange has another suggestion. If you don't like welding, you could start with a small diameter steel rod and form an eye loop in the end to serve the same purpose as the welded washer.
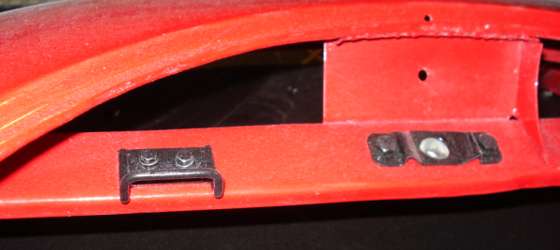
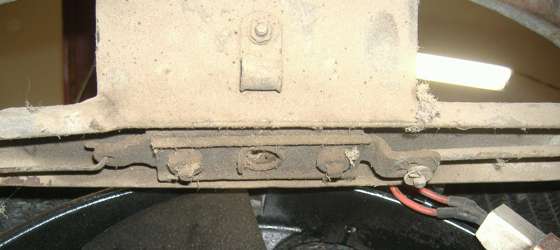
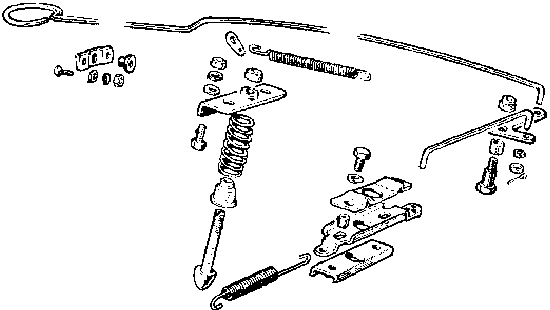
The latch release draw rods are connected with a cross drilled bend on the end, a flat washer and a split pin. If perchance one of these rods should become disconnected, your problem is much more challenging. This too requires access through the grille slats, and it helps if you understand the orientation and operation of the latch release slide. As you are facing the car from the front the latch release slide must be pulled to the right. With some luck and proper finesse a thin rod with a hook on the end may work, if you can find enough clearance between the grille slats to reach in at an acute angle from the side. Or you may try a 1/8-inch (3-mm) flat steel strap, slipped through the grill slats from the other side to push on the release slider near the spring attachment point. If this approach fails you may end up doing substantial damage to the grille by the time you gain enough access to affect the bonnet release.
If you have been doing restoration or paint work, and the bonnet is being installed for the first time, do be sure you have the latch working properly before you install the grille. Also check the condition of the split pins and washers on the draw rods occasionally to assure that they will not fall off from normal wear after many years of normal use. As an emergency backup, some people go as far as to attach a piece of small cable to the latch release slide and run it through a drill hole in the inner fender with a pull loop behind the headlight.
Addendum, Nov 2010:
Cam Cunningham in Lancashire, UK offers this trick.
"The answer to the broken bonnet latch is to change the mounting bolts at the top. Instead of screwing the bolts in from underneath the bonnet, fit longer ones to the top of the grill first and then slip a polythene sleeve over the end (cut from a length of plastic pipe). This means the grill can then be pushed into place in the bolt holes first (the plastic stops it rattling) and then the bolts at the bottom fastened. Now the grill can be removed easily without opening the bonnet".
Addendum March 3, 2012:
If you have small arms and plenty of patience, Larry Benson in Greenback, Tennessee, USA has this suggestion.
"Remove the three bolts (from under the valance) through the radiator panel securing the lower part of the grill. Gently raise the lower part of the grill to allow insertion of a slender arm between the grill and the body. Feel for the location of the three upper bolt heads holding on the upper portion of the grill. Remove arm and place 7/16 open end wrench in hand and reinsert hand with arm still attached. Tediously unscrew bolts holding upper portion of grill. Remove grill and then do whatever is necessary to release the hood. I had to do this twice, before I realized the SPACERS on the hood bracket mounted on the cross-member were too short, preventing the hood release rods from actuating the hood release mechanism. No damage to grill. I also managed to undo the guide plate hood bracket on the cross-member with the same 7/16 open end wrench with the grill attached, but it was very, very tedious and frustrating".
Addendum Nov 2013:
On 11/29/2013 Jon Weakly wrote:
"I got under the car and was able to remove the three 7/16 bolts holding the lower part of the grill to the body. Then we lifted the lower part of the grill high enough so we could get under with a ratchet wrench to remove the bolts holding the top. The piping around the edge of the grill will flex enough without damaging the hood to allow access. After removing the grill I could then free the latch bolt. I will have to replace the grill piping ($8.35 at Moss Motors) and reset it with contact cement, but what a relief"!
Addendum March 11, 2016:
This note from David Adams:
"Saw a screwdriver slot in the ends of the 3 top screws and they can be driven upwards and out through the grille slats. I used stainless screws to ensure that any need to screw out would be successful".

Addendum February 2, 2017:
Michael Hosier from Ontario, Canada wrote:
"I was reluctant to try any sort of prying or bending. What I did was drill a small 1/2 inch hole in the radiator shelf directly below the latch pin. I was able to insert a long screwdriver through the hole and engage the slot in the end of the pin. A simple twisting motion and the hood popped right open. Afterward I adjusted the pin depth and position and haven't had a problem since. I plugged the hole with a stainless steel spring grommet/plug from the top and could simply push up to pop it out of the way if I ever need to repeat the process in future".
On 12/8/2018, Daniel Francis Casey in Queensland, Australia wrote:
"A quick, easy and accessible method is to use your Boot Rod which is curved and can be used from either side of the grill without fear of damaging the slats. Been there and done that, not only on my own but with other members MGA's as well who said it would not work".
On 10/29/2020, Fred Stankovich wrote:
"I removed the 3 bolts from the underside of the valence. Then, as you mentioned used a vise-grip under the dash to hold the hood safety catch rod. I gently raised the grill and inserted under the grill a 1x2 piece of wood long enough to reach the bottom of the striker pin. As I put some leveraged pressure on the bottom of the pin the hood popped open. -- I discovered that apparently the pin had unscrewed itself and was longer than it should have been. Vibration? I realized that the pin only had a nut on the underside of the bonnet that wasn t holding it tight. Diagrams show that the nut should be on the top side of the striker pin bracket. I solved the problem (I hope) by installing a lock washer". -- Fred
|