The MGA With An Attitude
FRONT COWL VENTS, Sebring Style - BD-315
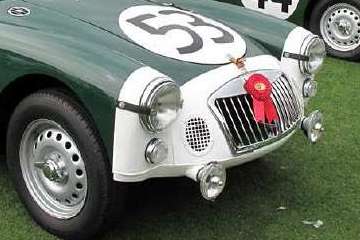
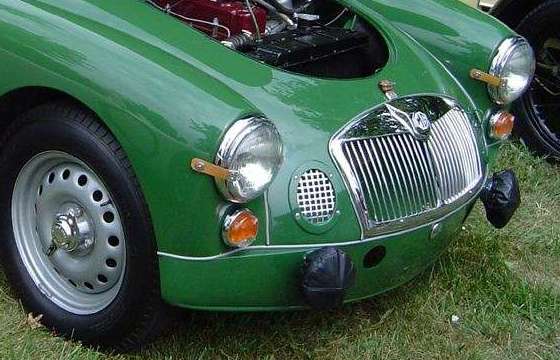
This article is about those (almost round) vents you might sometimes see in the nose of and MGA along side of the main grille opening. There were a feature on the Sebring race cars in later years of production, so may commonly be referred to as "Sebring vents". They serve a couple of purposes. The right side vent can duct cool air to the passenger ventilation inlet, while the left side vent can duct cool air to the carburetors. The trick is that these front vents enlarge the total air inlet area and separate the ventilation air flow from the cooling air flow. All of the air going through the original front grille can then be directed through the cooling radiator, which has the potential of better cooling of the engine.

I believe these special modification vent parts were never available commercially, so if you want them you may have to make your own. Not having done this myself, I can only suggest a few fabrication techniques.
If you use a hole saw to cut a 4-inch diameter hole in the nose, then stick a 4" diameter tube through the hole, the tube will sit basically perpendicular to the body surface. But that's not what you want. From basic geometry, if you have a flat plane cutting through a cylinder at an angle the intersection is an ellipse. You would like the round tube to sit approximately level and straight front to back in line with axis of the car. So after you cut the round hole you get to enlarge it to some oval shape until a 4" tube can fit horizontal and in line with the car axis. End result will be roughly elliptical hole in the body (and oddly rotated away from vertical).
You can make two layers of thick sheet metal with same shape hole, and form them to also fit around the tube. Then you can scribe another cutting line equal distance from the tube all around to give you a cutting line for the outer perimeter of the flanges, and cut them out of the sheet. Put one sheet metal flange in front and one behind the nose, and stick the tube through as alignment guide. Drill a few holes through the assembled flanges on the body for attachment screws.
Adjust position of the tube to your liking with enough sticking out the back to attach the hose with a band clamp. Then get inside and make a number of tack welds in the back to attach the rear side flange to the tube. Remove the screws for disassembly. Cut the tube flush with front face of the rear flange all around. The finished tube with flange then goes behind the body panel, while the loose flange in front is the decorative piece. Wire screen of your choice can be sandwiched between body nose and either front or rear flange to serve as a grille. If you put the screen in front it spaces out the front flange with a gap behind. If you put the screen behind the panel the edge of the panel may be seen inside of the front flange. If you paint it all black or all body color it serves as camouflage.
You could continuous weld the front flange to the tube, then cut the tube flush in front. Grind smooth in front and plate or paint to your liking. Then you have to get creative if you want a grill screen to fit inside the hole and close to flush with the front face. Maybe bend a flange around the elliptical shape screen so the flange fits against the ID of the tube, and maybe epoxy it in place.
If you don't like the idea of the elliptical hole being rotated away from veritcal, you can free hand the outline of the hole in the body cowl to appear to be more vertical. This will result in the fore/aft 4-inch tube being not quite round, but still close enough to secure the duct hose with a band clamp. The technique then is to cut the hole in the body to the shape of your choice, to be aesthetically pleasing, then squeeze the tube slightly out of round to fit through the hole, and enlarge the hole enough to pass the tube through generally level and axially in line. Then you can use the hole in the body as a template to cut holes in one or two more layers of metal to ultimately be trimmed and attached as noted above.
Food for thought. If anyone ever gets around to doing this, I would be pleased if you could take photos and make notes for others to see.
|