The MGA With An Attitude
Rebuilding the FABRIC COVERED DASH -- DT-110
MGA Twin Cam Dashboard Restoration - By Steve Clarke
In restoring my Twin Cam, I paid particular attention to the dashboard because it is, in my humble opinion, the focal point of the car. Sort of like the door handles on the MGA coupe which might be the coolest door handles ever designed. It is what you see. Granted, the Twin Cam engine is pretty cool too but the dash is so nice looking I think it deserves special attention to the detail so that the finished product looks as it should and not cobbled together.
All of the instruments, switches, windscreen washer pump, horn button, etc. should be removed and placed in individual Ziplock bags and properly labeled for storage. I sent my tach, speedo, fuel gauge and oil pressure/temp. gauge to Nisonger's at this time. This is also the time to carefully make note of all of your wiring
even though you will probably be installing a new harness. It will make reassembly much, much easier. I wrote down each wire for each switch and where it came from and where it ought to go from there.
The pop rivets holding the finishing strip along the dash bottom need to be drilled out. Care should be taken to not bend or kink this strip or slip with the drill which could cause scratches. The chrome speaker surround is attached on the top of the dash with two rivets and one on the bottom. After removing the vinyl covered beading across the top of the dash, you can then drill out the two rivets just mentioned and remove the speaker surround. This is a good time to take this and the map light chrome cover to your local plater.
NOTE: If you are going to try cleaning up the trim strip removed from the bottom of the dash by using a buffing wheel, pay real close attention to what you are doing. And you better really, really know what you are doing. A buffing wheel will pull the strip out of your hands so fast you won't even realize it until the twisted mess is lying on the floor and you're back to e-bay hoping someone has one for sale. You WILL ruin it. I chose to polish mine with Q-Tips and Semichrome polish. It was not intended to be chrome plated. It is stainless and will polish up very nicely.
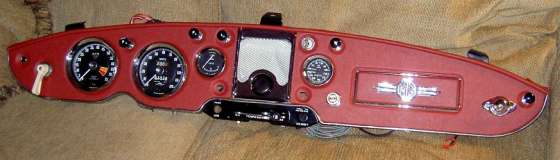
After removing the gauges, chrome speaker surround and the bottom trim strip, I found that the vinyl dash covering was installed in two pieces (See Fig. 2). It had also been painted at some time in the past (as were the seats, door trim and door panels). It was originally red.

Figure 2
I made two dashboard stands out of scrap lumber as shown in MGA! Magazine so that I could flop back and forth (the dashboard, that is). It's cheap and easy and will make your work reinstalling everything go much quicker (See Fig. 3).
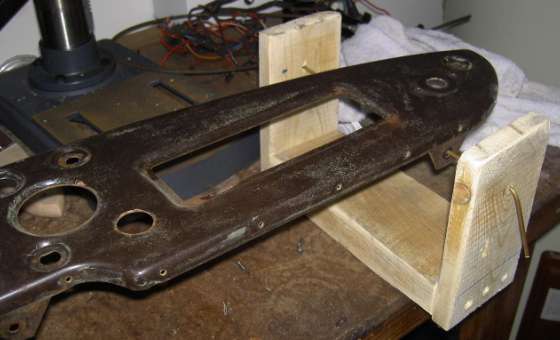
Figure 3
After the dash has had everything removed, it will need to be completely cleaned to get rid of the old contact cement, paint, surface rust on the back, etc. (See Fig's 3 & 4). I found the easiest way to do this was to simply use paint stripper. I was down to bare metal in no time. I have a bead blasting cabinet but the dash is too long for mine or I would probably have used it. After cleaning the dash completely, I wiped it down good with a surface cleaner like Prepsol and then primed it and sprayed one coat of black Rustoleum. No need to put anymore on than that.

Figure 4
You need to give the paint plenty of time to dry properly before doing anything else. I let it sit for three or four days. While this was going on, I made my new piping and cut
 out my new vinyl pieces for the dash. The top piping was made with a strip of vinyl 1-3/4" wide. I used the rubber tubing from the original piping and glued it back together by simply folding the vinyl over the rubber tubing in equal amounts so that when it is reattached to the top of the dash it will easily clip back on and extend out over the dash the proper amount. This strip is attached to the top of the dash with 6-8 small half moon shaped clips. If yours are too far gone to reuse, Moss sells them as a set of 8. This strip is cut at each end (See Fig's. 5, 6 & 7) so that it extends approximately 2" beyond the rubber tubing. It is then cut into slightly and bent back over the top of the dash and clipped into place. (I kept all my original vinyl as intact as possible to use as templates and to refresh my memory as I went on.)
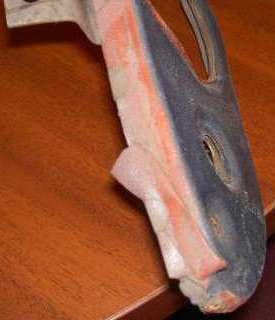

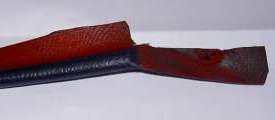
Figure 6

Figure 7
Figure 5
In gluing the vinyl to the dash, I used plain old Home Depot contact cement. Don't try it with the small bottle and little brush that comes with it. Get the can and a cheap throw away paint brush so you can really get some cement on both the dash and the vinyl. Also, I laid the vinyl face down with the appropriate side of the dash on top of it. Then I traced the outline of the gauges and the edges with a Sharpie pen. Since the dash is indented everywhere for gauges, switches, etc., I found it easiest to cut out the openings along the outlines before the actual gluing. I applied the contact cement only out to the outlines. This left the outer edges loose. I did this so that the dash face could be "worked" first before having to mess with the folded over portions. By "working" I'm referring to using a wallpaper seam roller (Home Depot) to carefully go over the entire area ensuring that the vinyl is well and truly cemented to the dash. This tool is also helpful in making the areas that are indented stay attached as they should. I also found it helpful to have a screen installation tool (Home Depot) to assist in this. In the indentations where switches go, I used quarters clamped down with squeeze clamps (Home Depot).
Remember, don't try to do the entire dash with one piece of vinyl. The factory didn't and I'm sure for very good reason. It is very easy to do doing it their way. (See Fig. 8)
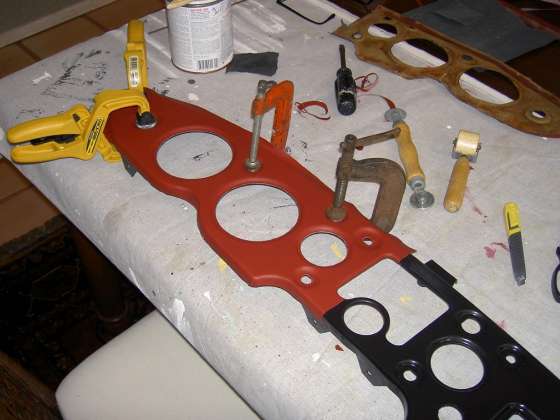
Figure 8
Once the piece is well attached to the dash, go back and apply contact cement to the edges of the vinyl and around the perimeter of the dash. As you bring the vinyl and the dash together going around the edges, you will see where the vinyl tends to bunch in places. This is where the little scissors on your Swiss Army knife come in very handy. As you encounter an area where there is too much material, slip the scissors into this area and simply make a cut. Then a couple of smaller cuts either side of the first cut and everything will lay down flat. Of course, there will be a little sliver of material you will have to carefully remove. You should end up with a nice, smooth fit all the way around for the finishing strip to fit over. This is simple and doesn't take long. Work it all the way around until everything is solid. By the way, follow the directions on the can of contact cement and let both pieces "cure" for at least fifteen minutes before putting them together. Once together, they are going to stay that way for a long time so be careful. Do the same for the other side of the dash. After all the gluing is finished, neatly trim away any excess around gauge and switch openings and around the edges of the dash. Always use a really sharp X-Acto or other trimming blade. I would not be in a hurry to trim either. Give the contact cement plenty of time to cure. Oh yeah, don't forget that your radio blanking plate also gets covered in vinyl. (See Fig. 9) Deal with the corners using your newly acquired Swiss Army knife scissors. You don't want any bunching here because the plate is a snug fit in the little chrome gizmo that surrounds it.
While everything is coming together, this is the time to take your gauge retainers and plate them (if your anal enough to have to do this). Mine were originally zinc plated and coated with yellow chromate. I made up my own plating operation with a kit from Caswell and the end result, while no one will ever see it, looks new.
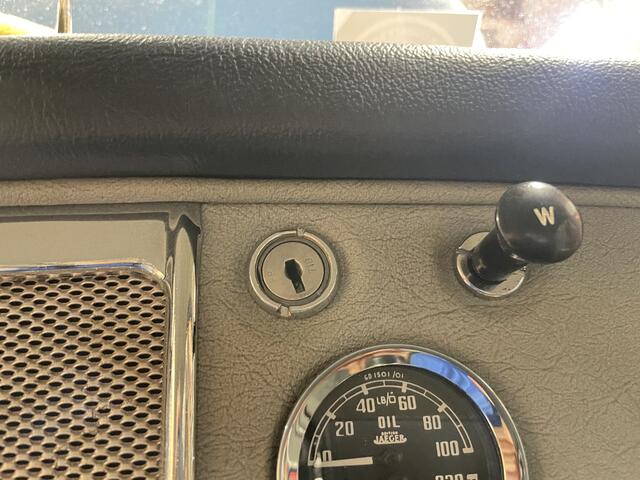
The finishing touch is the horn button (assuming yours works). I used Tripoli polishing compound and a loose buffing wheel and, believe it or not, that button polishes up like it was absolutely brand new. The button bracket that holds it in place was painted and not plated. So, I bead blasted it (it had become sort of rusty) and simply put on a couple of coats of black Rustoleum enamel. Clean up the speaker grill real nice, get a new blanking plate to replace the one that hasn't been on your car in thirty years and you're all set.
While my original turn signal switch handle and windscreen wiper knob were both black, I chose to go with white ones simply because Dove Grey/Red seems to lend itself to having a couple of white knobs. I saw a couple like this in Clausager's book and then managed to snag NOS ones on e-bay so I was able to make the switch and still maintain an original appearance. Also, use a 14 mm deep socket for the nut inside the cup on the washer pump. (See Fig. 9)
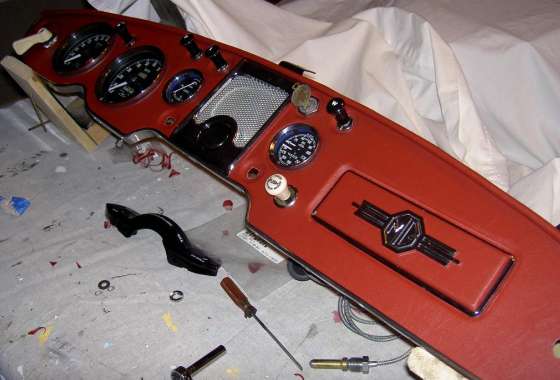
Figure 9
Remember, the finishing strip on the dash bottom is exactly that
a finishing strip. It goes on last. Same thing with the top piping. So, place the newly chromed speaker surround in position. Use a small screw and nut to lightly hold the bottom edge in place while you pop rivet the two places on the top. This will help keep the bottom hole from possibly moving out of position. Then position the finishing strip and do what I call a "light pop riveting". You absolutely need to be able to keep all the little holes lined up so I insert a pop rivet in each hole in the dash through the finishing strip. Then I alternate going around and "pull" the rivet just a little to tighten it up. It will look like a bunch of nails sticking out of the dash all the way around. Once you are certain that everything is where it ought to be and the strip is attached, go back with the pop rivet gun and finish pulling them through. This will give you a very professional looking finish to your project.
You will note from the pictures that I have not installed the starter and choke cables simply because they are cumbersome to have hanging around. Simply wait until you put everything back together.
The end of your project ought to look like the pictures I've attached. This procedure should work for Deluxes and Coupes as well except that I'm not familiar with how the vinyl attaches to the curved ends of the coupe dash.
-- Steve Clarke
Another helpful suggestion from Wayne Stambaugh on July 12, 2020:
"Since you will be replacing the fabric anyway don't be so hasty and remove the piece of trim yet from the bottom of the dash. Instead, leave the trim attached to the dash and with the dash stripped of everything but the fabric cover and the trim strip, go to the buffing wheel, and lightly buff the trim. Now remove the trim from the dash and it's polished and ready to reinstall after the fabric covering has been replaced.
I can't recall if this piece of trim is nickel silver or Chrome plated brass. If it does happen to be chrome-plated brass, heavy buffing would actually remove the chrome. Replating would be in order".
-- Wayne Stambaugh
|