The MGA With An Attitude
OIL FILTER DESCRIPTIONS, Original MGA Type -- OF-100
Filter descriptions, original MGA type - -
Filter Descriptions, original variations
Filter Cartridges - -
Filter Seal Rings - -
Spin-on adapters, Aftermarket
Spin-on adapters, MGB - -
Filter types - -
Frequently asked questions
Personal preferences
The original oil filters for the MGA are canister type assemblies with a replaceable filter element inside. The filter element is held in place firmly against the top abutment by a spring loaded plate at the bottom. Oil enters through the side of the canister in the earliest assembly, or through the side of the head assembly in later units. The oil then passes through the filter element from outside to inside, and then upwards into the engine block. In the filter head assembly there is a pressure relief valve that will allow oil to bypass the filter in the case that the oil flow rate exceeds the flow capacity of the filter element. This should occur only if the filter element is badly clogged, which should not ever happen if the oil and filter are changed at the specified scheduled intervals. All filters designed for this application have sufficient flow capacity to filter all of the oil entering the engine block, assuming the filter element is not clogged.
All of these filter assemblies use a square section rubber o-ring for a seal where the filter assembly mates to the engine block. It is good practice to change the rubber o-ring every time the filter is serviced, as an old seal left in place will eventually age harden and crack, allowing leakage of oil under pressure. A hardened rubber o-ring is difficult to extract from the groove in the engine block, but it should never be left in place with another o-ring installed on top of it. Use a sharp pointed awl or small screwdriver to dig out the old o-ring, and be sure to get it all out and clean the groove completely. Also in all cases when servicing the oil filter, be sure that the parts are reassembled in the correct order with nothing missing. Especially be sure that the spring and plate below the filter element are in place. Also clean and inspect the filter head occasionally to assure that the pressure relief valve will function properly (just in case it ever has to).
The early Tecalemit oil filter assembly is identified by the full height one piece canister with the oil entry fitting on the side of the canister. In this case the filter head is inside of the canister with a rubber o-ring seal around the filter head. Note that this o-ring is not the same as the one between the canister and the engine block. When changing the oil filter the oil supply pipe must be disconnected from the canister. The connection fitting at this point is a banjo bolt which is sealed with two copper washers. These copper washers may be reused a few times, but will eventually work harden and be squashed flat and may eventually leak. It is a good idea to replace these copper seal washers at least once during your ownership of the car, especially if the service history is uncertain. If your car is fitted with the optional oil cooler, the filter assembly will be connected with a large rubber hose in place of the original steel oil supply pipe. This makes it easier to R&R the canister if you leave it connected to the hose, but it may be a little more effort to clean the cannister while it's still attached.
The late Tecalemit assembly and the Purolator assembly both have a filter head which is separate from the canister. These filter heads mount to the engine block with an o-ring, and the canister then mounts to the filter head with another o-ring, and the entire assembly is held in place with a single long bolt through the center. For these assemblies the two rubber o-rings are identical. This arrangement makes it easier to change the filter, as you do not have to disconnect the supply pipe from the filter head. Unfortunately, many replacement filter elements are supplied with only one o-ring of the correct size in the package with the new filter. This rather encourages the practice of replacing only the lower o-ring when servicing the filter and leaving the upper o-ring in place. It is imperative that the upper o-ring also be replaced, at least occasionally, to prevent leakage of oil under pressure. It is good practice to do this every time the filter is serviced just to be sure that it doesn't get neglected in the long run. Unfortunately this requires you to disconnect the supply pipe from the filter head, which pretty much negates the advantage of the two piece assembly. However, with due care and judicious record keeping you might arrange a schedule to change the upper o-ring less frequently, but I would recommend that it be changed at least every second year regardless. Also the optional oil cooler installation with the hose connection to the filter head makes it easier to R&R the upper o-ring.
The primary visible difference between the late Tecalemit and the Purolator assemblies is that the late Tecalemit unit has a large steel dome washer welded to the bottom end of the canister, which the Purolator assembly does not have. These units use different center bolts, different springs, different flat washers, and different seals on the bottom end. Because of the difference in canister design the bolts and seals cannot be interchanged. There are minor differences in the construction of the filter heads, but this is insignificant, as they all serve the same function, including a bypass pressure relief valve, and they all use the same replaceable filter element.
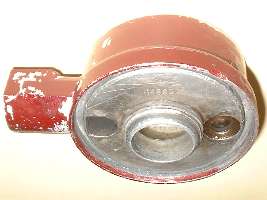
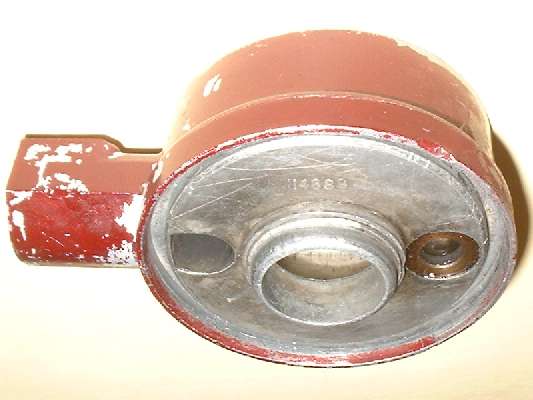
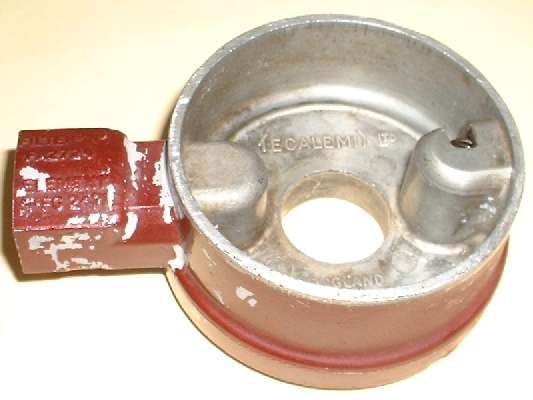
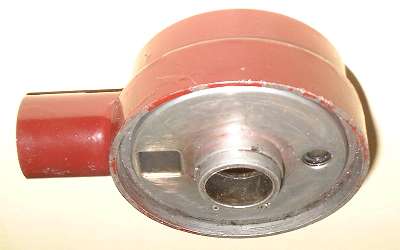
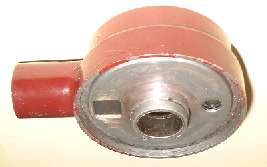
Late Tecalemit filter head missing splash plate.  Late Tecalemit filter head top side. Late Tecalemit filter head top side.
Here are pictures of the late Tecalemit filter head, without the splash plate. Markings on bottom side are "114688" and "DIALOY". On top inside it has "TECALEMIT LTD" and "ENGLAND". On top of the inlet boss it has "FILTER No FA2724" and "ELEMENT No FG2471".
There is a three step pilot spigot in center of bottom side. The first shoulder is 1-15/32" diameter x 7/64" high. Second shoulder is 1.365" diameter x 5/64" high. The final shoulder is 1-9/32" diameter x 3/16" tall with a rounded edge (pilot diameter for the filter element). The splash plate is 1.375" ID x 2-13/16" OD(+/-) x 0.036" thick (20 gauge). The plate sits on the first shoulder with nominal 0.010" diametrical clearance for easy assembly. The second shoulder is then swaged (pushed down) about 1/64" with a tubular punch to shorten and expand it in diameter to make a tight fit to hold the splash plate in place (essentially riveting the second shoulder over the inner edge of the splash plate). This provides a 7/64" relief space between the plate and head for oil flow. Looking closely at the picture above left (click for larger picture) you can see where a portion of the second shoulder was broken away in process of removing the splash plate.
Oil enters at the long projection port on the left, passes downward through the horse shoe shape hole, then passes outward between the filter head and splash plate, and then downward around the outer edge of the splash plate. Oil then flows radially inward through the filter element, and finally upward through the center hole into the engine block. The smaller round hole on the right side with a spring loaded steel ball (behind a press fit brass inset) is the low pressure relief bypass valve (in case the filter element may be clogged enough to not pass the full flow of oil at road speed). In the bottom of the canister lies another flat plate with a compression spring (and flat washer and felt seal) to hold the filter element securely upward against the splash plate, sealing both ends of the filter element.
The splash plate should be staked in place as a permanent part of the filter head so it does not fall off when the filter is being changed. If the splash plate is missing then a filter element may sit directly against the filter head, in which case the filter element might block part of the inlet or bypass ports, or might allow oil to bypass the filter element at top end without being filtered. The felt type filter elements do not have any end caps, so a missing splash plate would definitely defeat the filter allowing oil to bypass the filter element at top end. Note that the Think Automotive two-piece spin-on adapter shown on a following page will work with this late Tecalemit filter head.
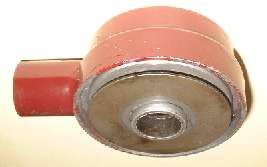
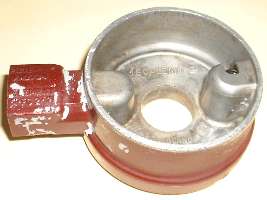
Purolator filter head with splash plate. Purolator filter head missing splash plate.
Here are pictures of bottom side of a Purolator filter head, with and without the splash plate. Markings on the inlet boss say "PurOlator reg. trade mark".
There is a shoulder on the center pilot of the filter head 1-5/32" diameter and 3/16" tall. The splash plate is 1-5/32" ID x 2-13/16" OD x 0.036" thick (20 gauge). There is also (not shown here) a fiber washer placed between the plate and head 1-5/32" ID x 1-1/2" OD x 0.090" thick. This provides a relief space between the plate and head for oil flow. Fiber washer and steel plate combined for total 1/8" thickness. The larger pilot diameter is then staked down in four places around the cylinder edge making burrs (or expanded wall thickness) to hold the splash plate in place. In the picture above right (click for larger picture) you can clearly see one of the staking slots, but the original burrs were removed (broken away) in the process of removing the splash plate. In picture above left the splash plate has been inverted, and you can see a clean ring in the center (lack of oil stain) where it originally nested against the fiber washer.
Oil enters at the long projection port on the left, passes downward through the square hole, then passes outward between the filter head and splash plate, then downward around the outer edge of the splash plate. Oil then flows radially inward through the filter element, and finally upward through the center hole into the engine block. The smaller round hole on the right side is the passage to the pressure relief bypass valve (in case the filter element may be clogged enough to not pass the full flow of oil). In the bottom of the canister lies another flat plate with a compression spring (and flat washer and felt seal) to hold the filter element securely upward against the splash plate, sealing both ends of the filter element.
This splash plate should be staked in place as a permanent part of the filter head so it does not fall off when the filter is being changed. If the splash plate is missing then a filter element can sit directly against the filter head, in which case the filter element might block part of the inlet or bypass port or might allow oil to bypass the filter element regularly without being filtered. The felt type filter elements do not have any end caps, so a missing splash plate would definitely defeat the filter allowing oil to bypass the filter element at top end. Note that the Think Automotive two-piece spin-on adapter shown on a following next page will not work with the Purolator filter head, because the center spigot on the head is smaller diameter than the seal ring of the spin on adapter.
Filter descriptions, original MGA type - -
Filter Descriptions, original variations
Filter Cartridges - -
Filter Seal Rings - -
Spin-on adapters, Aftermarket
Spin-on adapters, MGB - -
Filter types - -
Frequently asked questions
Personal preferences
|