The MGA With An Attitude
REPLACING KICK PANELS -- INT-108
Hopefully you have the carpeting installed first, as the kick panels serve as trim covering the carpet edges. Toughest part of installing the front kick panels might be crawling under the dash. This would be easier if the dash was out, but can be done with dash in place (if you're just a bit of a masochist). At one time I had radio speakers attached to the bulkhead next to the kick panel, which meant I had to R&R the speakers in the process. Otherwise just remove a bunch of little screws to remove the old kick panels.
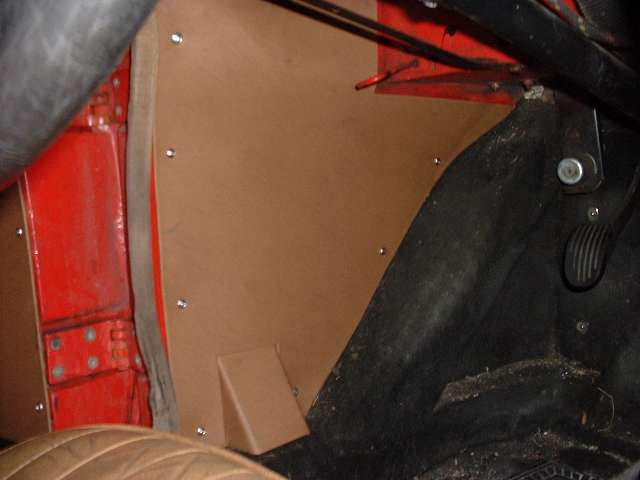
 The small angled cover at the bottom is a separate piece that goes in first. This covers the sheet metal foot brace where one of the body to frame attachment bolts resides. This small cover starts out flat but has flanges at top and sides, so you need to form five bends in the part before installation. There should be ridges coined in the backing material to make it positive that you will get the bends in the right places. You could attach this part with a pair of screws in the side flanges, but those screws should not be necessary. The kick panel can hold the small cover in place, and screws in the flanges of the small cover may add thickness which would push the kick panel (farther) out of plane.
With the door weather seal in place, push the panel down tight against the bottom body flange and against the carpet on the angled frame rail. Also butt the panel up against the weather seal (but be sure the seal is fully seated first). Start at the bottom of the kick panel when installing screws, and work your way up where the wall is mostly flat. Near top at the front you will need to press the panel in to conform to the body contour, then install a screw near the deepest part of the depression to hold the panel securely against the body metal. Working up the back edge, install a screw near the top edge of the top door hinge. This will hold the panel nearly in plane front to back while the upper part of the panel is being additionally formed. From the horizontal plane of the heater shelf upward the side wall is nearly vertical. Here you finally press the top of the panel in against the wall and install screws at the top edge to secure it. The door weather stripping shut butt against the edge of the panel and should leave no painted body metal exposed.
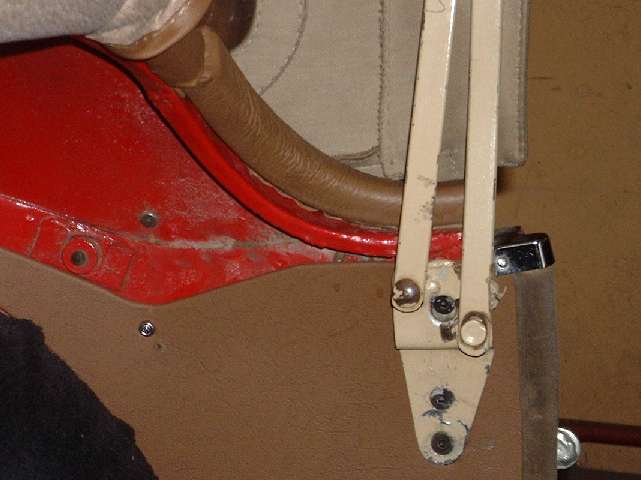
 You may remember this picture of the rear kick panel from the page on recovering the cockpit rear corner trim rails. As mentioned before, the three screws securing the rag top frame could be a bear to remove without major surgery on the body to repair the captive nuts. I will leave you to your own resources to decide what has to be done there. For this installation I will just say, remove the folding top frame. Having done that, the rest is quite simple. Position the rear kick panel against the bottom body flange and against the carpet on the inner wheel arch. Also butt the panel up against the door weather seal (but be sure the seal is fully seated first). Install screws starting at the bottom, working upward and toward the back. Finish with the last screw near the end of the tail of the panel ahead of the rear bulkhead.
If you do one side at a time you can use the opposite side for reference for location of the three large screws used to attach the top frame. You will need to cut out a small area of the panel at this location to allow installation of these screws. If you miss slightly and end up with oversized holes in the panel, no problem, as the top frame bracket can cover a multitude of sins.
|