The MGA With An Attitude
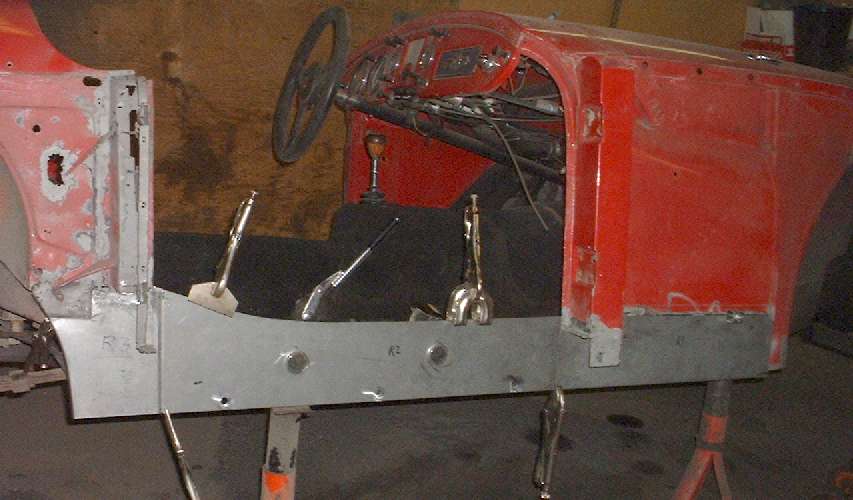
Body Sill Replacement - RT-610
Inner Sheet Metal Fitting
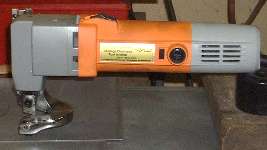 I bought a hand held sheet metal shear from Harbor Freight. It was $40 in store, or $30 +shipping on line. If you take a print copy of the internet ad to the store they will give you the on-line price at the store. It works well for 18 gauge sheet metal. Scribe a line on the sheet where you want to cut, pull the trigger and follow the line. It helps if you lay the sheet on a 2x4 board for overhang and underneath clearance, and apply one clamp to the bench to keep the sheet from sliding away. It makes a fairly clean cut, but since the tool is hand guided the cut line may not be perfect, so a little sanding or edge grinding on the sheet may be needed for final fitting.
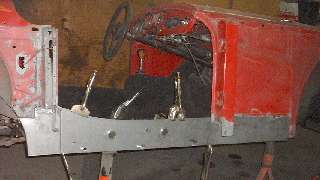 Here's the finish picture first this time. This represents a couple half days of fiddling while I was developing some personal techniques (negotiating the learning curve). The new sheet metal is clamped in place here, nothing welded yet. In original construction the inner body slab side forward of the door extends to the bottom as one piece. Likewise aft of the door extends to the bottom as one piece. Then there is a connector panel below the door.
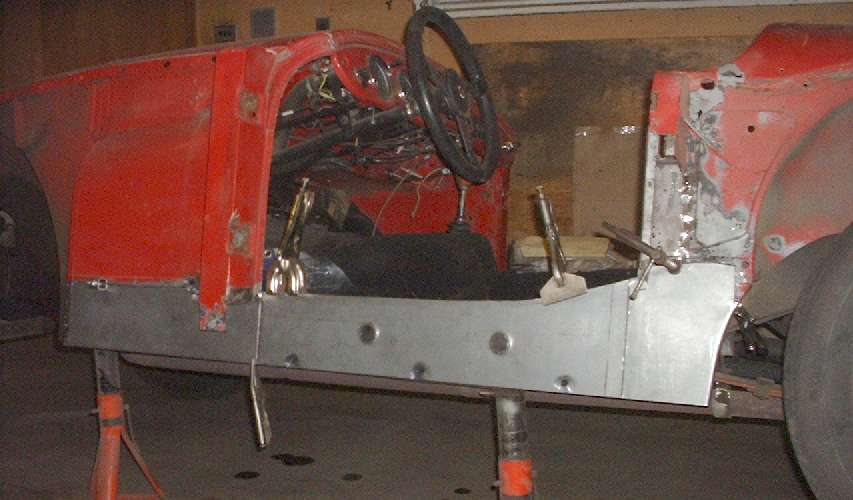
 Here's a closer view of the rear inner panel fitting (click for larger picture). Before starting I had considered making the three inner panels all one piece to eliminate the lap joints. Considering all the fiddling I did fitting the rear piece, I'm glad I left it separate. Using a paper template prepared earlier, I cut a flat panel with a curve on the back edge and a little extra material at top.
The offset step at front was formed first, a full inch wide as original to allow for a double row of spot welds. I had ordered an 18-inch bending brake, but since it hadn't arrived yet, the flange was formed by hand. The rear bend of the step was done first by clamping the flange in a vice, pressing gently on the exposed sheet, and progressively hammer forming the bend to about 30 degrees. Then I reversed the sheet and raised it a bit higher in the vice, and repeated the process for a bend in the opposite direction. The job was finished by laying the part flat on the work bench with a scrap of sheet metal on either side of the step and hammering it flat. At the top front corner it has a notch to fit underneath the "L" flange piece sitting on top of the frame, and a little kick to make the top edge flush at the outside.
Then came some patient fiddling to make the top edge mate to the steps and curve that I had cut in the main body panel with the mini Sawzall. This was done mostly with a 3-inch cut-off grinder, sneaking up on the final shape a few thousandths of an inch at a time until I couldn't put a finger nail in the gap and the bottom edge was flush and level. This seemed like the easiest approach as the panel is tucked in behind the front plate of the B-pillar, so the loose piece was easier to modify.
For the curved flange at the rear I put two pieces of 1-inch board together and cut the appropriate curve in one edge with a saber saw, using a disc sander for final smoothing of the wood. I also drilled two 1/4-inch holes through the boards and dropped in a pair of 1/4 inch bolts 1-1/2 inches long to serve as alignment pins. I then placed the sheet metal between the boards, aligning the intended bend line with the curved edge, clamped the assembly down on the work bench, and hammer formed the flange at 90 degrees against the edge of the wood block. The result is quite nice. Flipping the wood blocks the other side up will work for the mirror image part on the other side of the car. Find more on this flange forming technique a couple pages later.
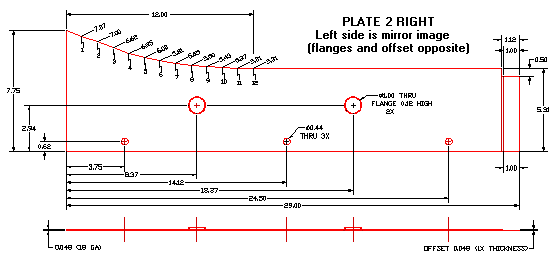
The drawing above is for the connector panel undeer the door. (Click for larger printable image). The panel I cut for the front inner fender repair is 20-inches long and 5-3/8-inches tall, but could be taller to replace whatever rusty metal you have to cut away.
The next challenge was making the two large flanged vent holes in the center sheet below the door opening. Original holes were 1-inch ID. My holes are 1-1/8 inch ID, simply because I had a 7/8 inch hole saw but no 3/4 inch hole saw handy, and I don't own any Greenlee hole punches. I started by boring the 7/8 inch hole in the sheet. Then I used an adjustable diameter hole saw to bore a hole half way through a 2x4 board as near as possible to 1.22 inch diameter (sheet being 0.048" thick, 1.125+.048x2=1.221). I used a wood chisel to remove the hole core, keeping the small pilot hole below. Next I placed the sheet over the board and used the 1-1/8 hole saw as an alignment guide to center the hole in the sheet over the hole in the board, and clamped it down on the work bench.
The flange was started by hammer forming with a ball peen hammer to about a 45 degree angle. Then I drove a 1-1/8 inch diameter blunt punch through the hole with a heavy hammer to get the finished size. As fate would have it, the punch I used was the back end of a spare 1/4 inch drill chuck that I would likely never use on a drill again. The flange was finished by grinding the extruded edge parallel to the sheet and deburring. The flanged holes were further cleaned up by tapping the sheet flat around the flange with a large wrench socket and hammer. Funny what you can do by hand when you get creative.
The last detail was to bore and deburr the three 7/16 inch drain holes near the bottom edge of the sheet. There is an offset flange at the front end of the center sheet similar to the one on the rear piece. The three pieces are now ready to be spot welded together as one long piece, ready to accept the structural box assembly. While I'm waiting for delivery a spot welder I can repeat this process for the other side of the car, and I hope the little bending brake arrives soon. (31 Dec 07 and 5 Jan 08)
Flash forward a few days, and the other side is done the same way. This was sort of a no-brainer after the first one, just several more hours of fiddling. I'm getting good at fitting the butt edge panels with no gap. The difference here is the inner panel aft of the door extends a little higher. I found some rust in between the old sheet metal and the body bracket, so I kept after it with the angle grinder until the sheet metal was gone leaving only the body bracket. The bracket is heavier gauge steel and was still solid, so the new sheet metal now lies flat against the old bracket. These three panels are also ready to spot weld together to make one long panel. (9 Jan 08)

(Overall length of the bottom edge was added by special request in Sept 2021)
Addendum August 13, 2011:
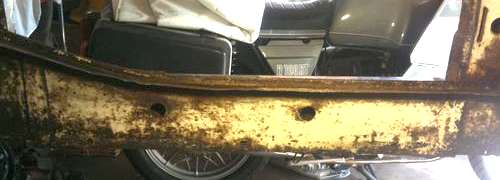
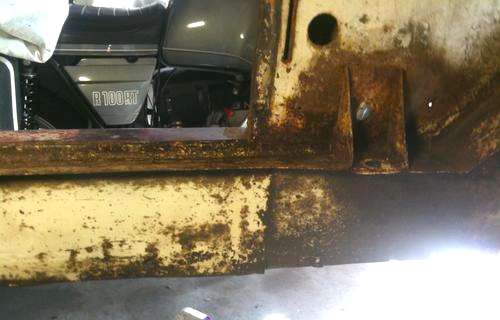
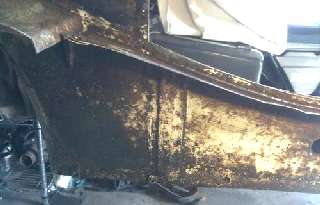
These photos of an original body sill showing the joint offsets and vent holes were supplied by Tony Leyva in San Jose, California, USA.

|