The MGA With An Attitude
WHEEL STUD SPLINES Design And Fit -- WL-103A
As a follow-up to the prior article, this is additional information about the size and fit of the splined shank of the wheel studs.

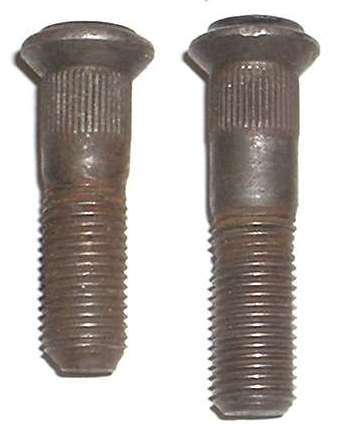
The standard MGA wheel studs are 7/16-20-UNF (fine thread). A most important feature is the diameter of the press fit spline under the head of the stud. For the MGA this is a (nominal) 15/32-inch spline, but it is actually larger on the major diameter. The press fit spline size refers to the size of the hole to which it will be assembled, so the 15/32-inch spline will be press fit into a 0.4687" diameter hole. For most practical applications the hole will be drilled +/-0.002", not necessary to ream it, as that much precision is not required.
The pilot diameter on the stud after the thread and leading up to the spline will be slightly smaller than the hole size. In this case pilot diameter of the original stud is 29/64-inch (0.453").
The spine is rolled onto the previously smooth cylindrical shank of the stud. This is commonly called "knurling". The process of pressing the rotating knurling roller into the metal of the rotating stud displaces metal away from the root of the "V" grooves toward the apex or crests of the spline. The initial shaft diameter before knurling is very slightly smaller than the hole in the mating part, but not quite as small as the pilot diameter. In this case the smooth shank may be about 0.465" diameter. Final result after knurling is major diameter of the spline being larger than the mating hole, in this case about 0.490" overall diameter. The root of the male spline is (by coincidence) slightly smaller than the pilot diameter, about 0.440" in this case. The stud (high strength steel) will be hardened after forming the spline.
Since someone asked, I have carefully counted the splines on the standard MGA wheel stud, and there are exactly 41 splines. The pitch or circumferential distance between spline crests is only important in that it must be the reciprocal of an integer so the last spline in the circle falls exactly on the first spline after knurling. If you have fewer splines they will be both deeper and taller, but will displace about the same total amount of metal in both parts. Smaller splines closer together may be easier to form on the stud. Pressing the parts together may exert less stress on the mating part with finer splines. Also finer splines occupy slightly less space (major diameter), so the piece that has to hold the female splines might be slightly smaller. As such it is common that these shank splines will be fine pitch, in this case about 0.036" crest to crest.
When this 0.490" major diameter male spline is pressed into the 0.468" hole, the spline crest may be crushed 0.005" (on the radius) to 0.480" final diameter (or maybe the male spline was not quite so large to begin with). At the same time the hardened steel spline is forming a female spline by displacing metal in the mating hole. Metal in the hole is usually softer than the stud, so the "dig" depth into the hole wall is more than the crush amount on the male spline. End result after displacing metal around the hole is finished ID of the formed female spline being smaller than the starting hole, and in this case about equal to the pilot diameter of the stud. Final depth of engagement of the mating splines is then about 0.014" (on the radius). There are reasonable tolerances on all of the dimensions of the stud and mating hole, so you can add or subtract a few thou from any of the noted dimensions.
Since initial diameter of the stud shank before knurling was smaller than the hole in the mating part, the final fit is not extremely tight. In the end there will be small voids or air spaces at the minor diameter of the mating splines while the major diameter of the splines is a press fit. When the parts are properly sized you can install the stud by placing it in the hole putting a suitable tube spacer over the stud (stack of flat washers for instance), installing a nut, and then pull the stud into the mating part by wrenching on the nut. A large press is not required (except for fast production assembly). You can also remove the stud by installing a nut flush with the threaded end and driving the stud out with a hammer.
The spline on this "press fit" stud serves a few functional purposes. It makes for an easy way to create a light press fit with relatively low precision manufacturing process, high speed automated stud forming, and high speed drilling of the mating part. In other words, cheap to manufacture and assemble. When in service, the press fit retains the stud securely in place so it will not be accidentally bumped out of place, and the spline is a positive lock against rotation of the stud when wrenching on the lug nut (so it does not have to be extremely tight press fit). It is also easy to remove and replace for field service.
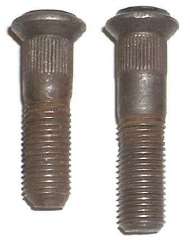
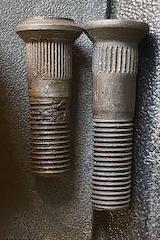
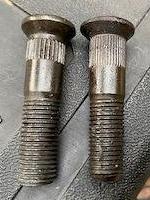
This ultimately leads to questions about replacing the studs. Removal is easy with a hammer as previously noted. Replacement is also easy when the new stud is same configuration as the original stud (same number of splines on same diameter). There will be a bit of curiosity if the number of splines on the replacement stud is not the same as the original installation. The next two pictures each show an original 41-spline stud and a replacement stud with fewer splines (in these pictures Moss Motors aftermarket studs with 27 splines).
 As long as the initial diameter before forming the male spline is the same as the original stud (a tiny bit smaller than the hole), the amount of metal displaced on the stud and in the mating hole will still be the same. With a different number of splines some of the metal in the hole will have to be "re-arranged" (sort of like pushing modeling clay around).
You can get away with this once, or maybe twice with differing spline count. But if you change the studs too many times with different number of splines this will eventually wear out the material in the hole so it may not hold the stud securely. The stud is not likely to rotate, but it might be accidentally bumped out of the assembly. Reforming material in the hole will not drive the stud off center or make it crooked. Seating the stud squarely (perpendicular to the surface) is a function of the underside of the stud head, even if the splines might be a little bit looser than anticipated. Once the nuts are pulled up tight everything will be secure, and you don't need to worry about alignment.
|