The MGA With An Attitude
Bonnet LATCH PLATFORM Replacement -- BD-205
On 30 June 2011, George Goeppner in Illinois, USA wrote:
>"What is the best method for replacing the bonnet latch bar? It seems there are two bent brackets on it that weld to the reinforcement bars under the front shroud, and two captive nuts at the ends that wing bolts fasten to. And the bonnet latch must be aligned to it as well. Any suggestions"?
We have lots of help from the bbs on this problem. The most desirable way is to stay as close as possible to factory issue. That part was spot welded in place, almost certainly before the top body cowling was installed. It will be more difficult for access without removing the body cowling, but can be done.
Standard prescription for removal would be to break the spot welds by milling or drilling through the foremost layer of metal and leaving the backing layer to save the sheet metal piece behind. That can work if you only need to replace the cross bar and want to keep the end brackets. It may be easier to replace the whole assembly. For that you can cut the brackets as close as possible to the body anchor points, then use an angle grinder to grind through the remaining sheet metal end tabs leaving the backing piece unscathed.
It is unlikely that you would be able to get a spot welder into the space allowed. To simulate original spot welds you can punch or drill some holes in the new part and plug weld it in place using a MIG welder. That can work if you install the end brackets first, followed by the cross bar. If installing the whole assembly as one piece you will more likely need to MIG weld along the edges of the end brackets.
On 30 June 2011, Mike J. Moore in Cheshire, UK wrote:
"I removed my latch bar to replace both wheel arch strips complete with all the wing nuts. As I had to remove both inner wings as well, releasing the ends of the latch bar from the wheel arch strips wasn't difficult. Two of the wing nuts (third from front) are spot welded to a bracket which in turn is welded to the ends of the latch bar.
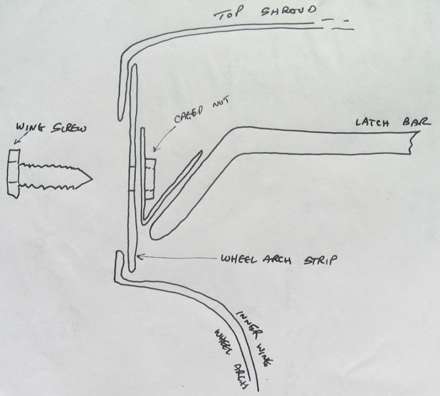
 Before I did any welding I made up a pair of new brackets to fit to the ends of the bar. The brackets were bent to an angle of 30-40 degrees and were spot welded to the underside of the latch bar ends and bent around the tip so that the upper portion landed up vertical and right against the wheel arch strip. It might take you two or three goes to get the shape right but they are easy to make (the width of the latch bar channel x 3 or 4 inches). Before I did any welding I made up a pair of new brackets to fit to the ends of the bar. The brackets were bent to an angle of 30-40 degrees and were spot welded to the underside of the latch bar ends and bent around the tip so that the upper portion landed up vertical and right against the wheel arch strip. It might take you two or three goes to get the shape right but they are easy to make (the width of the latch bar channel x 3 or 4 inches).
The upper part of each bracket must line up with the wing hole. Then I positioned and clamped the bar so that the bonnet latch hole was central with the bonnet peg and marked the position of the bracket holes through the wing hole. Then I drilled and welded a circular nut to the back. The original 5/16" captive nut was caged and the cage spot welded to the top part of the end bracket". - Mike
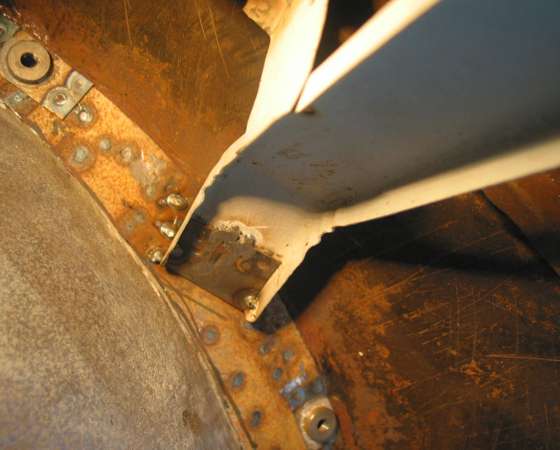
Photo from m.j. moore, Cheshire, UK
On 01 July 2011, Mike J. Moore in Cheshire, UK wrote:
"There are the two end fixing points plus the two points four or five inches in from the ends. Then there is the large five inch wide bracket right at the center which is spot welded to the underside of the front shroud drainage channel. I kept this latter bracket attached to the bar and it helped location when I replaced it.
The latch bar itself is not welded to the wheel arch strip. It is the bracket that is welded to the strip on the outside and to the bar on the inside. I found it easier to weld the inside of the bracket to the underside of the bar as you can see from the last picture. Doing MIG weld repairs will be a doddle as the steel is 16 gauge". - Mike
On 01 July 2011, Matthew S Randell in South Australia, AU wrote:
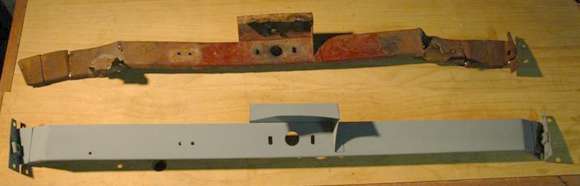
"I recently made a new bonnet platform piece: not that difficult really. My old one was completely shot. You will see in the pic that the ends are separate pieces that are welded on. This gives some small adjustment when fitting". - Matthew
|