The MGA With An Attitude
REBUILDING MG Disc Brake Caliper - BT-104B
At 07:09 PM 9/23/05 -0400, Dick Boes wrote:
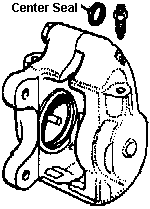
"Removed the calipers from my '79 B and let them soak overnight in a parts cleaner, only to be told today that I've probably ruined them. Supposedly there is a seal between the 2 halves that will fail due to this cleaner. Any thoughts?"
 Not splitting the calipers is one of those "old mechanics tales". The bolts were intended for single use, as they had a non-slip coating. Neither replacement bolts nor torque specs were supplied by Girling, as the calipers were not intended to be dismantled. Good for Girling, back in the day, if they could con you into buying a whole new caliper rather than rebuilding the originals. But in fact the calipers can be split and successfully reassembled.
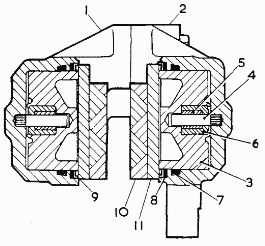
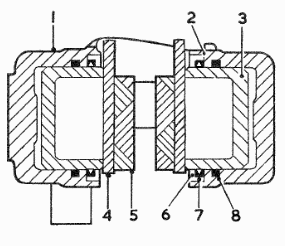
The seals between the caliper halves are now available new (Moss Motors #180-285). When reassembling use Loctite on the caliper half bolts and torque them to a reasonable spec. Use good shop practices and the calipers can be split, resealed and re-assembled safely. Splitting the caliper makes it much easier to R&R the pistons, clean the bores and seal grooves, and to replace the dust seals. For the MGA calipers it also makes it easier to remove the center pins if you want to use the cheaper MGB pistons.
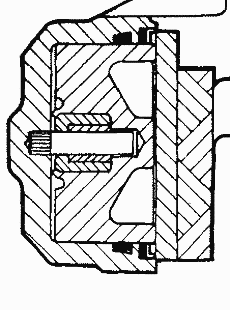
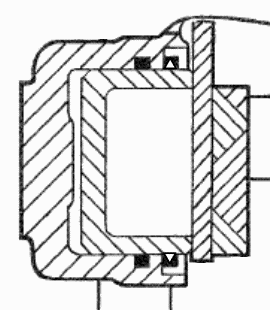
Before reassembly, be sure the square groove seal gland is very clean. Hydraulic seal is made with the square o-ring seal between that gland and the OD of the piston, so condition of the bore is almost irrelevant. It never needs to be sleeved or honed, but it doesn't hurt to hone it if it needs to be cleaned out.
Wet all internal parts with brake fluid. Install square o-ring seal. Install piston about 80% of the way in. Slip the small o-ring dust seal and thin metal retaining ring over the piston. Place a flat board across end of piston with dust seal parts in place. Squeeze the board against the caliper with vice or c-clamp to press the piston fully in and seat the dust seal parts. That's the easiest way to avoid destroying the thin metal ring. Ditto for the other side of the caliper, and install it on the car.
Pay no attention to admonitions to not split the caliper. If you do split it there is a good probability of successfully re-using the flat o-ring seal in between, but I would replace that part anyway (cheap insurance). When reassembling caliper halves, use thread adhesive on the bolts to be sure they will be perfectly secure, and apply lots of torque (high strength bolts).
There was a change of design for the dust seal and seal retainer ring. Early style had a thin rubber seal with "L" shape retainer ring flat dise facing the seal. Later style had a thicker double lip rubber seal with "L" shape retainer ring flat dise away from the seal. The later stye seal is commonly supplied as replacement part for both MGA and MGB calipers. See illustrations below.
MGA caliper above  MGB caliper above MGB caliper above
MGA seals below MGB seals below
Be careful not to damage the L" shape steel retaining ring during installation. For either stye the retaining ring can be pressed in flush with the outer surface. For the later style, the retaining ring may be pressed slightly below flush to mechanical stop (but it works as well if it is left flush). You canuse a flat boarda nd a C-clamp to press the outer seal and retaining ring. There is also a special tool that may be easier to use.
|