The MGA With An Attitude
Converting MG ZA/ZB Magnette to
"Modern" FRONT DISC BRAKES - BT-203
I suspect it will require some creativity to adapt this to the MGA, but I will post it anyway. It sounds like a good idea to use modern brake parts for reduced cost and longer term availability of service parts. Perhaps this may encourage someone to try it for the MGA. This article was originally posted in January 2016 edition of THE OFF-SIDE UNDO, newsletter of the English Motoring Club of Mississippi, written by Charlie Durning, and reproduced here with his permission.


FRONT DISC BRAKES ON A BUDGET
When I acquired my 1958 MG Magnette, the first thing I noticed was the pathetic brakes. Since the Magnette hadnt had much love in the previous decades of its life, I decided to treat her to a complete brake overhaul consisting of wheel cylinders, brake shoes, master cylinder, and finally park brake cables. In the end the brakes werent much better.
I did search for a disc brake kit for the Magnette. Originally I found a highly touted conversion that used unavailable Greene brackets. That conversion uses a combination of an unavailable bracket, MGB calipers, solid rotors, and rare MGA hubs, all sourced separately - not a good solution. Eventually I stumbled upon a kit offered by NTG, in England, using the same components as the Greene conversion; I just couldnt stomach the cost. There must be another way.
Considering how simple it was to convert the Morris with Nissan parts, I once again looked to Nissan. There were several options to consider and each had trade-offs. I focused on the brakes for the front of the Nissan 240SX. The 240SX is about 300 pounds heavier than the Magnette, the caliper bore is the same as the MGB, the 240SX master cylinder has the same bore as the Magnette, and, as a benefit, the rotors are vented. Sounds like a good match. At first I was concerned that the 240SX rotors are only 10. The NTG and the Greene conversions use 10.75 rotors. On the plus side the 240SX pads have considerably more surface area than the MGB. I rationalized the 10 rotors could be suitable.
The next challenge was to find rotors with enough offset to enable using the original Magnette hubs. In searching rotor specs I found a Toyota Cressida vented rear rotor would fill the need. The best part is it is 10.5 inches. Once the rotor arrived I headed down to a buddys house to use his lathe.
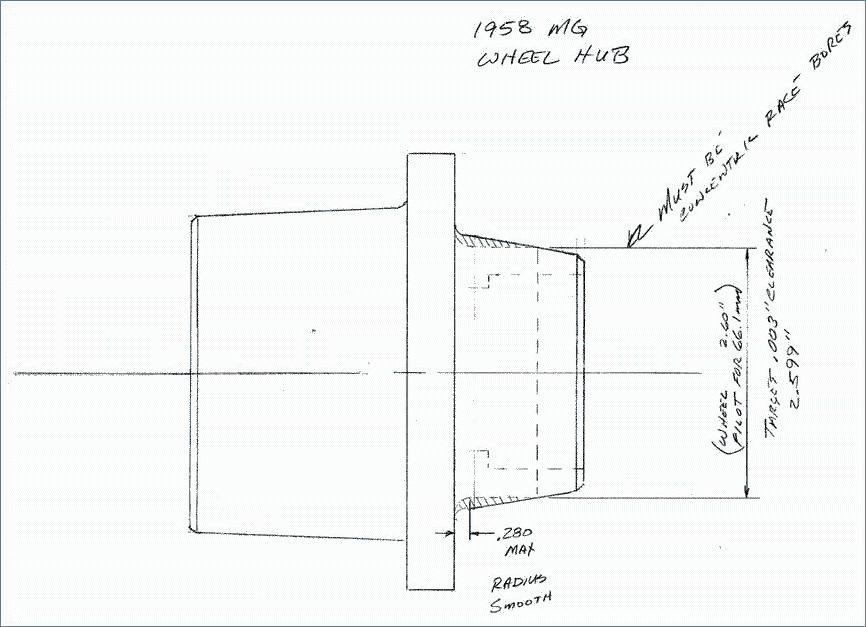
Since the drum for the Magnette uses the outside of the hub flange as a pilot, I had to come up with a solution to keep the rotor concentric with the hub. I decided to machine the snout of the hub for a pilot. Once that size was established I then bored out the pilot hole in the rotor to fit the newly machined hub.
Back in the shop I mocked everything up using a spare Magnette hub and spindle and a caliper bracket made from MDF. To my disappointment the caliper hits the web inside of the Magnette wheel. Oh well, back to the books to find smaller rotor. In measuring the interference it looked like a 10 rotor would allow enough clearance.
Since I hated to give up the ½ I thought Id see if TR-6 wheels would clear. They did, so that is an option to keep the 10.5 rotors. Well, the Magnette still has good tires and the skinny tires are a poor fit for the TR-6 wheels. I continued the search for a 10 rotor. The 10 rotor will remain on the car until I convert to different wheels.
Back to the rotor spec books. My search found a 10 rotor from a Mazda RX7 with exactly, well close enough, offset as the 10.5 rotor. Off again to my buddys house for some quick lathe work.
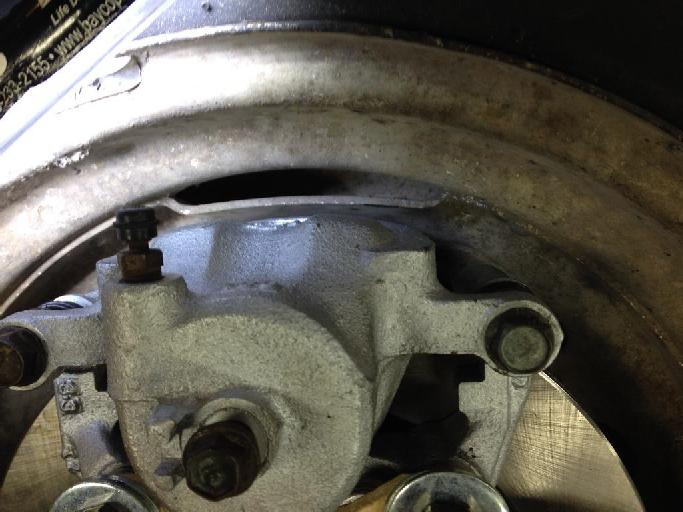
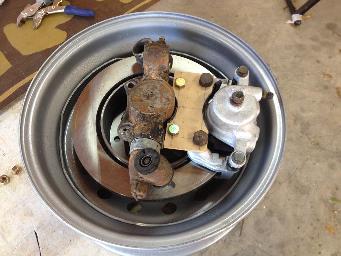
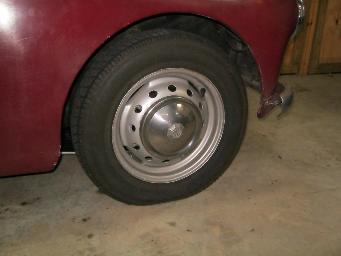
The mock up with the 10 rotor and a new MDF caliper bracket looked good. The acid test is to fit the original Magnette wheel. Eureka! It fits with just enough clearance.
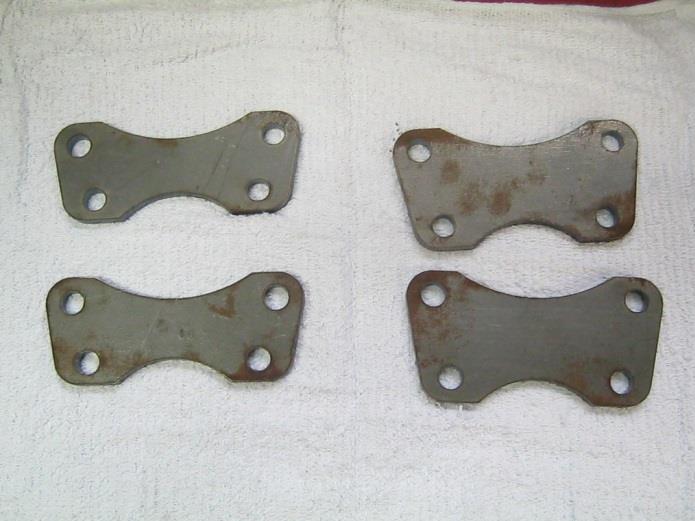
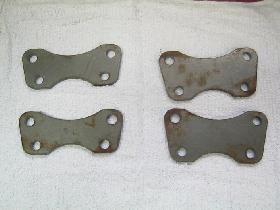
Since MDF is not a good choice for the final bracket, the next thing was to get the brackets made from steel. I found a local shop that was willing to take on the project. Two weeks later I have laser cut steel brackets for both the 10 and the 10.5 rotors. They did beautiful work.
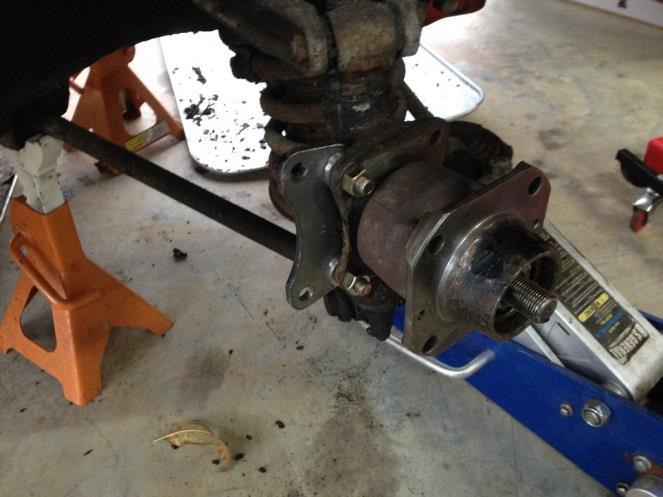
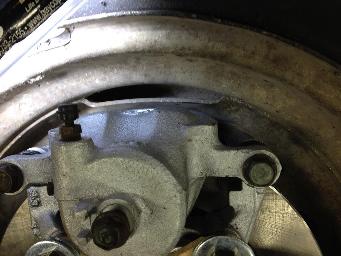
All that was left was to strip off the drum brakes and fit the discs. The dirt, grit, and caked road grime, notwithstanding, the tear down was uneventful. Its amazing how much stuff can build up in nearly 60 years!
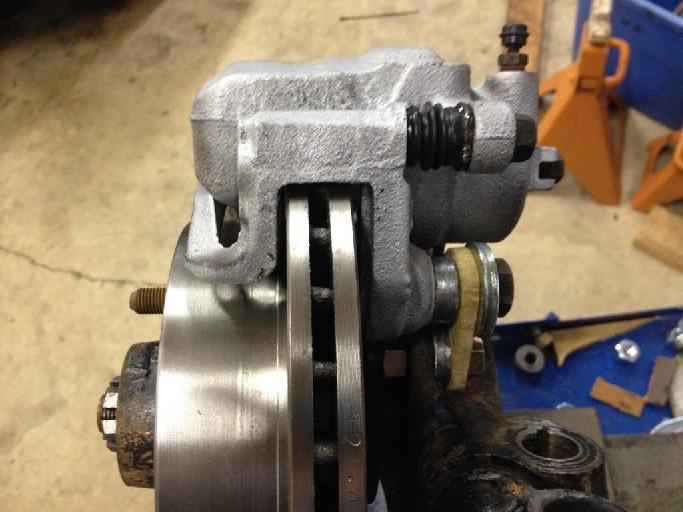
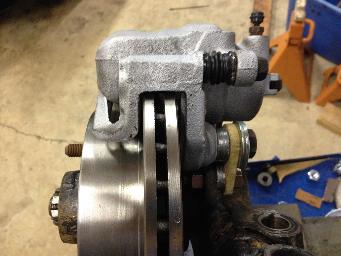
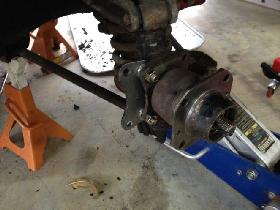
The caliper bracket was fit to the spindle without any issues. After the modified hub was installed, the 10 rotor and caliper were trial fit. Clearances were checked and all looked good. I did discover an issue with the caliper hitting the coil spring when turning to full lock. Not good, so I made a steering stop to keep the caliper out of the coil spring.
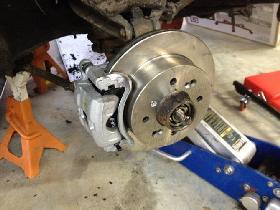
 Machined hub pilot
Trial fit Machined hub pilot
Trial fit
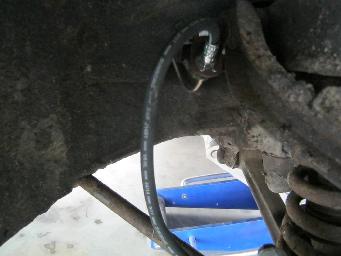
The last issue was the flexible brake hose. The flex hose had to clear a number of obstacles, which included the front suspension, inner body panels, and the tires. After several hoses that hit one thing or another, I found that the rear brake hose from a Saturn S series sedan was just right. To make that hose work some concessions had to be made.
On the Magnette, the hose attaches to the underside of the frame bracket. In order for the Saturn hose to clear everything, it needed to be attached to the top of the frame bracket. Since the end of the brake pipe had to be changed to a Metric fitting, I went ahead and made up a new pipe that would accommodate the new hose.
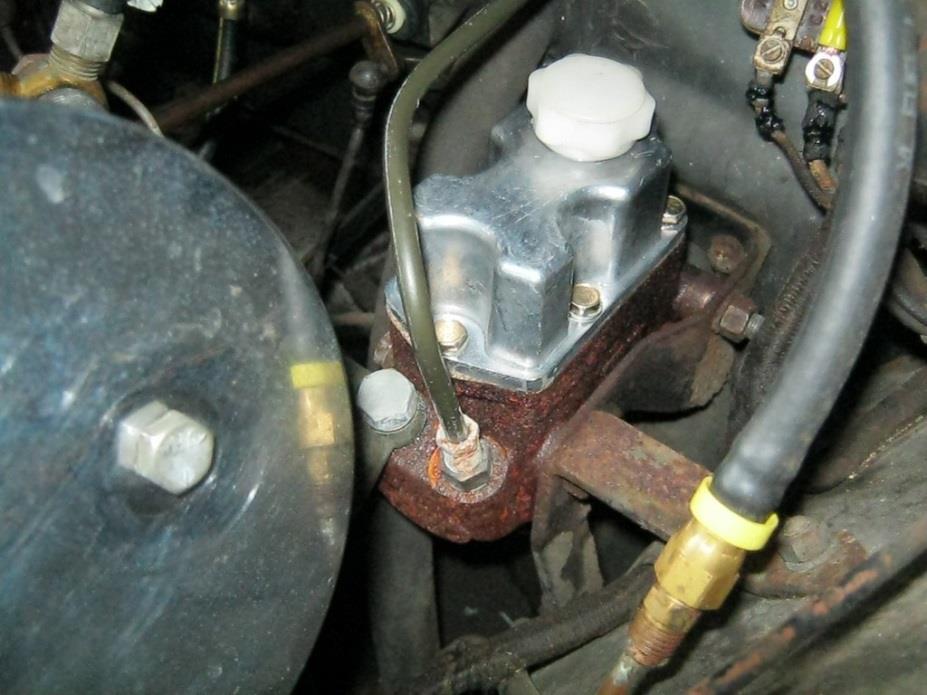
The next issue is the master cylinder. There are 2 trains of thought when converting to disc brakes. One is to remove the check valve and the other is to leave it in. Since the master cylinder is a real pain to remove, I decided to try it with the valve in. As it turns out that was a good choice. I also installed a raised reservoir cap to accommodate the greater fluid requirement for disc brakes.

After a quick bleed it was time for a test drive. To say there is a considerable difference in braking is an understatement. Now the Chick Magnette will stop with confidence. All in all - time well spent.
The cost? Considering the results and compared with the available kit this is indeed a bargain. Then taking in that the Nissan brake parts are modern and readily available
|
as compared to the available kit, using 50 year old technology, this is indeed a home run, and at one fifth the cost of the NTG kit!
The finished product. The purists will never know.
I want to thank Donna for putting up with my mania, my buddy Joe for the use of his lathe, and Brother Clay for his evaluation of the finished product.
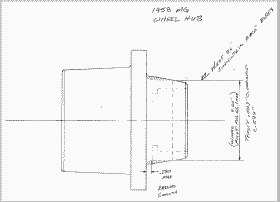
Machining pilot diameter in front bearing hub
|
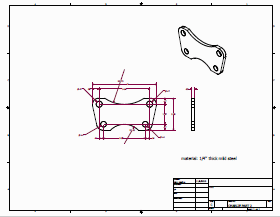
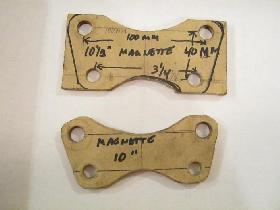
Bracket for 10-1/2-inch disc brakes
PDF image file - DXF drawing file
|
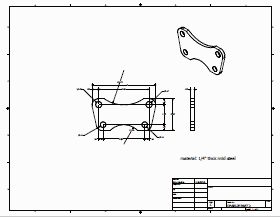
Bracket for 10-inch disc brakes
PDF image file - DXF drawing file
|
The DXF drawing file needs a CAD drawing program to read and display it.
This DXF file can be loaded directly into a laser cutter.
|
Bill of Material for Magnette 10.5-inch Vented front disc brakes
121.44034 10.5 Centric Rotor
1985 Toyota Cressida rear rotor
Machine hub to pilot the rotor. Machine
The rotor ID to fit then new hub pilot.
FRC3125 & FRC3126 Raybestos Calipers
1992 Nissan 240SX NON ABS front caliper
D422 front pads for calipers
This rotor is 18MM thick. The caliper was originally designed for a 20mm rotor. Should not be an issue on our cars. This brake will not fit within original Magnette wheels.
Bill of Material for Magnette 10-inch Vented front disc brakes
121.45013 10 Centric rotor
1985 Mazda RX7 rear rotor
Process is the same as above. Relocate the holes in the caliper bracket closer to compensate for the smaller rotor. This brake will fit within the original Magnette wheel. This rotor is 20mm thick.
Here are the Magnette part numbers:
ATB4080 RH knuckle
ATB4081 LH Knuckle
ATB4087 Hub assy
ATB4084 RH backing plate
ATB4085 LH backing plate
ATB7075 Brake drum
Use .250-in thick spacer between the back of the spindle and the new bracket to space the bracket inboard. Use .375-in spacer between the new bracket and the caliper to space the caliper outboard. In some cases a .312 spacer is used in place of the .375 spacer. The goal here is to center the caliper bracket over the rotor. -- The calipers have the same bore as the MGB rotors so hydraulic ratios will be comparable.
If the MGA backing plate holes are spaced the same as the Magnette there is promise to use the brackets as drawn.
Here is a link to one of the guys who is doing the same brake conversion. Lots of good pictures.
https://photobucket.com/user/1963wagonman/media/1955-1958%2520MG%2520Magnette%2520Technical%2520Information/Disc%2520Brake%2520Upgrade/20160112_135018_zpsdsbvzfuu.jpg.html?sort=3&o=9
Basic instructions
Basically the install is simple. I had the Magnette hubs machined for a pilot on the snout of the hub. One hub cleaned up at 2.9-in, however the other had to be cut down to 2.84-in to get a clean pilot surface. Dont worry both hubs are now 2.84-in. That dimension is unimportant so long as there is a good surface for the rotor bore to index. You can see the machined pilot in one of the attachments. While in the lathe it's a good idea to skim the wheel mounting surface to true it up. Next bore out the center hole on the rotor to match the hub. In addition I drilled the rotors for the set screws. Not sure if that is necessary.
Each caliper adapter will need 4 spacers, 2 between the back of the spindle and the bracket and 2 between the adapter and the caliper. I made 1/4-in spacers and those worked out to get the caliper centered on the rotor. You may need to adjust those sizes a little to get it spot on. To make the spacers I used a 1-1/8-in hole saw to cut out the basic rings and then drilled the centers. 2 need a 7/16-in hole and 2 need a 12-mm hole. I used the original caliper bolts for the Nissan calipers and found those to be a little long. You can use shorter bolts or put a spacer under the head of the bolts.
I am currently using the brake hose from the rear of a Saturn S series car. They look to be just right. The Magnette brake hoses are attached to the bottom of the frame bracket. To get the clearances that satisfied me I attached the hoses to the top of the bracket. Just make a new brake pipe with one metric end to mate up to the hose. The metric end on the pipe is a bubble flare.
That's it. I got the car finished and took it for a vigorous drive. I am pleased with the results.
Additional note: I found that the outer pad backer on one side makes light contact with the rotor hub. That does not compromise the brake performance. I did trim the inside arch of the outer pad for clearance.
|