The MGA With An Attitude
Dash BROKEN STUD Repair -- DT-143
On 1/13/2018, Bill Proctor in Greenville, NC wrote:
"I broke one of studs that fasten the horn button to the dash. How do you fix it"?
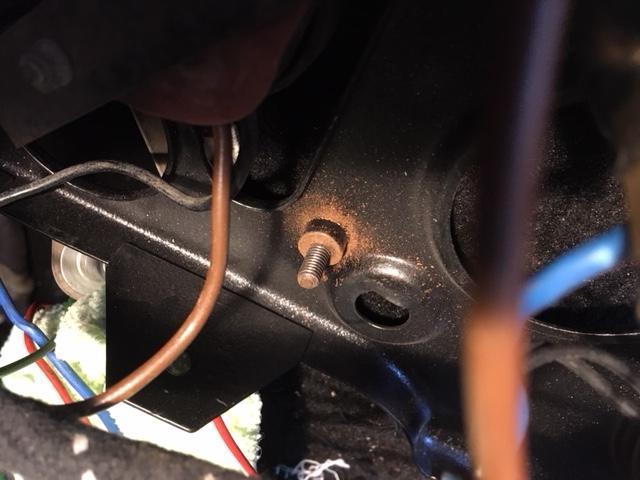
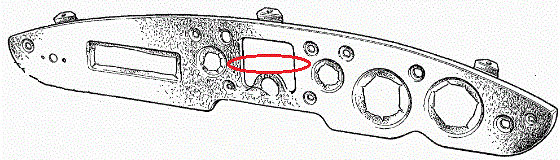
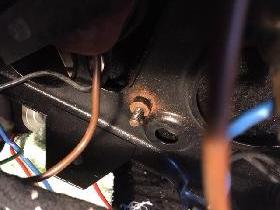
On the MGA dash panel, in the area of the red ellipse below, there are four threaded studs welded to the back of the panel. These studs hold the radio speaker grille (and blanking plate when used) and a bracket for the horn push button. These threaded studs are not listed in the Service Parts List, because they are welded to the dash panel, and therefore not available as separate replacement parts. Occasionally these threads may be damaged, or the studs may be broken during disassembly due to rust seizure. Such captive threaded parts are always a problem for repair, as it commonly requires cut and weld for replacement.
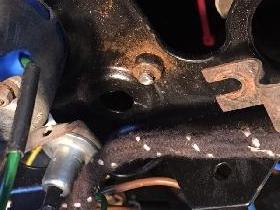
Photos below show a broken stud on left (along with the horn push bracket), and a survivor stud on right. These are #6-32-UNC threads, rather small and relatively easy to break. I'm pretty sure the repair will be impossible in situ, so the dash assembly will have to be removed from the car (or at least dismounted to lay face down on the tunnel). For this you should remove the analog temperature gauge first to prevent breaking the delicate pipe which contains the volatile ether fluid.
The stud and pedestal were originally all one piece, like a screw with a large round head, and resistance welded to the panel. If you don't mind welding you could grind away all of the threaded part of the stud and most (or all) of the pedestal, and weld on a hex head or socket head screw, and maybe add a flat washer or two to make up the correct height for the pedestal to match the others. You might otherwise be able to solder a screw into place (and maybe include a flat washer to restore original diameter of the pedestal). Welding or soldering would require subsequent cleaning and repainting of the dash panel.
If you don't like welding or soldering, you might accomplish a repair without damaging the paint on front side of the panel. Carefully grind off the threaded part of the stud to be flush with the pedestal, leaving the pedestal in place. Then drill and tap a concentric hole to accept a #6-32-UNC threaded stud. You can make the stud by cutting the head off of a screw, and install the stud in the tapped hole using thread adhesive. This should make a nice repair that looks identical to the original part. However, the pedestal is not very thick, so it would require very careful drilling to go deep enough to hold a thread without going all the way through the face panel. Then start with a #6-32-UNC taper tap, followed by a plug tap, followed by a bottoming tap to get full thread all the way to bottom of the hole.
It is much easier to drill and tap all the way through the panel, but then you have to refinish and repaint the front face. If you're doing that, then a touch of solder on the front side will secure the threaded stud and seal the hole for finishing at the same time.
On 1/17/2018, John Udy wrote:
"I have done a similar thing by fixing a stud to a small plate and then fixing the plate to the back of the dash with epoxy. This worked well for providing additional studs to the dash, but the idea may be able to be adapted for the repair you described".
JB Weld does a good job gluing metal parts together, but it requires a certain amount of surface area to make a strong joint. The original stud pedestals may be a little too small for this, but if you can grind the pedestal away flush with back surface of the dash panel, you may find space to use a larger plate for gluing to the panel.
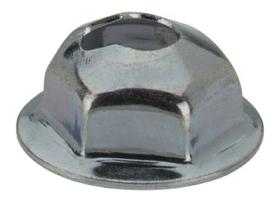
On 12/16/2020, Scott Childers wrote:
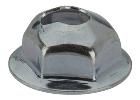
"I wanted to add another possibility. One of my threaded posts was rusted and the threads unusable. I was able to re-secure the horn push on that post using one of these self threading nuts".
|