The MGA With An Attitude
TURN SIGNAL CONTROLLER, Electronic Delay And 4-Way - ET-249
This device, built by Jason Green, is in the working prototype stage at time of this publication. It is an electronic control module for turn signals, including programmable time delay and 4-way flasher control. It will work with the standard MGA turn signal switch, even if the original pneumatic time delay is not working. It will work with either 1500 or 1600 model cars with or without the turn signal relay unit. It also works with positive or negative earth (rather rare for an electronic unit).
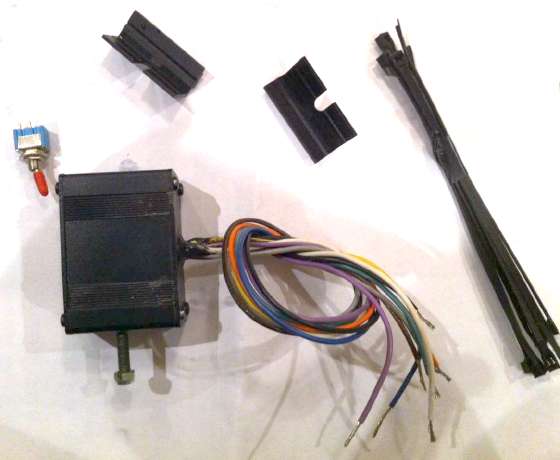
The unit arrived as pictured with with a T-stud on one end of the case, a pair of "L" shape mounting brackets that may be attached to the ends of the case, a small toggle switch that may be used to actuate the 4-way function, and a few tie-wraps to spiffy up the wiring after installation.
You may need half a dozen 16/18 gauge wiring butt connectors, one bare 16/18 gauge ring lug connector, a stripping/crimping tool, a screwdriver for dash switch terminals, and a small wrench for the hex nut on the mounting stud. The installation is easy if you can cut, strip and crimp a wire connector.
For the MGA I cut the threaded stud shorter, and mounted the unit on end on top of an under dash brace right in front of the turn signal switch. The L-brackets were not used, and no drilling required. I connected the 4-way control wires to the original "F" switch (when the MGA is not equipped with fog lights), so the small toggle switch was also not used.
Since you will be working with a couple of wires that are direct connection to the battery, disconnect the battery before you start.
Disconnect three wires from turn signal switch, and connect them to the controller. For the MGA 1500, put a small wire nut on the unused Green wire from the harness so it can't short to anything. Connect three wires from the controller to the turn signal switch. (Remember for MGA the R and L terminals of the turn signal switch are reversed). Connect the controller ground wire (Green) to Black harness wire on back of dash (nearest instrument mounting bracket). Connect controller power input wire (Yellow) to the lighting switch, or ignition switch input side (Brown/Blue) for always hot power (may need to extend the Yellow wire for this connection).
If you want 4-way flashers to work, connect the last controller wire (Grey) to the flasher switch (may require extending the Grey wire). The other side of the flasher switch takes power from the turn signal switch input terminal (add your own longer wire, preferably Brown).
Lastly, disconnect the switched Green wire on the fuse block that powers the flasher unit, and reconnect it to the always hot fuse (Brown/Black terminal). This will allow the 4-way flashers to work when ignition is off. Reconnect the battery, and it should be ready to drive.
One last adjustment. If you have a working time delay in the turn signal switch, you should back off the time adjustment screw in rear center of the switch to minimize the time delay. If the switch is held on for more than two seconds it would double the delay time before the signals switch off.
All of the power inputs to this circuit need to be connected to always hot 12-volt supply so the 4-way flashers will work with ignition off. The turn signals will also work with ignition off, but not to worry, because they have the timeout and automatic shut-off function. With the original flasher unit you may expect the flash rate for the 4-way flashers to be slow, longer than normal time for lamps on, and normal time lamps off. This can be fixed by changing to a heavy duty flasher unit that is designed to operate anything from one to six bulbs with constant flash rate. A disadvantage here is that turn signals will always flash even if one bulb is burned out or disconnected. That defeats the non-flash warning function, so you need to check and verify operation of the external turn signal lamps more often.
Turn Signal Controller (TSC) TSC100
1. Overview
| . |
The Turn Signal Controller (TSC) an electronic device designed to initiate and control the delay of an automobiles turn signals and four way/hazard lights. Used in conjunction with the vehicles flasher unit (the flasher must be sized to operate all four corners if four way/hazard functionality is being used) the TSC allows precise control over the delay interval of the turn signal while also allowing both turn signals to operate simultaneously for four way/hazard control. |
2. Specifications
| . |
a. | Works on positive or negative ground 12 volt vehicles; |
|
b. | 5 amps maximum current per side; |
|
c. | Epoxy potted (waterproof) electronics housed in an 2 1/2" w x 1 3/16" h x 1 5/8" extrude aluminum housing; |
|
d. | 16 gauge wiring; |
|
e. | Positive mounting system with supplied dovetail head bolt or optional mounting brackets; |
|
f. | Factory set delay of 20 seconds can be reprogrammed countless times. User programmable delay from 5 seconds to 4 minutes (240 seconds); |
|
g. | Holding turn signal closed for 2 seconds doubles delay routine; |
|
h. | Double click cancels turn signal; |
3. Control
The TSC can be used with various switch configurations to provide complete control over the turn signals and four way/hazard lights. If four way/hazard light control is not required, the four way/hazard switch can be omitted.
Option 1
| Turn Signals |
Single Point Double Throw (SPDT) switch (similar to the Lucas switch found in MGAs and other British cars) |
| Four Way / Hazard Lights (optional) |
Single Point Single Throw (SPST) on-off switch |
Option 2
| Turn Signals |
One on-off momentary switch for each of the left and right signal |
| Four Way / Hazard Lights (optional) |
Single Point Single Throw (SPST) simple on-off switch |
Option 3
| Turn Signals |
One on-off momentary switch for each of the left and right signal |
| Four Way / Hazard Lights |
Controlled by depressing left and right momentary switch simultaneously |
4. Instructions
| . |
a. Initiating Turn Signal
To initiate turn signal, momentary close turn signal switch. When the switch closes, power is supplied to the flasher, and the indicator activates. The indicator will stay on as long as the switch is closed.
Short Delay hold switch closed for less than 2 seconds then release
Long Delay hold switch closed for greater than 2 seconds before release
b. Extending Delay
The delay can be extended by closing the appropriate switch prior to the delay expiring. Closing the switch before the end of a delay restarts the delay.
c. Turning Indicator Off Early
The indicator can be turned off early by closing the switch, opening the switch, and then closing the switch again all within 1 second. Double Click
d. Four Way/Hazard
Separate SPST on-off switch. Close switch to turn on four way/hazards. Open switch to turn four way/hazards off.
Two momentary on-off switches. Close both the left and right switch simultaneously to turn on the four way/hazards. When the switches are released the four way/hazards will stay on. To turn off the four way/hazards close both the left and right switch simultaneously.
e. Programming The Delay
The Short Delay is factory programmed at 20 seconds. The Short Delay can be reprogrammed multiple (hundreds of thousands of times). The Short Delay can be programmed for any time interval between 5 seconds and 240 seconds (4 minutes). The Long Delay is twice as long as the Short Delay. To reprogram the Short Delay, perform the following sequence, with a maximum of 1 second between each step (do not rush):
1. Close and open the left switch;
2. Close and open the left switch;
3. Close and open the left switch;
4. Close and open the right switch;
5. Close the right switch and keep it closed;
Within 5 seconds, the right indicator starts to flash, indicating the start of the programming mode. The length of time between the right indicator starting to flash and the right switch being opened (turning off the right indicator) sets the Short Delay. When the right switch is released, the programming mode is exited. As an example, if the right switch is held closed for 39 seconds after entering the programming mode, the Short Delay will be set to 39 seconds.
|
Addendum December 2016:
Since someone finally asked, you cannot buy this device. Apparently it never went into production. The guy who built it gave it to me for installation and testing. I didn't have any use for it. It was several months before I got it installed in a friend's car to verify that it works. By that time I could no longer get in contact with the maker.
|