The MGA With An Attitude
CARPET LAYING -- INT-101 - (Page 1 of 6)
Introduction: (This entire first page is addendum January 2011).
MGA carpet was Crossley's Karvel, normally black on roadsters except possibly on some very early 1500 cars which may have had carpet color matching interior trim color.
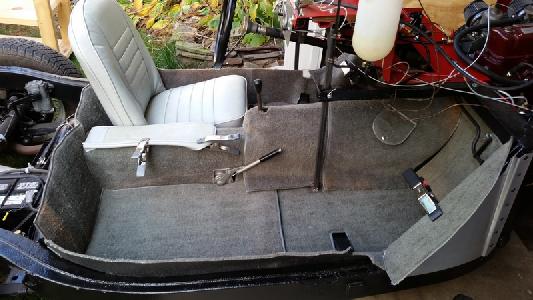
It is folly to build a street car MGA with no carpet padding (thermal insulation), as you would fry your leg on the tunnel (especially the exhaust side). Tunnel padding also helps with heat retention in cold weather. Most commercial carpet kits come with separate felt underlay for the tunnel and foot well from below the frame goal post back to front of the seats. I believe that was as original. The spare wheel bag attached to the rear bulkhead (the part forward of the bulkhead) was always carpet material. Carpet in the battery cover area was optional for roadster (standard in the Coupe), but recommended for insulation and noise suppression. I also carpet the boot (all glued in place). That makes very little difference for heat or road noise, but keeps loose items from making noise with road bumps (big difference), and no scuffed paint.
Last time around I also padded the tunnel between the seats, which was a bit of improvement, especially if you don't have an arm rest. I also padded under the seats, which is likely only a minor improvement but helps a bit on the exhaust side. Sliding seat rails might be a bit of a problem with padding under the carpet. I had previously raised the rails a bit with plywood spacers, so this is not a problem for me. Taller people may not want to raise the seats, so check this situation before you glue down the padding under the seats.
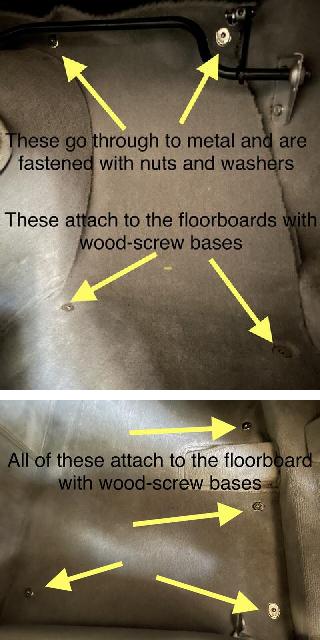
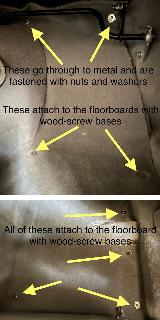
I glue down all padding so it can't move. I have had to scrape it all out once for replacement (after more than 100,000 miles), but well worth the bother to avoid constantly dealing with loose padding. Padding over the removable top cover on the tunnel can be cut to size of the cover and left loose (not glued) for gearbox servicing. If you glue it down, do not glue it over the area of the screws.
I glue down all carpet on the frame side rails, rear bulkhead, and all of battery cover area. I also glue down carpet on tunnel front and rear sections. Leave carpet on tunnel center section (shift cover area) loose for servicing the gearbox. This piece tucks under the front carpet section. I leave wide flanges on bottom edges of the center tunnel carpet to be stapled to the floor for good security and easy R&R.
Driver side foot well carpet had a rubber heal pad sealed onto the carpet. I use LTD

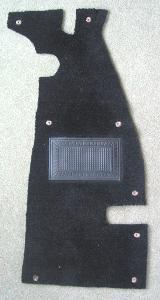 fasteners on carpet in the foot wells (as original) for easy removal for cleaning and drying (does get wet occasionally). Standard length LTD studs work well with 3/8" thick padding in place. Carpet under the seats can be slit to go around the seat rails and can be left loose with no fasteners. It lays there nicely without moving and can slide out the back for service. I take time (considerable fiddling) to carefully trim the floor carpet to fit perfectly around the sides and into the corners, looks neat and helps to immobilize it. The first photo is foot well carpet for right side of RHD 1600. The second photo is foot well carpet for right side of LHD 1500. The gearbox dipstick cover flap was secured with a durable dot press stud fastener (snap).
The only bound edges for original carpet were around the back edge of the tunnel front and center carpet pieces where they over-lap on top of other carpet, around the snap down cover for gearbox oil fill and dipstick, and around the cut-outs around chassis cross member in front of the seats. Moss Motors supplied carpet sets are as original. Some aftermarket carpet may have all edges bound for the foot well pieces (can't be trimmed), or may have some thin padding incorporated into the carpet itself. The rear tunnel carpet piece had the armrest sewn onto it and an access slot underneath so the Dunlopillo cushion could be pressed onto the armrest after attachment.
Padding the underside and back of the heater shelf and upper bulkhead makes a wonderful improvement in thermal insulation (hot and cold) and sound deadening. It would be a pain to do with a fully assembled car, easier with dash and steering column removed (easy removals). Bulkhead padding is also much easier in absence of heater box, wiring harness, pedals, and wiper drive parts. I had this padding piece in hand for some years before the golden opportunity arose to install it. Original thin foam type material used in the Coupe was highly perishable, not recommended except for concours show (if you could find it).
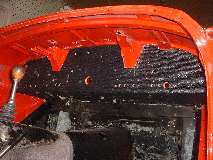
The Moss Motors supplied under dash pad is good stuff, tough nubbly vinyl over felt similar to the original spare tire cover (except black). It is die cut to fit perfectly with knockouts for heater and pedal openings and all the holes for fasteners in proper locations.
 Turn Page Turn Page
|