The MGA With An Attitude
CARPET LAYING -- INT-101 - (Page 2 of 6)
This is a detailed, step by step description for installation of the MGA carpeting. This will be very useful if you have just purchased a carpet kit with no instructions.
Problem: You just purchased a new carpet set, but there were no installation instructions included in the kit. I think the retailers may all be intentionally removing the instructions from the kits and throwing them out. Ditto for tops and tonneau covers. It appears to be a liability problem if the instructions are not perfectly clear and complete, and you should have any problem with the installation, then maybe the supplier would owe you a refund. With no instructions included it is your responsibility to do it right, and if you don't want the risk yourself you should pay a professional installer to do the job. Whoever is installing the carpet will be responsible for getting it right, and liable for the cost if they screw it up.
When I did this I had the dash out for painting, and believe me it's a lot easier access in the foot wells without the dash panel and steering column in the way. Only three screws to remove the steering column, and seven screws to remove the dash (3 top and 4 bottom). Disconnecting everything from the back of the dash is not a big deal, except that you do have to remove the temperature probe from the cylinder head to remove the safety gauge, and also disconnect the choke and starter pull cables from the engine compartment.
In spite of all the worry, carpeting is no big deal, just time consuming, which is where the cost savings comes in if you do it yourself. Start by scraping out all the old stuff and getting the surface clean enough to accept adhesive. You may take this opportunity to do some minor repairs or to clean and paint parts of the frame rails hidden under the carpet. You will need to trim most of the new carpet pieces to fit. I trim carefully with scissors, a little bit at a time, making the pieces fit right up to the sidewalls (in most cases), but not having to bend the material into a female corner. The exception to this is the pieces that cover the raised steel floor rails just ahead of the seats near the outside rail. There you leave flanges on the raised carpet piece so the main floor carpet piece overlaps on top.
Padding First:
Do all of the padding first, before any of the carpeting. Last time around some padding was supplied with the Moss carpet kit. There was padding included to do the tunnel and the floor forward of the seats. You can pad the tunnel from the front all the way back past the shifter. Optionally padding the tunnel between the seats is a bit tight on space but usually fits.
Addendum, November 2009:
Since installing new carpet again in 2008, I can revise some notes here. This time I did pad the tunnel aft of the shifter and between the seats. The seats fit fine, but your knuckles may rub on the carpet when you pull the hand brake. My arm rest is still sitting loose on top of the tunnel, so not much concern to me when there is padding underneath it. I like the results of padding the tunnel all the way back, improving sound deadening a bit more.
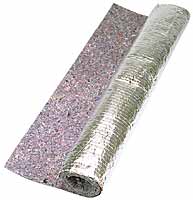
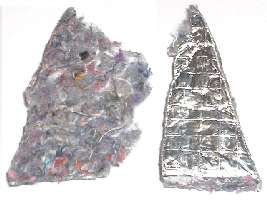
I bought this "space-age" carpet padding from J.C.Whitney in 1998 (and it was old issue then). The same stuff is now available form Moss Motors. They call it felt. It is actually composed of shreaded fiber materials pressed together, appears to be made from various scraps of cloth and thread and loose fiber (click for larger image). It is 3/8" thick with a laminated foil backing including a coarse fiber screen for reinforcement. It makes good thermal insulation, sound deadening and comfort padding, and it is much less expensive than lots of other commercial materials.
I wouldn't recommend installing this stuff underneath the car (like inside the tunnel), because it can soak up water like a terry cloth towel. I like it under the carpets. I glue the padding in place (foil side to the floor) and leave the overlying floor carpet loose (on LTD fasteners) so the carpet can be removed for drying if it gets wet.
Do not attempt to pad the side rails under the doors, as it is then difficult to keep the carpet edges down, it may interfere with the seat cushion, and it could make it difficult to keep the carpet glued down farther forward where it wraps around the contours of the upper side rails. Padding the floor is pretty easy, just snip to fit and glue into place. I would recommend not padding the raised part of the frame rail just ahead of the seat near the side frame, as that would lead to looseness and added wear for that small carpet piece. Cut the padding to fit right into the corners without bending the edges. All carpet padding may be glued into place so it stays put, as loose padding has a tendency to move around a lot.
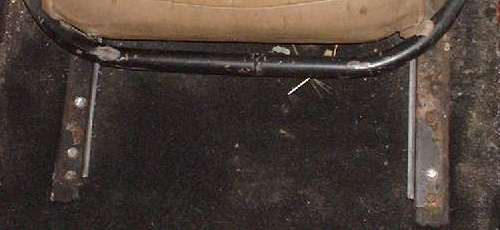
A few words on carpeting and padding under the seats. The fixed parts of the seat mounting rails could be screwed down on top of the carpeting with half a dozen fat short wood screws for each rail (as mine are), or the floor rails may have a single bolt at each end. This may result in bending distortion of the floor rails to make the sliders bind. When the carpeting settles and takes a set this could also lead to loose seat rails and binding of the slides. It is better if the rails are screwed down directly on the wooden floor, and the carpeting then slit to fit around the rails. As the seats are installed you need to be able to lift a flap on the carpet to fasten the rails to the floor, and then drop the carpet flap back over the screwed flanges. Otherwise you could just cut a slot in the carpet panel to clear the fixed rail, and also leave this piece of carpet loose so it can be later be slid out the back under the seat for cleaning. If you are tall and have a headroom problem in the MGA, then it is best to have the fixed slide rails fastened directly to the floor boards.
I on the other hand am slightly shorter than average and have a problem with visibility over the dash mirror and front fenders, especially when autocrossing around close pylons. I also wanted to install carpet padding under the seats, so I decided to settle two problems at once. I cut strips of plywood 5/8 inch thick, 1 inch wide, and 20 inches long, and placed these on the floor centered on the position of the rail mounting screws. Mark the position of the rail mount holes on these wood strips, and then screw the strips to the floor with 1-1/4" long flat head wood screws, avoiding the locations to be occupied by the rail mounting screws. Using extra screws in these wood strips near the ends will improve the strength of the seat mounting. The fixed seat rails should then be installed using 1-1/4" round head wood screws, three at each end of each rail, for a total of 24 screws (or a single bolt each end for the other type of rails).
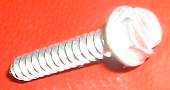 Last time I used slotted hex washer head screws for convenience. These should be #12 screws (.216" dia) (or 1/2" single through bolts). Do try to find the correct screws for this application, as it is always nice for the seat to stay put, especially in an emergency situation. The thickness of the new wood strips allows for 3/8" thick padding and 1/4" for the thickness of the carpet, which will then come up even with the top of the wood strips.
Turn Page
|