The MGA With An Attitude
CARPET LAYING -- INT-101 - (Page 3 of 6)
Rear Carpet:
When installing the carpeting, start at the back and do the rear vertical plywood bulkhead panel first. There should ultimately be a thick rubber gasket on the top edge of that panel to seal the battery cover. That rubber piece should be installed after the carpet so it overlaps and covers the top edge of the carpet. Trim the carpet piece to lay flat on the panel and stop flush at the ends without having to bend the carpet piece at the edges. This takes a bit of patience and careful trimming, but it's worth the time when it comes out right. You can install carpet padding here if you like, as it will help a little to cut down exhaust and road noise coming from the battery area. It is however much more advantageous to pad the sheet metal areas which vibrate than to pad the plywood areas which don't rattle (much). If you pad the rear bulkhead you might consider trimming the padding about 1/2" short of the top edge of the panel, and also maybe stapling the top edge of the carpet there to keep it secure under the edge of the rubber seal strip. Any padding here must be glued or stapled to the bulkhead, and the carpet must also be glued. Stapling only along the top edge of the carpet will probably not secure it well enough.
Now we have a slight diversion. The original factory installed standard carpeting came back to the rear plywood bulkhead only. Carpeting over the battery cover and inner rear fender area was an optional extra (standard on the Coupe). Some of the current carpet kits are sold as original, without the rear area materials. If you do have the rear carpeting pieces, this would be a good time to install those, before you put down the nice stuff on the floor. The pieces that cover the inner fenders should be installed first, being the trickiest and most likely to make a mess. These pieces are contoured to fit the convex area of the inner body (sort of). They are not large, but they are stitched up from flat stock, so they will probably not want to lie perfectly flush on the contoured surface. Take a little time here to carefully trim the pieces to fit right into the corners, but not to bend the edges up. Press them down and smooth them out until you're satisfied with the fit before getting into the glue. Once the glue is applied and the panels are pressed into place for keeps, you may want to come back at 15 minute intervals for a while to press the material down repeatedly until the glue sets up to hold it securely in place. I use a narrow wall paper roller for this job.
The factory supplied rear carpeting never did cover the rear steel bulkhead (except in the MGA Coupe). This rear bulkhead carpet piece may or may not be supplied in your kit, even if you do purchase the rear carpet kit separately. If you do have this carpet piece, this would be the time to install it, after the fender cover panels but before the battery cover pieces. And I hope you would do it before installing the spare tire cover which protrudes through the bulkhead, as the glue could make a very nasty mess on the tire cover. The upright carpet panel is fairly easy to install because the steel bulkhead is mostly flat.
 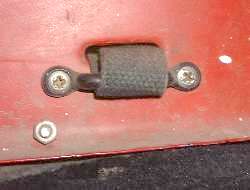
Tool roll straps in the boot. - - - Attaching brackets on front of bulkhead.
Originally the early production MGA had a pair of brackets for the tool roll straps in the boot, at least through August 1958 when my car was produced. These brackets look like miniature drawer pull handles secured with two screws on the front side of the bulkhead where the straps pass through the slots. Assuming that you will be using these small brackets, do allow for slots in the carpet panel to clear the brackets on the bulkhead (if you choose to carpet the bulkhead). Also trim the carpet panel to fit right up to the flange around the tire aperture in the bulkhead, but not to bend the edges up.
On the other hand, I have pictures of later production roadsters which do not have the brackets (or the screw holes) for the tool roll straps. For these cars there were slots in the carpet cover over the spare tire just in front of the bulkhead, and also aft of the bulkhead when the spare tire was covered in the boot. The tool roll straps then passed forward through the slots in the bulkhead, then downward through slots in the carper cover, then backward into the boot, and finally upward through more slots in the tire cover (when installed). This is sort of a no-brainer. If your car doesn't have the screw holes, you don't use the brackets, but you need to cut slots in the carpet cover. Find more information for this setup in INT-102.
Next you will have the two small pieces that go on the horizontal surface to the left and right of the battery cover. These pieces may be installed right up to the battery opening so that the battery cover will overlap and sit on top of the carpet panels, 'IF' your 1/4-turn fasteners are long enough to accomodate the carpet thickness. Do trim out generous clearance holes in the carpet for the two 1/4 turn fasteners before gluing the carpet panels in place.
Carpeting the battery cover itself looks easy, but there is one little hitch. Where the carpet bends down over the front flange of the cover it wants to spring back flat, so it's a bit fussy to make it stay put long enough for the glue to dry. You may want to devise some way of blocking the carpet up against the front of the flange while the glue dries. Otherwise you need to come back to press it back into place periodically until the glue takes a set and holds the flange secure. One easy help here is that you can leave the carpet panel hanging over past the edge of the panel on the front and at the ends, and then trim it off later after the glue has dried.
Turn Page
|

