The MGA With An Attitude
|
| MGAguru.com |
|
MGAguru.com |
REBUILDING MGA SEATS -- INT-110
At 11:33 PM 12/10/03 -0500, Robert Cook wrote:
>"I am having my seats redone and the fellow doing them is having trouble making them from the old seats. I have purchased new leather and he is not sure how to sew the pleats in the leather. I told him it looked like it was just pinched and sewn along the pinch that is the stitches appeared to be at 90' to the pleat. Do you know where I can get info on the way they were sewn."
If you still have the original covers, just have the new ones stitched up the same way?
It was 1986 when I last rebuilt my own MGA seats (nearly 200,000 miles ago). At that time I bought complete leather covers from Moss. Very nice stuff, but also expensive (and more expensive now). The driver side seat back left face panel (near the door) has been worn through, replaced, and is worn through again. I had a pro shop R&R the back cover to replace the small panel last time, spring of 1997. I had one backrest completely disassembled more recently for a welding repair, so I am now more familiar with it again.
All new covers were installed again at a club tech session in Naperville, IL, on March 20, 2005. See the large layout of photos and notes in article INT-110A.
I don't think the "pleats" are just pinched and sewn. I believe these are all cut as separate panels and stitched together. If one was to look inside I think there would be open cut edges at the stitching lines for the "pleats". The advantage there is being able to make it from small strips, not having to have two large sheets of leather for each seat. In production I would guess these panels are all cut to width and then machine stitched using an edge guide to maintain exact distance from edge to stitching line. The ends of the assembled panel may then be trimmed after the small panels are sewn together.
At 07:34 PM 1/23/04 -0500, Fred Stankovich wrote:
>"What's the best way to restore the seats?"
Win the lottery, and buy new ones complete? (Bloody expensive). But even if you have never done this before, you can still successfully rebuild the original seats at a substantial savings.
>"I have vinyl seats that are covering the original leather.
That's rather uncouth, but not particularly uncommon. It's fairly easy to remove the original covers before installing new ones.
>"I saw in one restoration site what looked like new padding and then new leather "skins" that were installed by the owner. Is that better / cheaper than just buying whole new seats or is that the only way to restore the seats?"
Buying whole new seats is the most expensive way. Like anything else in restoration work, the more of the labor you can do yourself, the less you pay to someone else. The more you can salvage use parts the fewer new ones you have to buy.
The seats are easy enough to disassemble and reassemble. Bottom cushion lifts out. Remove screws from floor to remove seats from car. Remove two hinge bolts to disconnect backrest from base frame. You can detach the backrest without removing the base frame from the floor. The outer fabric covers are fastened underneath. Just remove tacks or staples and pull off the covers. Pre-made covers are easy to install. Just slip them on, pull them snug, and tack or staple them at the bottom. The backrest cover fasteners go into thin plywood strips which are screwed to the bottom of the frames. Bottom cushion cover is attached underneath the flat plywood base board.
The center armrest is a stitched cover over a foam rubber block on a thin plywood bottom piece. Armrest commonly comes complete when you buy pre-made covers. It needs to be secured to center tunnel carpet by whatever devious means you like. It could be sewn in place by hand if you have the patience. Maybe use contact adhesive, but tough to get it to stick to fuzzy carpet. I leave mine loose, just sitting in place, toss it out when autocrossing.
Once you strip off all the fabric materials, the seat frames are thin steel tubing with a few welded brackets, usually somewhat rusty, but physically serviceable. Sandblast or wire brush to clean, followed by appropriate painting. If something might be broken, a little welding is in order. If they're really butchered, look for a good used set.
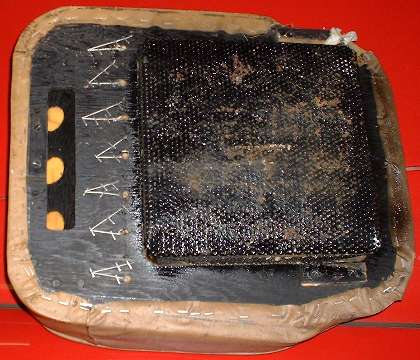 The bottom cushion has a plywood baseboard with a perforated metal screen in the center, formed like a shallow square box with flanges. It also contains a wedge shape wood piece near the front on top which you can constructed as a couple pieces of plywood and a couple small wedges of 1 inch board. There are also a few short wood strips on the bottom which fit just inside the frame rails for positioning.
All wood parts and screen are assembled with wood screws. Parts are right and left handed due to shape of center tunnel. If the metal screen part is badly rusted it needs to be replaced, either buy new or form up a new one from perforated sheet stock. If not badly rusted, then just clean and repaint. Original plywood part is likely rotted and warped. Assuming you have enough of the original part, you can use it for a template to cut a new part from plywood. Use wood preservative and paint appropriately for long life. The inner cushion is contoured foam rubber. If old ones are shot, then it's generally best to just buy new ones. Moss Motors sells the handed parts molded to correct shape and ready to install. Victoria British (as most recently known) sells unisex cushions, top and bottom foam blocks glued together, needing some trimming to fit either side. Better to buy the handed parts ready to install and avoid the trim to fit work.
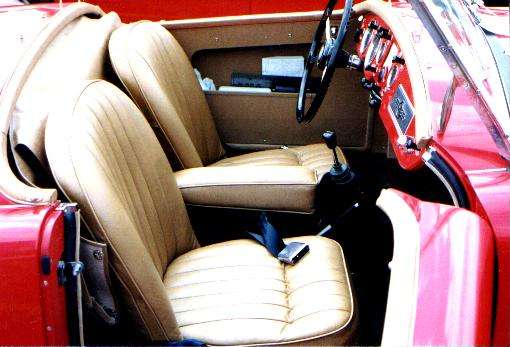
Notice a lateral pleat across the seat cushion about 5" back from the front edge (first photo above). I almost never see this in restored cars (other than mine), but I'm pretty sure it is the original style of assembly from the factory. This would be for Roadster seats only, not Coupe or Competition seats. I owned three MGA in the late 60's, one of which had original seats which were like this (other two had replacement covers). The MGA I have now which I bought in 1977 had original seats (to the best of my knowledge) which were also assembled like this. In the process of restoration I lost (wife tossed out) the original covers, but I had a picture of the seats before disassembly. I also had the bottom cushions complete with covers and base boards with a bunch of tell-tale holes in them, and a good memory of what it was like at time of disassembly. I used the old base boards to make new ones exactly the same.
Looking at the bottom of the cushion you will see a row of seven holes directly under the lateral pleats, each in line with the fore/aft seams in the cover. There are strings coming out of the holes and stapled to the base board. The string used is a heavy waxed string (for long term durability). A small hole is pricked (big sewing needle) through the cover fabric laterally directly on or just slightly below the stitching row in the cover "pleat". The string is run through this hole and tied off around the cover fabric just below the stitched seam, leaving about a foot of string attached.
At each position there is a hole pricked vertically through the foam cushion (big sewing needle). When the foam cushion and cover are assembled to the base board, the strings are run downward through the cushion and through the holes in the base board. The strings may be temporarily tacked loosely in place so they don't slip back through the holes while in process. The cover is then stretched into place and tacked or stapled to the base board. The last move is then to pull the strings tight (maybe just a little snug) to pull the top fabric down to form the lateral pleat in the cover. The strings are then tacked in place on the bottom of the base board. This is a nice trick, and I'm about 95% sure it is original, but so far I have not seen anyone else do it when restoring MGA seats.
The backrest backboard is upholsterer's cardboard, like heavy card stock, wrapped around the back of the frame, possibly glued in place originally. You can buy this heavy card stock material at a local upholstery shop, but it's fairly cheap pre-cut from Moss. I attached it to the frame with duct tape, no fuss. The backrest was originally padded with rubberized horsehair, trimmed to fit. If you need new parts, you can buy this at Moss Motors, not terribly expensive. When I did my seats in 1986 the horsehair padding was not available (at least not from Moss). I padded the back with 2" thick foam rubber inside of the frame, followed by 1/2" foam rubber top pad with cloth facing on the front.
This top pad material is a common special application material available from a local upholstery shop. It is cloth faced on one side, and two edges (off the roll) are tapered gradually thinner over a distance of a few inches, trim to fit. For this application the tapered edges are not particularly important, but the cloth covering on one side is very nice for reinforcement and durability. This I cut larger than the seat face so it would wrap around the top and sides of the frame for edge padding (not around the bottom) with the cloth surface on the front side. This also was attached with duct tape.
Along the bottom edge of the back frame there are plywood tack strips held in place with small flat head sheet metal screws. If the old ones are perished, just cut new ones to fit and screw them in place. Slip on new covers, pull snug and tack in place. The back frame has two small metal stop pads on the bottom to align the angle of the backrest. The wood tack strips have to be slightly thinner than the height of these metal stops to avoid interference and angular misalignment of the backrest. It has been a long time, so I don't recall the exact thickness, but 3/8 inch seems right.
The most expensive part of all this is the new leather covers. Original covers are (stitch pleated) leather on the seating surfaces with vinyl on the sides and back, and piping around the edges. Original leather type is much preferred, but all vinyl is much cheaper. Considering cost of the pre-made leather covers, you might get a competitive quote from a local upholstery shop to make them from flat stock, using original covers for the pattern. Piping can be the same color as seat cover, or contrasting color to match body paint color. See "Original MGA" for details of original color schemes.
A few years ago I heard tell of some old retired fellow in rural Texas who restored a pair of roadster seats on contract complete for $300, including leather material on top surfaces, all new wood parts, and powder coat painting of the frames. I suppose the original inner cushion materials might have been re-used. It likely depends on where you can find cheap skilled labor I guess (good luck on that).
The last time I needed leather material for a repair panel (1998 I think), a local shop charged me $135 including labor and materials. The invoice called it a yard of leather, but only a small panel was replaced. I did not get the left over material, so not sure of the cost of leather these days, but it ain't cheap. You need an industrial sewing machine to stitch leather and vinyl materials. I can get new pre-made leather covers delivered for well under $500 (watch for winter sales), so I wouldn't be fussing with trying to make my own. This is a noble cause to save some money. I could never justify buying complete new seats.
Addendum March 2005: Zowie! Now you can visit MGA Seats Rebuild Tech Day - March 20, 2005 - where we have 47 photos and pages of notes on rebuilding the MGA seats. Check it out at INT-110A
|