The MGA With An Attitude
VALVE CLEARANCE EYEBROWS - Page 4 of 4
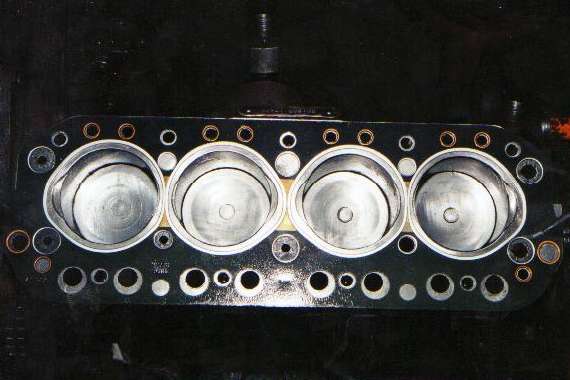
Now time warp forward an hour or two, and here's the engine block all de-burred, cleaned up and re-oiled with a nice black fiber head gasket sitting on top for reference.
On popular demand, I have to pause momentarily to explain how keep the grinding dust out of the engine, or how to clean it out if it gets into the cylinders (which it will). Before starting the grinding, clean the block and the top part of the cylinder bores with paint thinner or petrol, and finally wipe it off with lacquer thinner and allow to dry. Use wide masking tape to cover the top of the block, at least cover all of the holes other than the cylinder bores. You can also cut discs from light card stock (like an office file folder) to fit inside the cylinder bores. Cut the disc to be slightly larger than the cylinder bore, then turn up the edges to fit it inside the bore. Position it an inch or so below the top of the block, and tape it into place on the cylinder wall, continuously around leaving no gaps. When the grinding is finished, vacuum out the grinding dust and wipe everything clean with soft cloth and solvent before (and after) removing the discs and top deck tape.
If you do the grinding on a bare engine block you can clean everything with solvent before assembly. If you do the grinding on the assembled engine without taping anything (very bad move), then you would be well advised to remove the sump and flush everything with copious amounts of solvent. You may need a pressure washer to finish rinsing inside the block to assure removal of all traces of metal dust, also cleaning out the water jacket. Be especially diligent to remove any trash which would accumulate in the tappet gallery at the side covers. This is serious business not to leave any grinding dust inside the engine. Also plan on changing oil and oil filter immediately after initial run-in, even before the first test drive on the street.
If you had taped over the top of the engine block but had allowed grinding dust to accumulate in the cylinders on top of the pistons, vacuum the bulk of the dust out of the cylinders before moving the crankshaft and pistons. Apply a generous amount of oil on the cylinder wall and into the space around the piston above the top ring in each cylinder. Rotate the crankshaft one turn to move the pistons once to top of bore and ending up back at half stroke. This will move most of the debris to the top of the cylinder bore. Use a soft cloth to wipe out the debris along with the oil. Finish by wiping the cylinder walls down to the tops of the pistons. Now add more oil to the cylinder walls, rotate crankshaft one turn, wipe out oil, and repeat the process a few more times until you are satisfied that the trash has been removed and you are wiping out only clean oil. Again, plan on changing oil and oil filter once immediately after initial run-in, before the first test drive. By now you should have the idea that it is better to keep the dust out to begin with rather than having to clean it out afterward.
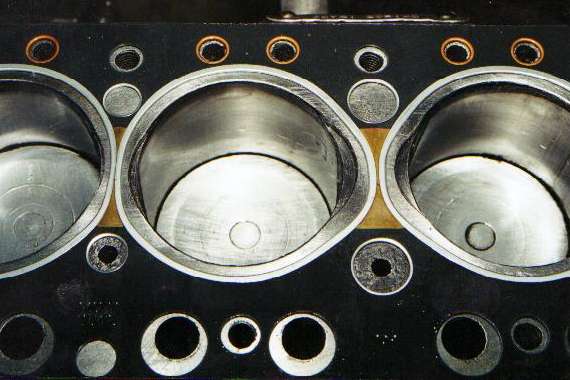
And here below is a close up of the #2 cylinder (centered) with the head gasket in place. And if you're looking close, that's oil on the cylinder walls, not grinding dust. Notice that the head gasket has a much larger clearance hole than the bore of the cylinder, and that the newly cut eyebrows in the block aren't even close to the gasket. The same head gasket can be used on all B-series engines from 1500 to 1800 cc, and even on a lot of overbore blocks (but not sure about the 1950cc conversions). I would actually prefer a head gasket with a smaller aperture around the cylinders and a wider web in between, but I don't know where to buy one like that.
From here all that remains is to put the head back on and get back to checking mechanical clearances and cam timing. Or if you're still being entertained you can continue on to the next page for the next topic of MG engine tech. Thank you for your diligent attention.
Barney Gaylord
|