The MGA With An Attitude
STEERING WHEEL And COLUMN REMOVAL - SR-108
Removing the MG steering wheel is not too difficult, just a bit of a trick. The hub cover with the MG emblem is a plastic piece with a shoulder and is held in place with spring steel clips commonly known as Tinnerman fasteners. Remove the cover by slipping a sharp knife blade under the edge to start a small gap, then use a thicker knife blade, and finally a flat tip screwdriver. Pry gently to avoid chipping or cracking the edge of the cover. Work your way around the part to pull it up evenly, as it will come out easier without tilting.
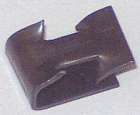
Four of these clips are installed around the back edge of the center badge cover for the steering wheel. The flat side of the clip goes inboard. The barbed leg goes on the OD of the center cover rear rim. Two of the sharp barbs dig into the flange of the cover so the clips will not come off. When the cover is inserted into the steering wheel center hub, the outward pointing barbs slide down and dig into the ID of the steering wheel hub for a good grip so the cover will not fall out.
A tip from Dominic Clancy in Switzerland: "Don't use the clips - if you ever have to get it off again it may be damaged in the process. The trick is to wrap a couple of layers of insulation tape around the bit that fits into the steering wheel boss, just enough to hold it in place and allow it to be removed with a fingernail in the future if necessary. This tip was passed to me by Grahame Davies at Moto-Build".
The mounting interface for the wheel hub is a tapered shaft with fine straight splines at the base and a large nut to hold the wheel on the shaft. The tapered shaft makes a tight zero clearance fit when installed, but it also makes the wheel hub want to stick on the shallow taper. If this joint had not been apart for decades it could be prudent to start with a little penetrating oil. Loosen the big nut using a 1-5/16-inch socket. Installation torque spec is 500 lb-in or 40 lb-ft, so the nut should not be difficult to break loose, assuming it is not rusted in place. Unscrew the nut until it is flush with the end of the shaft and leave it there. This will serve two purposes. It will allow you to hit the end of the shaft with a hammer without damaging the threads, and it will save your teeth by not allowing the wheel to fly off violently when it breaks loose from the taper. You might remove the nut long enough to apply a touch of penetrating oil to the splines, then reinstall the nut flush with the end of the threads.
The next step may be a one-man job if you are well coordinated, otherwise it may be prudent to recruit a helper. To do this alone you need to get in the seat and put your knees under the wheel and two hands near the top of the wheel and pull up firmly. Sometimes (if you're lucky) the wheel may come loose by pulling and rocking side to side to break the grip on the taper. When it breaks loose (if it does) the hub will come up suddenly and hit the nut with a bang, which is when you should be very happy that you left the nut on the shaft. Do not apply too much rocking force along with the pull, as you might crack the plastic in the wheel rim or bend the wire spokes at the interface point. If this does not work right away, revert "Plan B".
The next step up is a similar method. Get in the seat and put your knees under the wheel and one hand near the top of the wheel and pull up firmly. Use your free hand to wield a flat face hammer. As you pull up on the wheel smack the end of the shaft (and flush nut) firmly with the hammer. There will be a very small amount of end float available for the shaft that will allow this hammer shock to move the shaft slightly while the wheel hub stands still by its own inertia (hopefully). If all goes well you might use a few well directed and progressively stronger hammer blows, and the hub should pop loose with a sudden impact against the loose nut. This assumes you are coordinated enough to pull-pull-pull and hit it with the hammer all at the same time. Otherwise life may be easier if you pull with your knees and two hands while a helper wields the hammer (and you keep your face away from the path of the hammer).
See a video on this subject from Johm Twist, of University Motors.
If that doesn't work the chore gets a little more involved, as you need to remove the wheel and steering shaft as an assembly. For the one-piece steering shaft you would need to remove the first bolt in the u-joint just forward of the foot well firewall. The bolt has to come all the way out because there is a notch in the shaft that will prevent removal with the bolt in place. Penetrating oil may be prudent here as well to free the splines. It may also help to pry between the clamping ears on the u-joint to spread the jaws a bit. In the end the shaft must come free from the u-joint. When the shaft is out it can be an opportunity to replace or oil the two felt bushings inside the outer tube housing. That task is covered in a different article.
The two-piece adjustable steering shaft can be disassembled at the top end. Loosen the clamp at the top of the column, remove the bolt completely, plus withdraw the spring and rotate the clamp and you will see a small slot with a woodruff key. Remove the key, and you can then withdraw the wheel and short top shaft. If perchance the assembly is so horribly rusted that the loose slip joint may not move, more penetrating oil may be helpful. Otherwise you end up disconnecting the u-joint as in the prior paragraph to withdraw the main shaft.
If on the rare chance the shaft and tube assembly may be so badly rusted that the shaft cannot be turned, or it may be turned with some force but cannot be withdrawn from the felt bushings, then you end up removing the clamp under the dash to remove the entire steering column assembly from the car.
Once you get the steering wheel and shaft out of the car you can take it to anywhere that has a press. Alternately place the shaft between the jaws of a vice (DO NOT CLAMP IT), loosen the nut a couple of complete turns to be flush with the end of the thread so that the top of the shaft is protected. Use a HEAVY hammer lightly on the nut, and the shaft will come free from the sudden shock.
Addendum April 28, 2021:
Here is a suggestion from John Hopwood in the UK
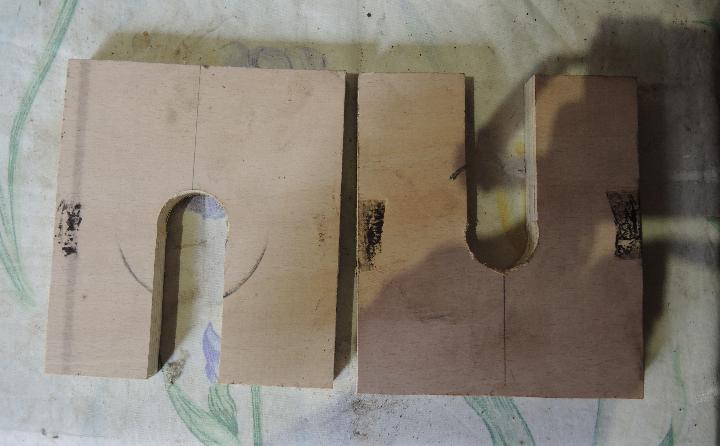
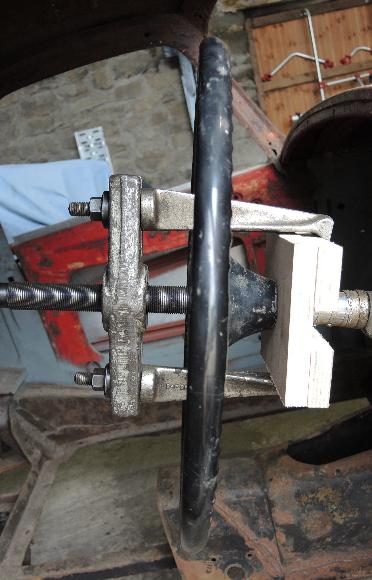
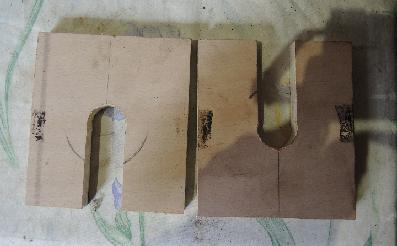
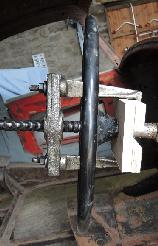
"Steering wheel on hard, reluctant to use a big hammer, but did have a decent gear puller, two small pieces of ¾ plywood and job so easy with no risk to steering wheel, face or chest"! -- John
|