The MGA With An Attitude
AFTERMARKET FRONT SWAY BAR, Underneath #1 -- FS-102
FS-102 is a short course in the installation of an aftermarket type front sway bar.
Aftermarket sway bars that bolt to the bottom of the front frame extension are relatively easy to install. They should also work with the early type spring pans and a-arm brackets without the hole for the link. The aftermarket type bars usually have links that are essentially a straight bolt with rubber grommets and cup washers like the rod end of a telescopic shock absorber. These links are available through any local auto parts store.

The sway bar will have a vertical hole through a flattened end on the bar, and the bottom attachment point for the link will be a short piece of angle iron that attaches to the original a-arm with a single bolt (you drill the hole there), see picture.
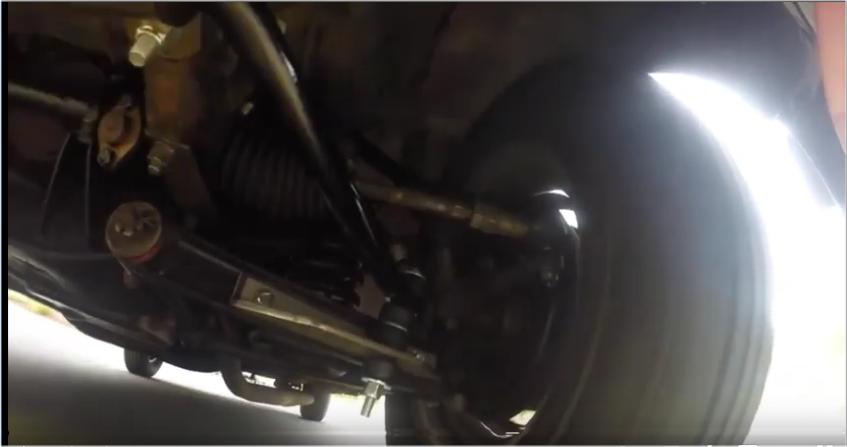
Aftermarket type anti-sway bar attached to bottom of front frame extension.
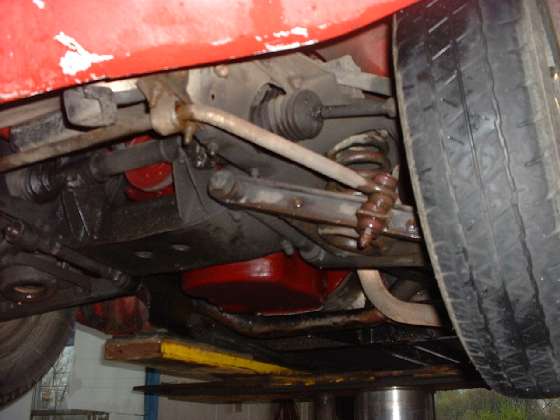
NOTICE: The vertical connecting link is not tilted as much as it appears in this picture. That is an illusion caused by site angle of the camera. Also the suspension is hanging unloaded with parts dropped to lowest point of travel, and lower A-arm hanging at an angle (normally level under load). See picture below for condition of loaded suspension.
This type of sway bar is easy to mount, and you don't have to remove anything (except maybe the horn). The weight of the car should be on the suspension when you do it. It is quite convenient if you have a drive-on lift with tracks for the tires so you just drive on and lift the car with the weight still on the suspension. Otherwise you can use drive-on ramps for the front wheels. Or if you have to jack the car up to work underneath, then raise the car, place blocks under the front tires, and set the car down with the full weight on the tires. Then you pre-assemble the sway bar kit complete, hold it up to the chassis, mark the mounting points, drill six holes, install the bolts and you're done. I did this in 30 minutes for the first installation (on a hoist). I later did it in 30 minutes on floor blocks for a friend's car. You may have to relocate the horn if it's in the way of the new bar location. I just reversed the (original Windtone) horn bracket to relocate it bit farther forward. Later I installed smaller twin horns that fit in just above and in front of the bar.
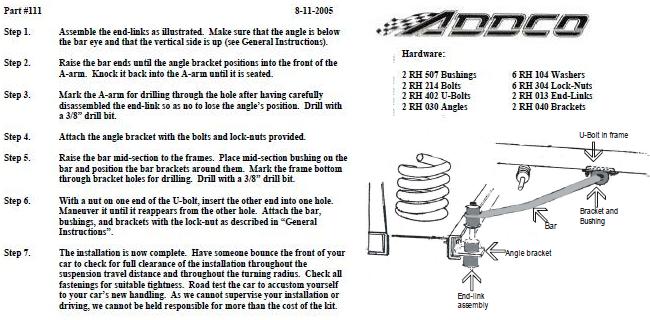
Addco Sway Bar Installation Instructions -
Click for larger printable PDF document
There are some tricks with the attachment bolts. The aftermarket kits from ADDCO use a U-bolt formed with square inside bends, as in three sides of a rectangle. If there is a few inches of space behind the panel, these can even be installed from a blind side. For the front bar on my car this "square" U-bolt drops through a pair of drilled holes in the bottom edge of the front frame extension. What looks like two bolts for the frame bracket is actually a single U-bolt. For the rear sway bar (in case anyone is nuts enough to think they need one), there are two holes drilled in the underside of the tubular frame. The square U-bolt is looped through inside the frame (being careful not to accidentally poke it at the wrong moment and drop it inside the box frame).
There are some problems with this method, especially when mounting to a relatively thin metal surface. The shank of the U-bolt presents a moderately small contact area against the frame, which makes for a high stress point, which can eventually lead to stress cracks. After about 10 years of harsh use with my first 3/4" front sway bar (about the time the bar broke), the front frame extension had a bunch of cracks around the mounting holes under the shank of the U-bolt(s). When I reassembled it with a new 7/8" sway bar (for competition), I put a piece of 1/8" thick angle iron on top of the front frame flange for reinforcement. It is not welded on, but just acts like a very large flat washer to distribute the working load over a large area. I suggest you install at least a flat steel strap here, 12 or 11 gauge thickness (0.1046-0.1196 inch, 2.656-3.038 mm).
You might buy this aftermarket type sway bar from Victoria British (front of the catalog, not the regular suspension page), but do not trust the pictures in their catalog to show what the parts actually look like. And don't bother calling V.B. to ask any questions, as they have absolutely no technical type personnel on staff (by intention). - NOTICE: V.B. closed in 2020, all inventory transferred to Moss Motors, Ltd. USA.
However, you can also buy this part (complete kit under one part number) through J.C.Whitney. It is no longer in their catalog, but if you call and ask they can order it for you (should take about 10 days for delivery). The kit is made by ADDCO in Florida, the world's largest manufacturer of sway bars. You could order it direct from ADDCO, but it will be much cheaper through J.C. Whitney (probably about $129 these days). Just ask for a front sway bar for 1956-1961 MGA, and you should get the 3/4 inch bar by default. You may be able to buy some other size on request, but I've never tried that.
For spirited driving and long term durability I can also personally recommend using the polyurethane bushings for both the frame mount and the end links. V.B. sells these parts separately from the sway bar kit (added cost). You can also buy them through J.C. Whitney for half the cost. And you may be able to order the sway bar kit with the polyurethane bushings included as original parts.
Addendum 9 Sep 05:
I have a reported case of someone in Tokyo, Japan, having a problem trying to order the sway bar from J.C.Whitney. This may have been a reaction to the out of country shipping address. A call to ADDCO quickly turned up an alternate distributor. Try Swaybars.com for friendly service. Browsing around some you may be able to find it for about $120 with rubber mounts, about $15 more with urethane bushings. There may be a $10 charge for custom packaging to reduce the package size for an APO delivery address.
Addendum 27 Jul 06:
At 12:22 PM 7/27/2006 -0600, Steven Loe wrote:
"I wasn't able to get Whitney to special order the ADDCO front anti-sway bar for MGA. However, I seem to have found a cheaper source: I just ordered the ADDCO 3/4" front bar (which now comes with urethane in the end link kit by default) for $88.31. The Part number for the ADDCO bar is ACO-111. Summit Racing's number is (800) 230-3030". SummitRacing.com
[Update April 2009, Summit Racing price is up to $166.95, but still cheaper than most other sources].
Addendum 20 Mar 2020:
A new ADDCO sway bar recently purchased from Summit Racing.
Tim Prime in the UK wrote:
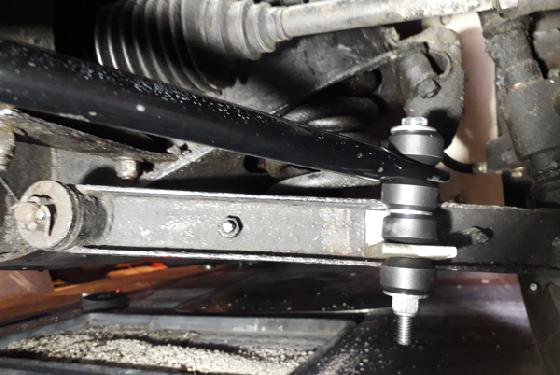
"The sway bar was pretty simple to install and I'm keen to try it out soon to see what sort of difference it makes. I should add that since I took the photo I have slackened off the lock nut as ADDCO Technical Support advised that the bushings should only just about be able to be rotated by hand".
I suggest you install the link bolt other end up, or cut off most of the excess thread so it doesn't hang down so much below the suspension arm (watch out for road hazard damage).
Addendum September 2021:
Recent news may indicate some reduction of quality for the Addco sway bar. Still functional, but may need a little more fettling during installation.
 On 9/9/2021, Tom Yearnshaw wrote: On 9/9/2021, Tom Yearnshaw wrote:
"I purchased the ADDCO anti-sway bar kit a couple of months ago and was not very impressed. Hopefully the bar itself is of good quality. The finish certainly was not. Cheap in the Chinese tradition. The furnished U-bolts that clamp the urethane bushing mounts to the MGA are NOT square at the bends. In fact, a 7/16" drill bit (7/32" radius) actually lays nicely into the inner radius of the U-bolt bends.
Also, had I used their lower A-arm angle bracket as a drilling template, the drilled hole would have just scored the lower surface of the spring pan => I could not have installed a nut. Fortunately, close inspection of supplied parts allowed me to discover this BEFORE I drilled. I made new angle brackets for the A-arms from some high strength, 1/4" wall structural tubing.
I also salvaged some 1/8" wall tubing to fabricate sandwich brackets for the front frame extensions. That reinforced the OEM sheet metal of the frame extensions using two existing holes to clamp the sandwich, and it allowed me to provide a wider horizontal flange for the bushing brackets. I tossed their U-bolts and used flange bolts and nuts to attach the bushing brackets. My approach is probably overkill, but I won't have to come back in a few years to do the job again.
I am not at all impressed by the quality and finish of the parts ADDCO supplied. When I got done, I used their anti-sway bar and the urethane bushings/mounts. I even found some old shock mount washers that were of the right size. The supplied washers were like thin fender washers".
Addendum May 12,2023:

Enjoy another swaybar in action video, courtesy of 16 year old Andy Patrick, who wrote, "How to fit a anti roll bar to a 1959 MGA roadster. We have had the car 30 years and do a few improvements each year. This is one I have wanted to do for a long time and can I say it made a very noticeable improvement in the handling of the car".
|