The MGA With An Attitude
Engine Carrier -- TS-201 - (Pg 2 of 5)
Note that the drawing below is dimensioned in INCHES. The primary material for construction is 3/4 inch thick wood. I used 3/4" plywood (four square feet is enough), but only because I had it lying around the shop. One 8 foot length of standard 1x6 board would do just as well. You will also need a 24" length of 1-1/2" wide continuous hinge (aka, "piano hinge") cut to four 5" lengths (including 3 screw holes as shown), and two dozen #5 x 3/4" grommet head wood screws (finishing heads). Do not use the #4 x 1/2" screws that commonly are packed with the hinge.
Minimal tools required would be a hand drill and coping saw to cut the hand hold holes, a file for rounding the corners, a hacksaw for cutting the hinges, and a small screw driver. The job will go much quicker of you have a power drill, a saber saw, and a router with a 1/4" to 3/8" radius routing bit with a nose mounted edge guide.
The height of the long front and rear boards was 5" in my case, but only because that piece of plywood I had was a little on the small size. That height was still enough to give 1/4" clearance below the lowest point of the engine oil pan. The intended height would be 5-1/2" so it can be built from 1x6 board without trimming the width. Similarly, the height of the side boards was 3-1/2" in my case, also just because of the size of the piece of plywood at hand, but those pieces can also be 5-1/2" high for convenience in construction. If the side boards are full height, then you don't have to cut the funny notch in the hinges at 3-1/4" as shown below.
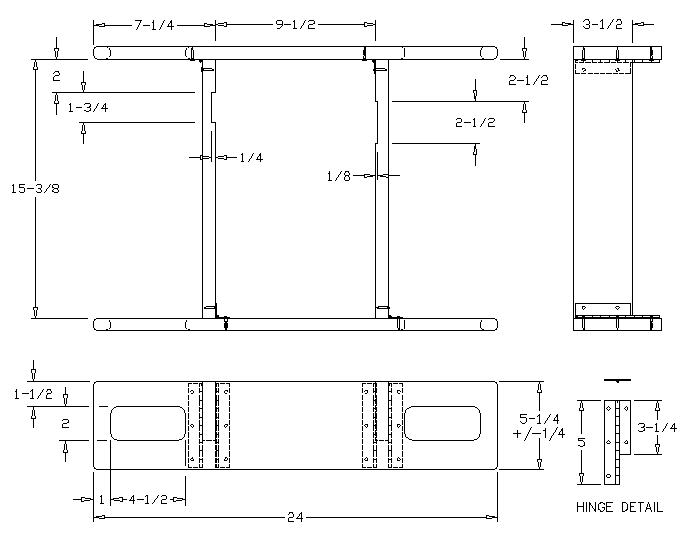
The short notch inside of the left side board is to clear the drain plug in the oil pan. The longer notch in the right side board clears the bulge on the side of the pan opposite the drain plug, and is/was an adjustment to the inside width after assembly. At the time of construction it was more expedient to slap it together first and make it fit afterward. Fine tuning this dimension gives it a nice fit on the oil pan so it doesn't move around much.
Before final assembly, round off all of the edges for the first 6" on each end of the long boards with the hand holds. Note that the hinges are installed on opposing sides of the side boards so the fixture can be folded flat for storage. Again, you may want to route that last notch in the right side for fitting after assembly.
When the assembly was finished I penned the lettering on the front with a permanent ink marker, just for effect. And since I hope this thing will be around for many years to come, I treated it with wood preservative, which gave it that darker aged appearance. The whole job only took a few hours, much of which was spent scrounging materials and measuring things and dressing it up afterward. The actual construction work took less than two hours.
Helpfully yours,
Barney Gaylord
More pictures on the following pages.
|