The MGA With An Attitude
Crankshaft REAR SEAL for Twin Cam - TC-315
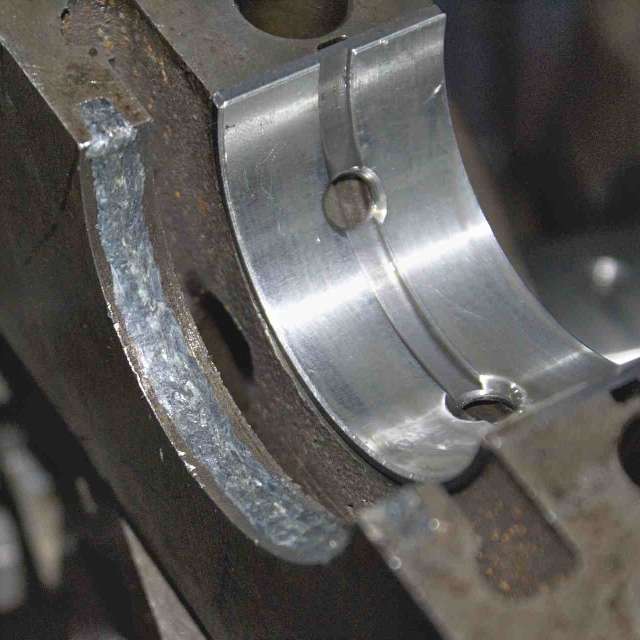
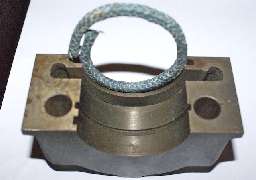
 Pictures here show the rear seal arrangement for the MGA Twin Cam engine. This resides in the same location as the mechanical scroll seal of the pushrod engines, but configuration is different. There is a groove in the engine block and bearing cap to accept a rope seal. There is still a scroll groove on the crankshaft, but it is wider, very shallow, and almost flat, so the rope seal will glide across the top of the groove. To the best of my knowledge the rope seal configuration was never used in any other Austin B-series engine, although it was common in other engines of similar vintage.
 Addendum, April 2010: This photo and note from Bob Somerville in Australia. "It is true that there is a scroll on the Twin Cam crank. It is not as defined as one on a pushrod crank - maybe only 0.020" in depth. The rope seal bears on the outer surface of the scroll area". [end addendum]
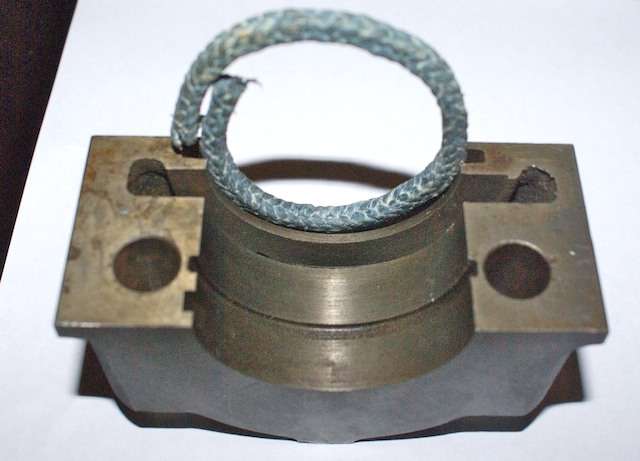
The "rope" is a braided fabric cord impregnated with graphite powder (or maybe molybdenum disulfide). Cross section of the cord is important to closely match the cross section of the groove so the seal will have a snug fit against the crankshaft. Cord too thin will not make a good seal, while cord too thick will prevent full seating of the bearing cap and cause the crankshaft to bind up. This braided cord can be adjusted slightly for cross section. If you stretch it longer it will become thinner. If you compress the length it will become thicker. During installation it is important not to trap any of the seal material in between the bearing cap and engine block, as that would prevent seating of the cap and increase bearing clearance.
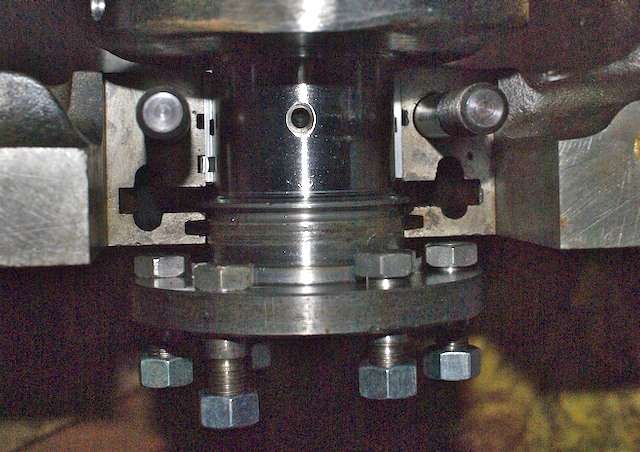
 The main bearings and crankshaft may be test fit first assuring proper free rotation of the crankshaft, then crankshaft removed for fitting of the seal. For installation the seal cord will be pressed into the gland (slot) in the engine block, and the crankshaft can then be seated firmly in the bearing cradles (with bearings in place) to properly compress the seal. The crankshaft is then removed, and the seal cord is trimmed flush with the block using a razor knife. Similarly the cord will be pressed into the gland in the bearing cap, and the bearing cap (with bearing shell in place) will be pressed firmly against the crankshaft to compress the seal. The bearing cap is then lifted free, and the seal cord is trimmed flush with the bearing cap. The crankshaft is then returned to the block and the main bearing cap(s) installed.


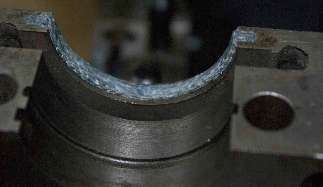
Photo on left shows the bearing cap (without bearing) with the sealing rope pressed into place but still protruding a little above the working surface. Photo on right shows the assembly (with bearing) after the parts have been pressed into assembly to fully seat and compress the seal.
Addendum, February 2010:
Here is another description of the material and process contributed by Bill Mack of Mack Motorsport.
I have had no trouble with the rope seal. Others have however. I have seen a couple of blocks damaged by attempts to install a seal which was way too large. I have a dim recollection of one of those being made from rubber or some sort of rubberized rope. I think I have used 5/32 graphitized rope packing and also a seal from a Ford V-8 289 engine which I pulled the middle piece of rope out of thereby leaving the outer sheath which was about the right size. It is a braided piece, so you can squeeze it down and the piece will become shorter and thicker or stretch it out and the piece will become thinner. It's sort of like one of those Chinese finger tricks.
I usually install the crank in the block with a piece of seal in there which is obviously too long and too thin then use a thin tool to pack it in the slot until I can feel a little bit of drag. Trim the ends flush with the block surface using a razor blade. On the cap I just stuff the rope seal into the groove until it is sticking up just a little bit over the edge of the groove, trim flush, then install the cap, torque it up and feel for the drag again. Be sure that no rope gets between the cap and block to screw up the fit and bearing clearance. Also do not over fill the cap with rope as it will be cracked when you torque it up.
It's not as hard as it seems and there should be some old timers around who are familiar with this type of seal as it was very popular on older American engines. Jaguar also used this type of thing on their engines up to the early 4.2's.
Good Luck,
Bill Mack
|