The MGA With An Attitude
MGA Guru Is GOING MOBILE - (November 1 - November 15, 2025)
Saturday, November 1, 2025:
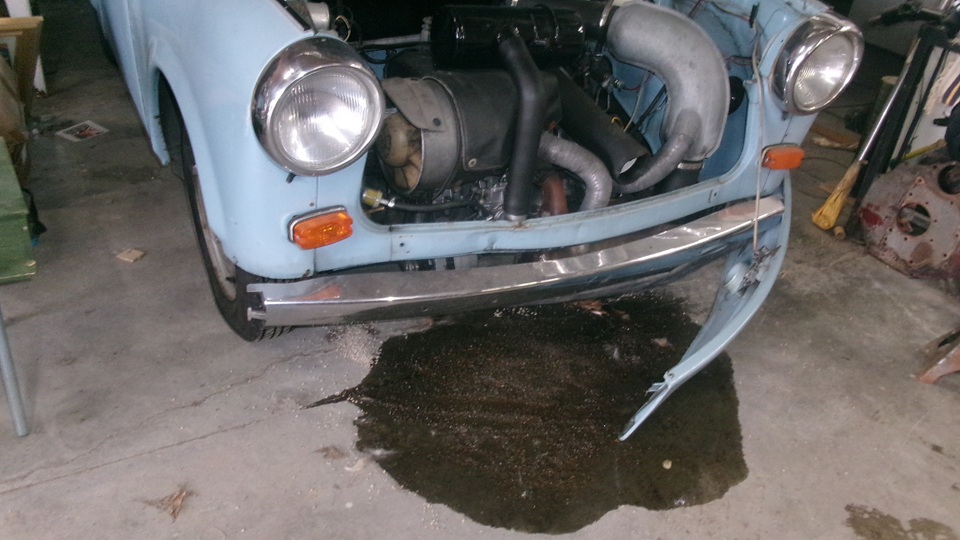
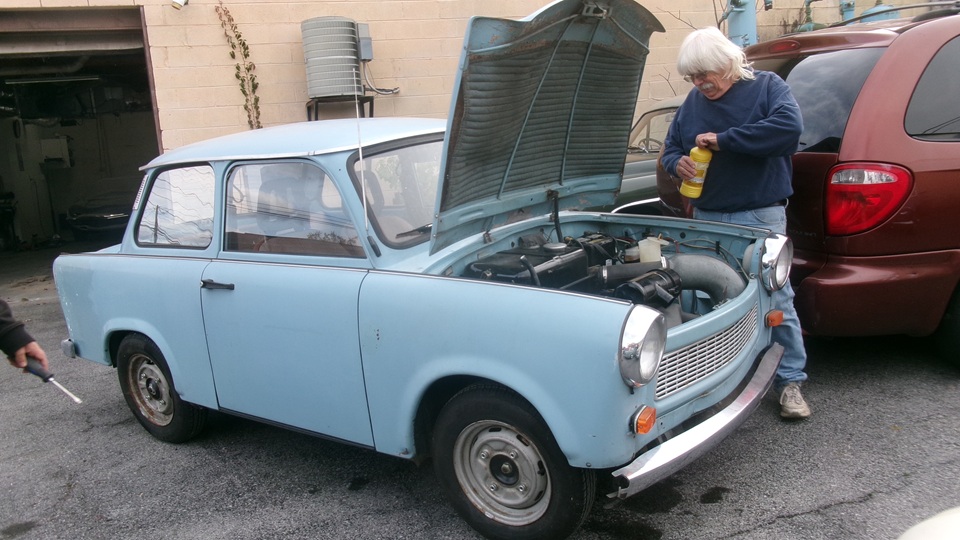
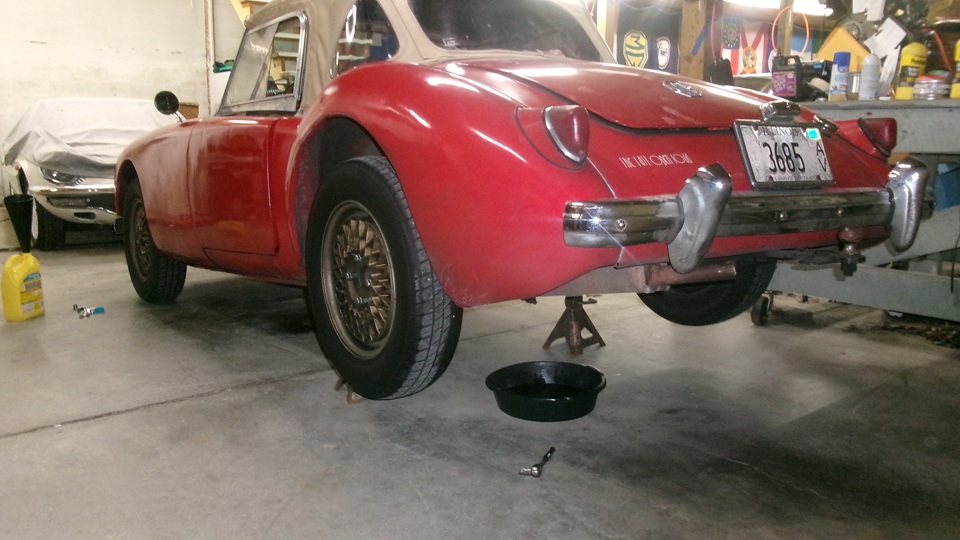
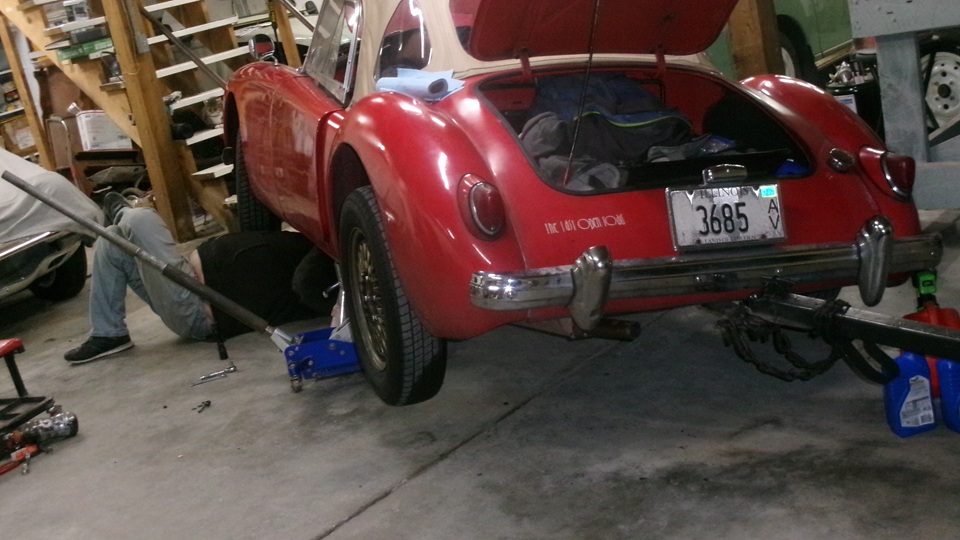
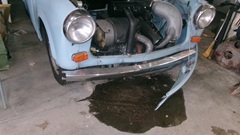
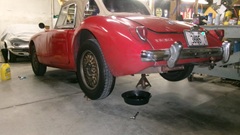
Early afternoon, getting bored with waiting. May be a good time to do a few small things with the MGA.Needing another quart of gear lube for the differential, navigator took a short walk around the block to the Napa store, but it was closed on Saturday afternoon. Okay, we can do a few other things first. We jacked up the left side and began to remove the broken exhaust brace, about to make a new one. That's when our Host picked an odd time to make his appearance, intending to get his Trabant out and running for a car show next week end. Okay, get the MG off the jack and see what we can to for the Trabant.

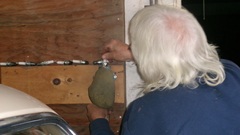
 First it wouldn't start, no fire. Swap spark plugs and try again, still no fire ,but then it was dribbling fuel on the floor. Gave the carburetor a little tap or two with a light hammer,and it stopped drooling, but still no fire. Remove spark plugs, crank it to blowout excess fuel, plugs back in, and it fired a little then flooded again. With another new and clean set of plugs it finally fired up ,got it outside, but while topping off brake fluid and reinstalling the grille, it quit gain, no fire. Grab a hand full of spark plugs ,take a few minutes at the spark plug sand blaster, install two clean plugs and toss the rest in the car for spares, and then it fired up and ran okay. After e ten minute test drive it was getting a good pressure wash and general clean-up. By that time it was about dusk and chilling down some, so we would call it a night and get back to the MGA tomorrow. First it wouldn't start, no fire. Swap spark plugs and try again, still no fire ,but then it was dribbling fuel on the floor. Gave the carburetor a little tap or two with a light hammer,and it stopped drooling, but still no fire. Remove spark plugs, crank it to blowout excess fuel, plugs back in, and it fired a little then flooded again. With another new and clean set of plugs it finally fired up ,got it outside, but while topping off brake fluid and reinstalling the grille, it quit gain, no fire. Grab a hand full of spark plugs ,take a few minutes at the spark plug sand blaster, install two clean plugs and toss the rest in the car for spares, and then it fired up and ran okay. After e ten minute test drive it was getting a good pressure wash and general clean-up. By that time it was about dusk and chilling down some, so we would call it a night and get back to the MGA tomorrow.


Sunday, November 2, 2025:
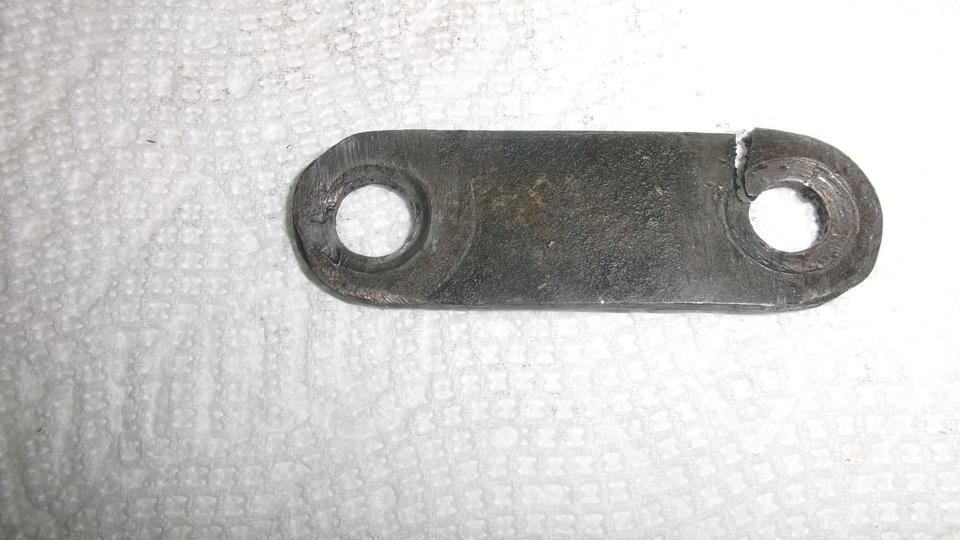
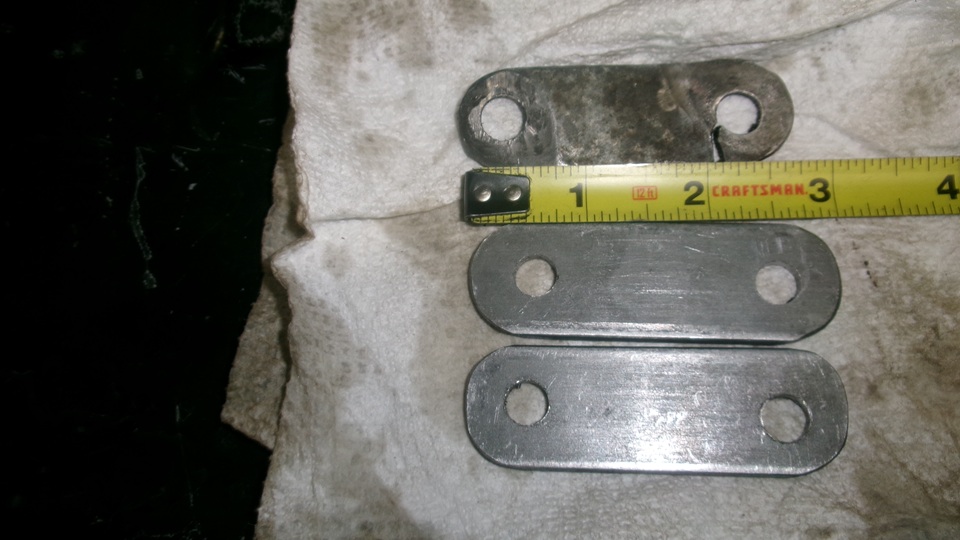
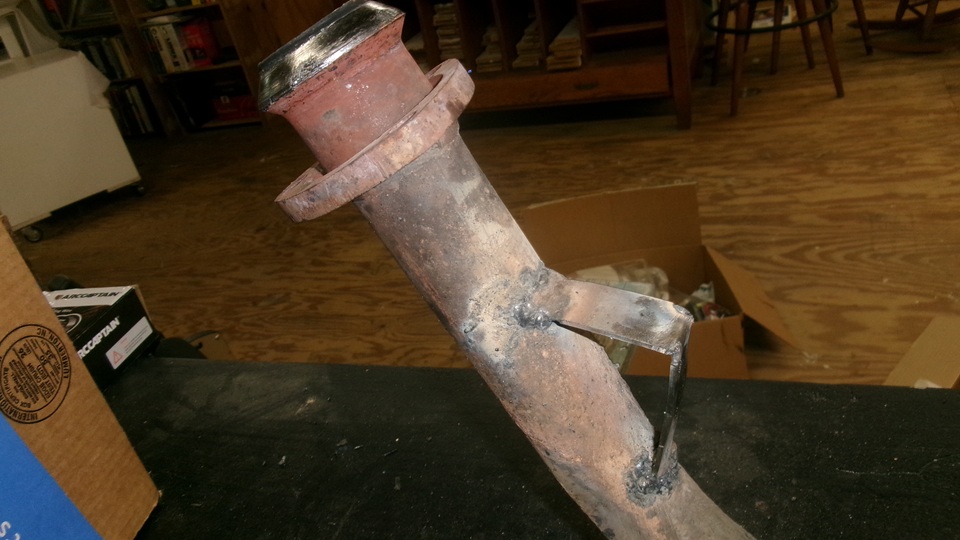
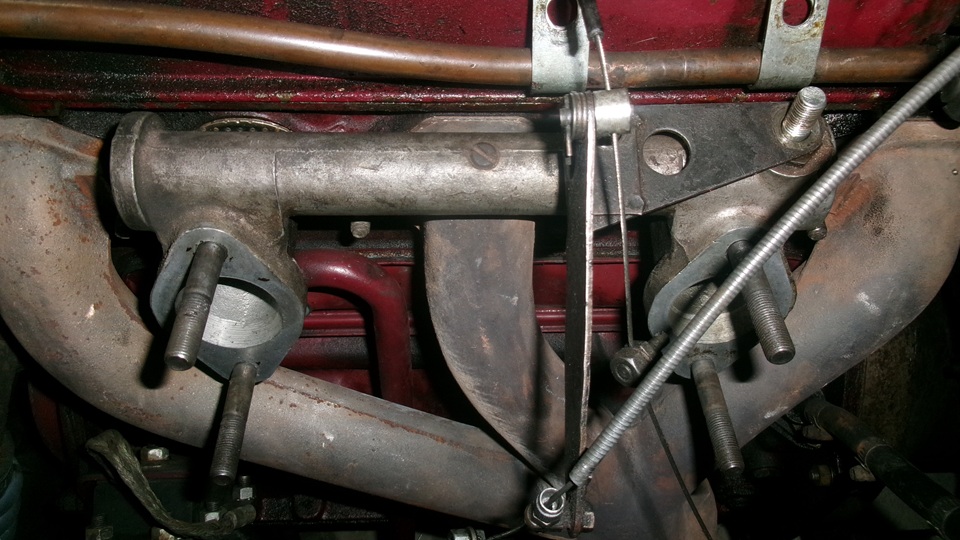
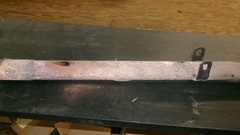
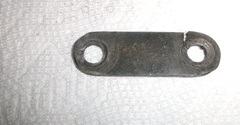 I slept in , had a late breakfast, didn't really get motivated until noonish. Navigator got a jump on me this time, heading down to the garage mid morning. By noon he had jacked up the MG and removed the fractured exhaust brace. Good story with this piece. From the factory this was 1/16-inch thick sheet metal strap. There was also a second one about twice as long going to another bolt higher up on the bellhousing. The longer strap was never the right length, usually too long, so it never helped to support anything. As a result it was always left off, set aside never to be seen again. The shorter horizontal strap working by itself was inadequate and broke often,
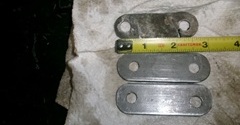 needing to be replaced at least once a year. About the third time around I began doubling up on these original thin straps, and two of them in tandem would last more like two years before fracturing. After a couple of those failures, I made a thicker single solid strap. This one was 1/8" thick x 7/8" wide, likely because that's a piece of metal I had lying around at the time. It lasted 25 years and 400,000 miles. Hard to argue with success, so I was about to do it again. The new one is now 1/8" thick x 1" wide. and it was easy enough to make two while I was at it, so there will be a spare for someone else whenever they might need it.
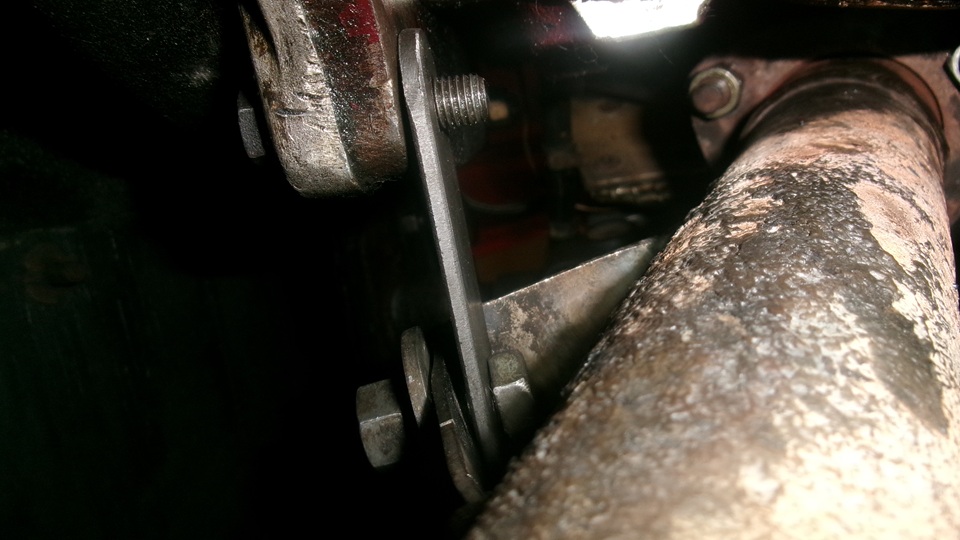
 While I was making the new brace(s), navigator was changing oil in the gearbox. Then we got our heads together to change gear oil in the rear axle. By now there is another problem with the exhaust pipe brace configuration. This short brace attaches to an angle bracket welded on the exhaust pipe several inches below the pipe donut seal flange. That welded brace is likely 16-gauge like the exhaust pipe. The top weld is still good, but the bottom weld seems to have cracked out of the pipe wall leaving the bracket lower flange detached, and a finger nail size hole in the pipe. I recon that explains the small exhaust leak we have had for the past few months, so maybe it was not a failed donut seal ring. -- Still thinking about how to fix that. Maybe weld a half-pipe over the hole, and then weld the bracket to the patch. Something to sleep on. If not enough space to weld in there, we may have to undo the 3-bolt flange and two hangers to drop the whole exhaust pipe and muffler. Not too much work, but could be a logistics problem if we do not have a welder in house.
Monday, November 3, 2025:
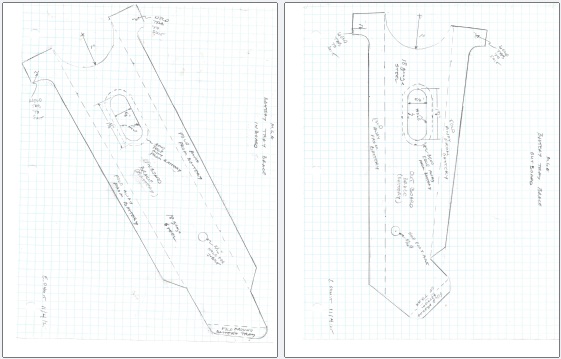
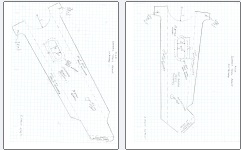
Added a new Frame Tech page for the Side Braces for battery carrier trays in the MGA chassis frame. This includes full scale templates with fabricating and assembly notes.
Had a Zoom tech session with John Twist, UML tonight with 149 people chatting about Winter Storage. How many times can you say "Mice" in two hours?
Tuesday, November 4, 2025:
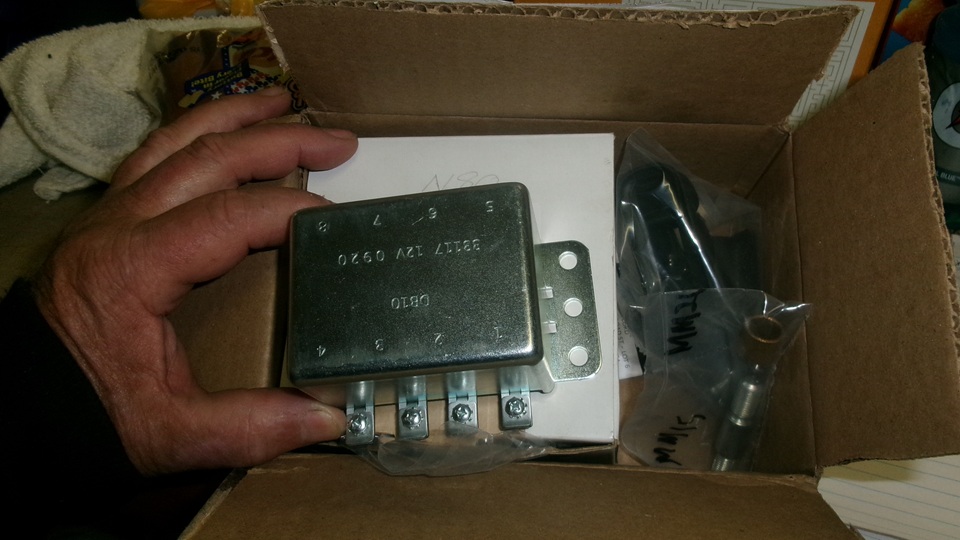
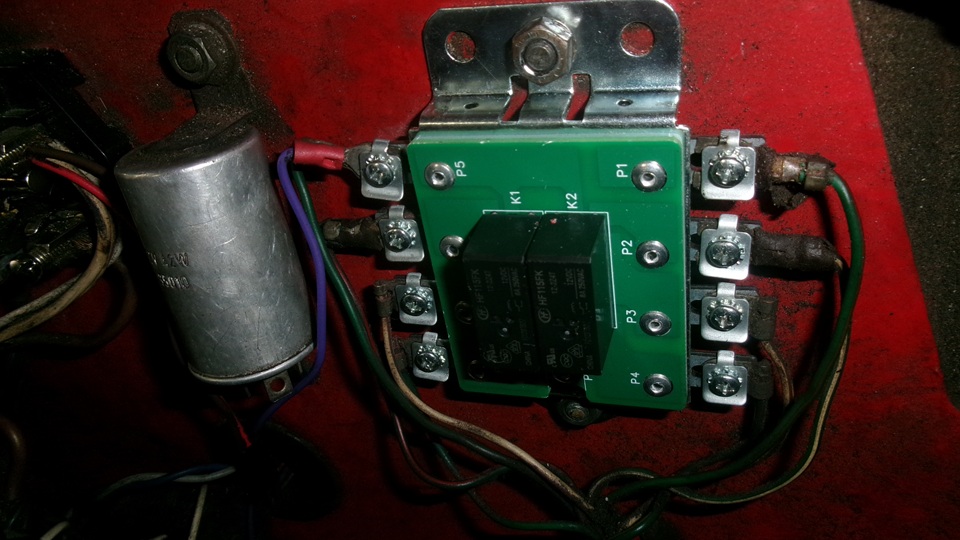
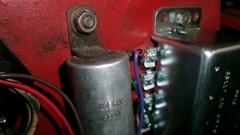
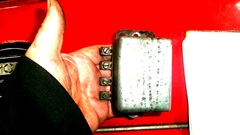
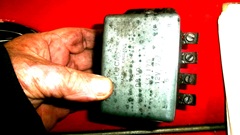
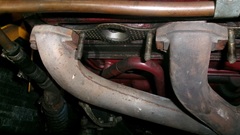
A few things on the work list today, and Navigator thought he could handle this one. It was time to install a new turn signal relay module. Should be easy. Disconnect 8 or 9 wires, remove two hex nuts, swap the parts, and put it back together. And so he did. Time to test it, switch on, and try the turn signals. Nothing, just dead, no power. Two minutes of diagnostics finds a blown fuse. Install new fuse, switch on, and blow another fuse. Remove cover from the box, looks okay. replace fuse, try again, and it works. Power still on, go to snap the cover back on the box, and there was a spark nd another blown fuse. Curious yet? It turned out to be the metal cover shorting out on terminal 1, which is the turn signal flasher unit output going into this relay unit.When power is on, the flasher unit is live, and shorting the output to ground will blow the fuse.

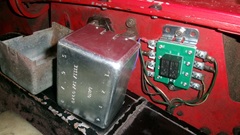
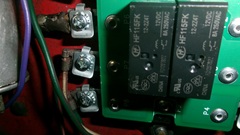
First picture below, terminals 1 to 4 on he right side all have the terminal clips in correct orientation with the keying finger on the inboard side. That keying finger drops into a small hole on the underlying terminal bar. the left side terminal clips are incorrectly positioned with the keying finger at top. To find which part might be at fault, we swapped covers between the old and new relays. Both covers fit perfectly on the old relay base, meaning the two covers were identical. Both covers would short on the terminals of the new relay base. Further investigation reveals the new side terminal bars are shorter than the old ones, which is why the terminals are shorting out on the metal cover. Now what to do with this new Piece of Crap? Can we jury rig something to make it work? Well. yes. It is significantly inconvenient, but it can be fettled. We turned all of the terminal clips to incorrect position with the keying fingers pointing up, engaging nothing. Then the clips and wire terminals have to be individually manually aligned, but this keeps the clip fingers away from the metal cover. Then there is a close up of the relays inside the package. They are 8-amp load rating, and I will look up the operating temperature rating later. For the astute observer, the extra purple wire on terminal 5 is the brake switch signal for trip-off of the new cruise control unit.
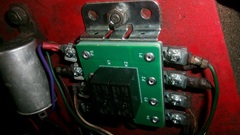

We found another engineering design fault with this unit. Notice each terminal leg plate is attached at the inboard end with a single point rivet, and these rivets are not particularly tight. When tightening the screws to secure the wires, the terminal plates may rotate around the rivets, which could cause more shorting problems.there is no designed keying mechanism to hold the terminal plates in place.
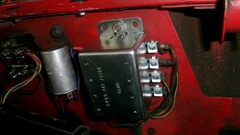
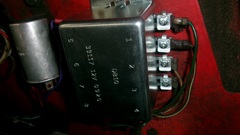
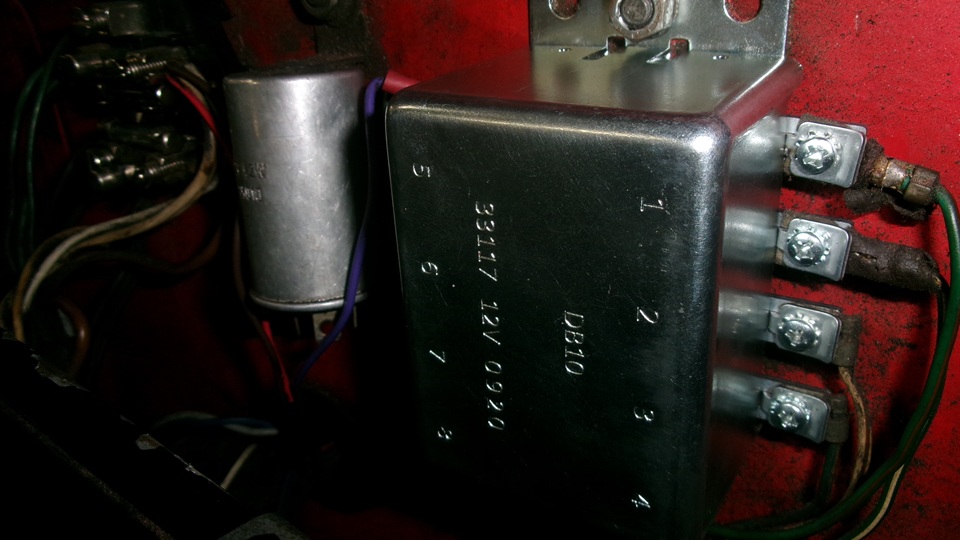
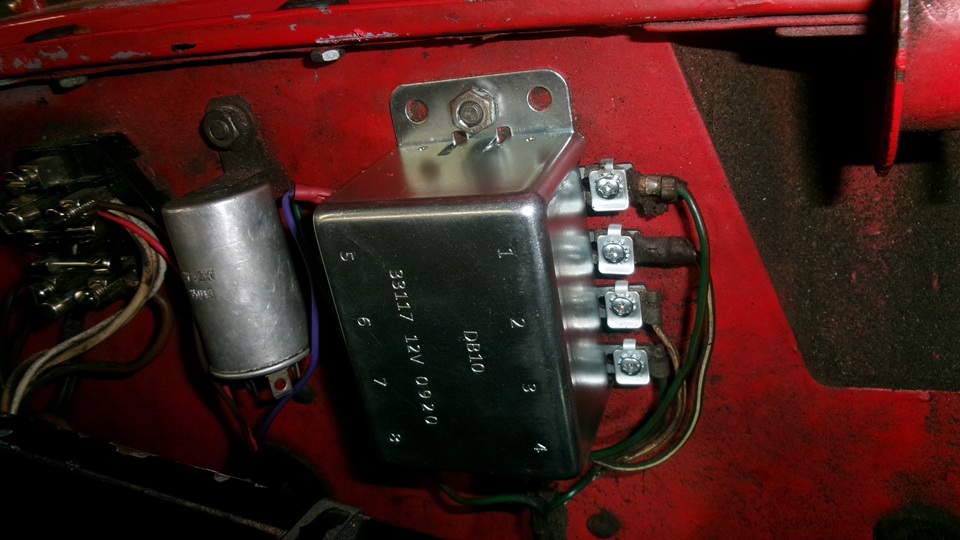
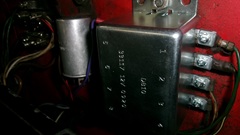
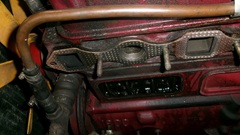
A few more pictures of the old relay unit to show how much open space there is between the terminal clips and the metal cover. This is the unit that I assembled with epoxy in place miniature relays with hand soldered wires as prototype and proof of concept in the late 90's. I recon we will be keeping this one as a working spare. And now I get use the information above to post a new tech page for Faulty Replacement Parts, and recommend that people should not buy this one.
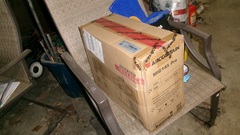
With that done, we moved on to the next project. We need to weld a broken stabilizing bracket on the exhaust down pipe, Our
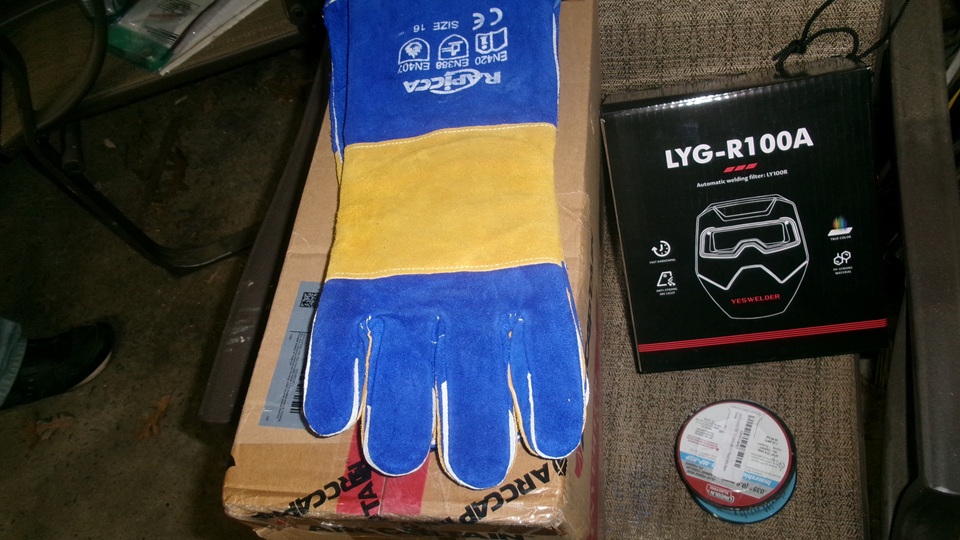
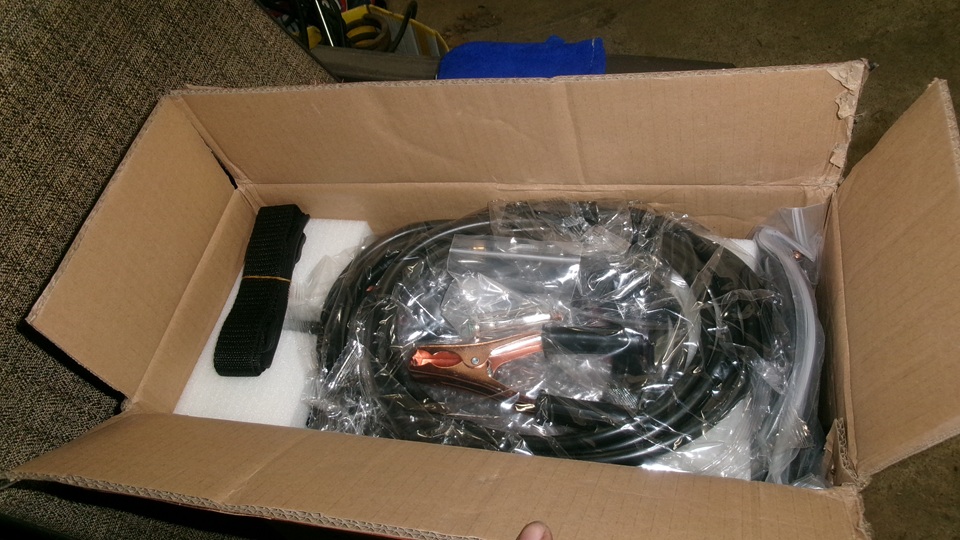
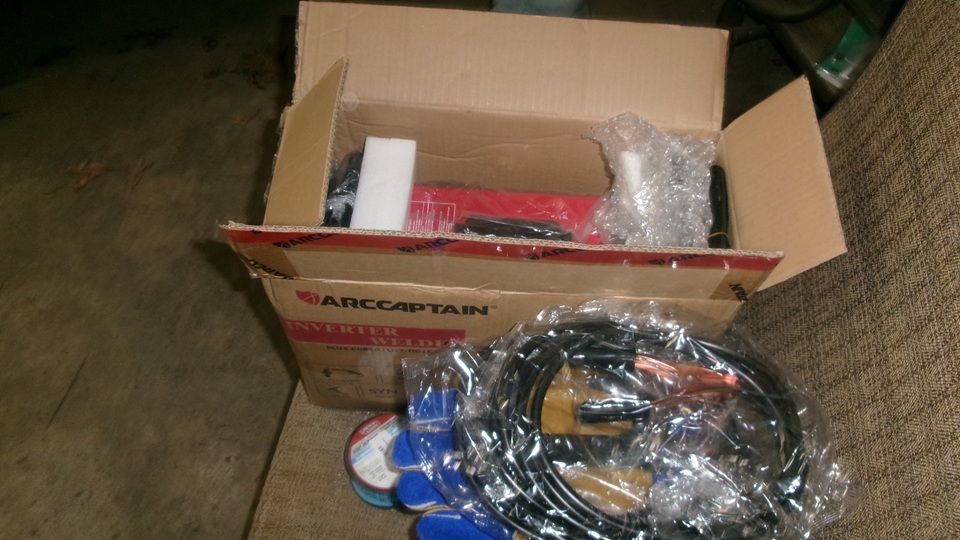
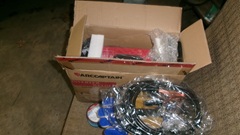
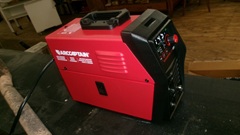
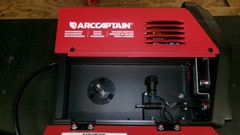
 host Michael Crews happens to have new-in-box MIG welder, something cheap and very Chinese, but it may work for the small jobs. Like opening Christmas presents, we find the very basic MIG welder in cabinet that is very light, like maybe10 pounds. They weren't kidding about it being portable. There are three working cables starting with the MIG welding cable with hand torch and wire feed and maybe shielding gas cable cover (not sure about that one yet). There is the grounding cable with simple ground clamp.And there is another cable with electrode holder clamp for stick welding. Interesting. A pair of very nice welding gloves, obviously not part of the welder kit, a 2-lb spool of flux core welding wire, and a light weight box with self-darkening welding goggles (with optional face shield). We will get to try out all this stuff tomorrow.

Wednesday, November 5, 2025:
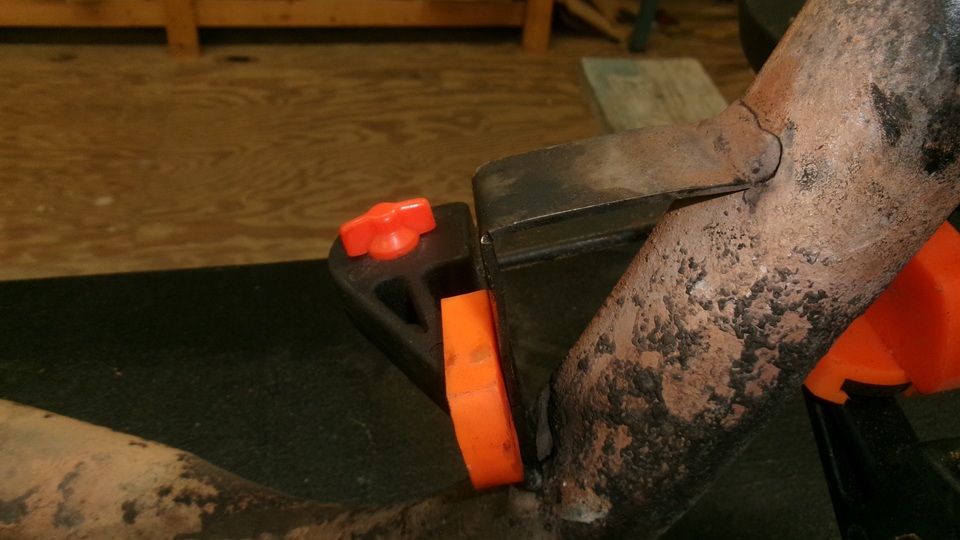
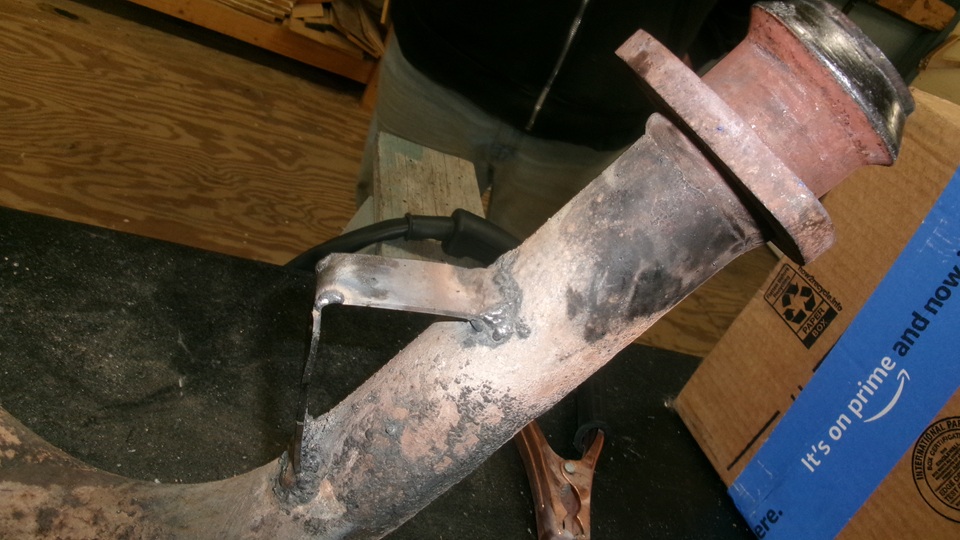
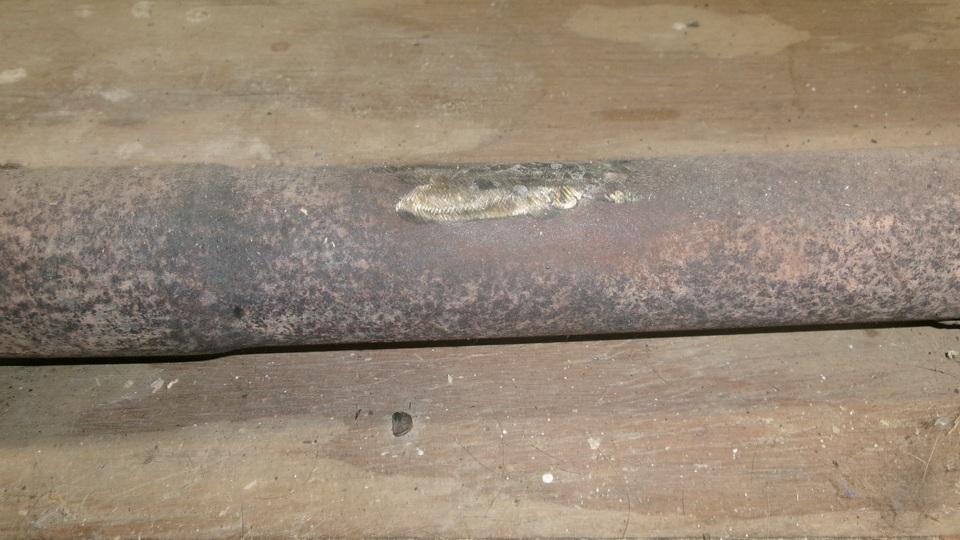
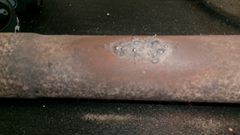
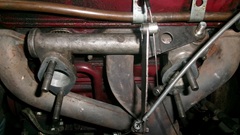
Today we get to weld up the MGA exhaust pipe. the first issue is the inverted L-bracket to attach the lateral brace from the
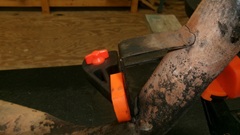
 bellhousing bolt. The bottom end cracked all the way around the weld leaving an open hole in the pipe. The top end was also cracked about half way around the weld, so the bracket could wiggle but wasn't completely detached yet. Creative placement of two sliding bar clamps held it firmly in place for the welding process.
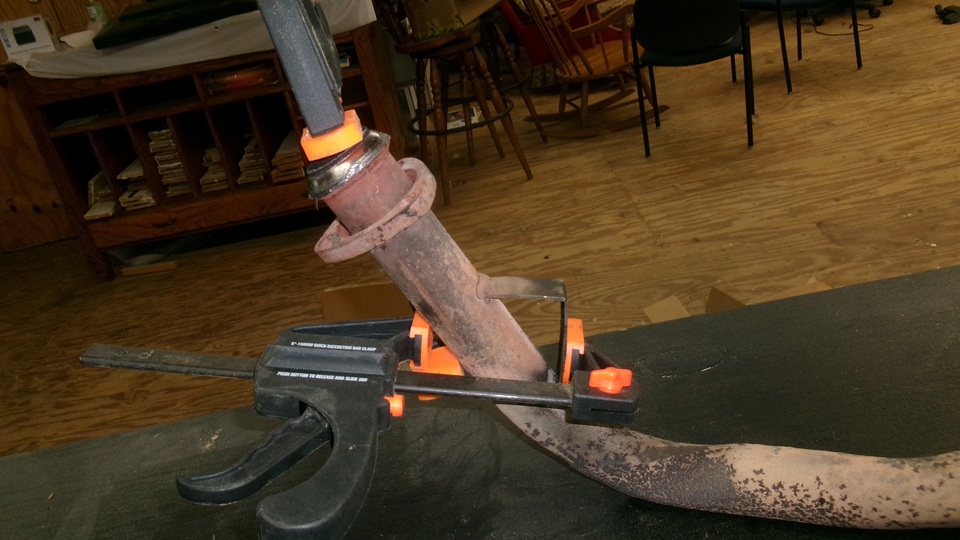
Then we got to unpack and set up the new MIG welder.I spent a lot of time reading the books before proceeding. Aside from being very basic, it does have all the right gadgets for the automatic wire fed with computer control. Not long to mount the two pound spool of flux core wire and feed the wire through the torch cable to the contact tip. Plug in the ground cable, and give the ground clamp a good bite on the angle bracket. To get started, use the touch pad control panel to set welding type (MIG), the wire diameter (0.035"), and the base material thickness (0.060"). From this the computer calculates and controls wire feed speed (bout 0.2 inches per second) and welding current (about 70 amps at low voltage DC with positive ground). And it works. Just point and pull the trigger, and manually guide where you want the weld to be deposited. I didn't get pictures of the self-darkening goggles, but they work too.

With the thin material I was mostly making short weld bursts like tack welds stitched together. No rush, and not wanting to burn holes. With flux core wire and no shielding gas, there would be some surface spatter, but it does make good structural non-porous welds. I recon it passes as a good portable repair and maintenance welder, and nice not to lug around a heavy high pressure gas bottle with regulator and hoses. Great for small jobs like this. -- By the way, this is a 16-gauge stainless steel exhaust system, having been in service 18 years and 340,000 miles, solid metal, full thickness, n thin corroded spots.
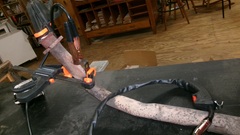


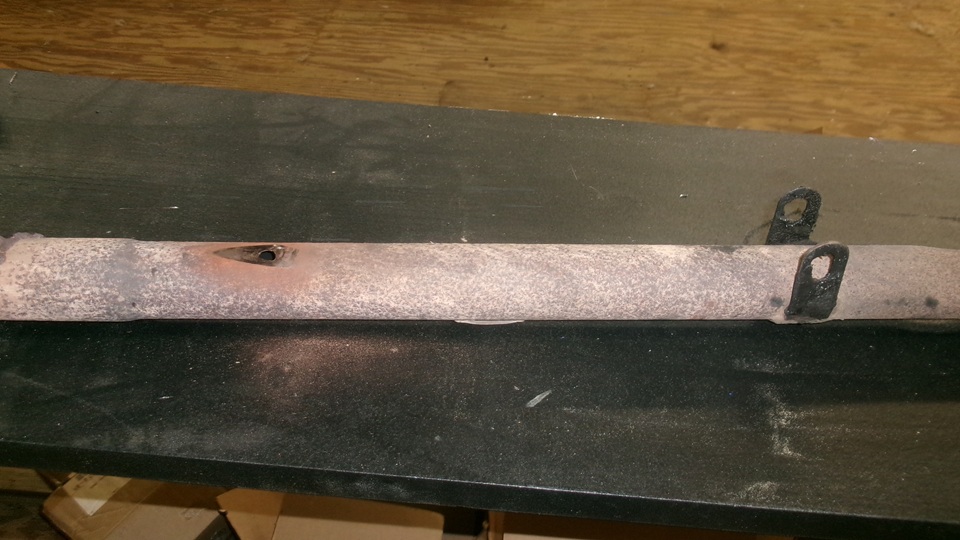
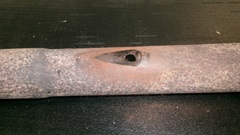
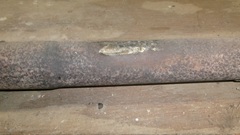
The second issue was rub-through hole where the pipe had been bumping and rubbing on the chassis frame about 15 inches forward of the center hanger. There was a bit of finesse, welding in a hole with out using a patch. I have done this often with a gas shielded MIG welder, but this is my first time with a flux wire welder. The technique is to lay the torch down nearly flat with the wire extending across the e hole to be welding on the material edge at the far side of the hole. Again little spurts, about a quarter second at a time, to keep adding small dots of metal to the inside edge of the hole. As the hole gets progressively smaller, it eventually closes up at the center. I was particularly pleased that this one came out with good thickness and nearly flat with not much excess metal to grind off to make it smooth, and no blow holes.
Last move was to bend the pipe down a little in the middle so it would no longer rub on the frame. Lay a couple wood blocks on

 the floor at ends of the bend span, and jump on the pipe in the middle until it hit the floor. Not enough permanent bend? The block it up a little higher and jump on it again. In a few minutes we had it bent down about 1/2 inch, and good to go. Enough for one day, we will get to the PCV valve and carburetors tomorrow,
Thursday, November 6, 2025:
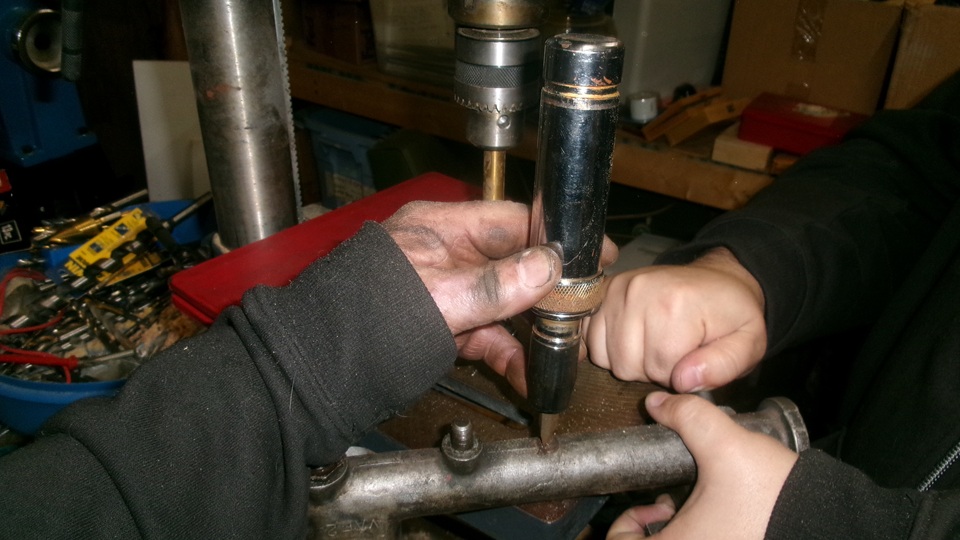
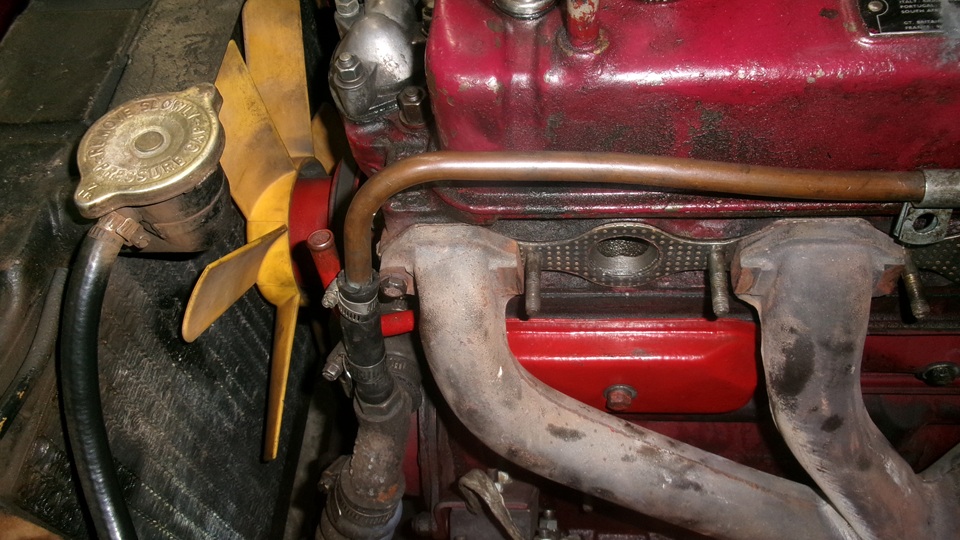
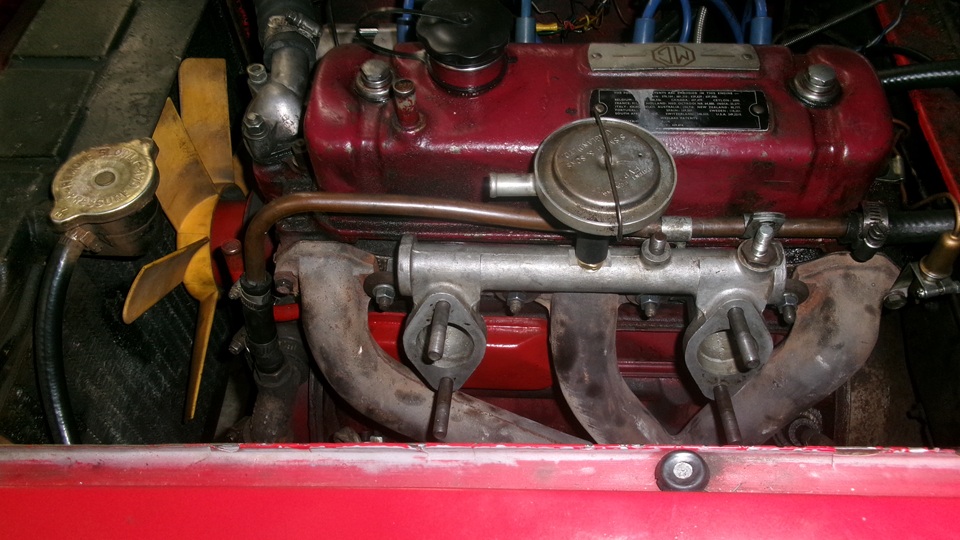
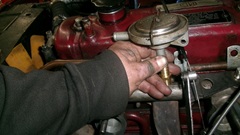
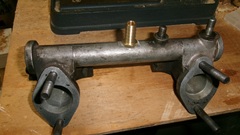
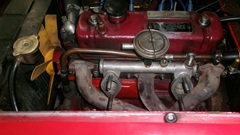
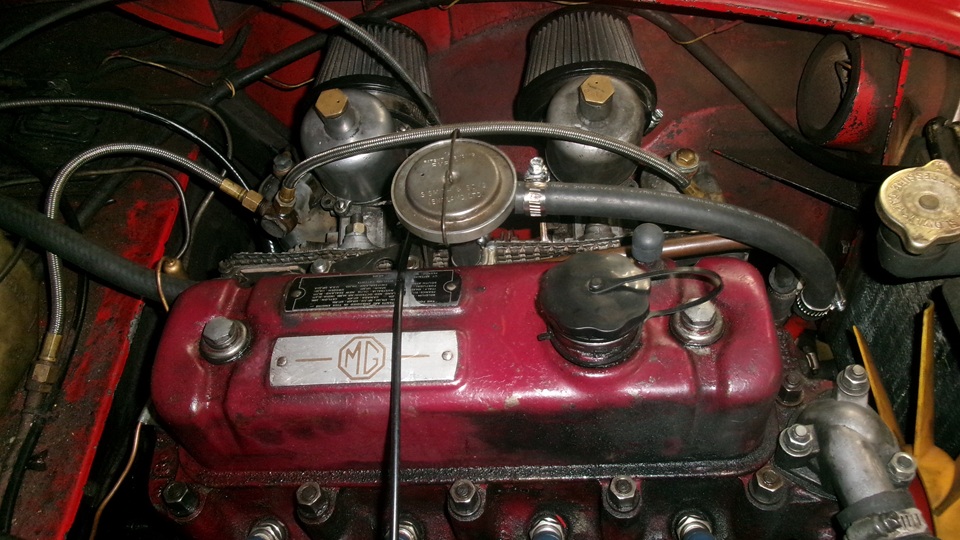
We got a mid morning start on removing the carburetors and intake manifold, ready to drill and tap a port in top center of the manifold for installation of a PCV valve. I needed to check to be sure there would be space for it there, or if I might want to locate it a bit more forward. Notice there is non-standard 1/8-inch pipe plug in this location. That takes a long step back in the WayBack Machine to when I had installed vacuum modulated Cruise Control in 1989 (removed in 1997).
Okay, just remove the little plug, and I won't have to drill a pilot hole here. Good location with enough space for the PCV valve.

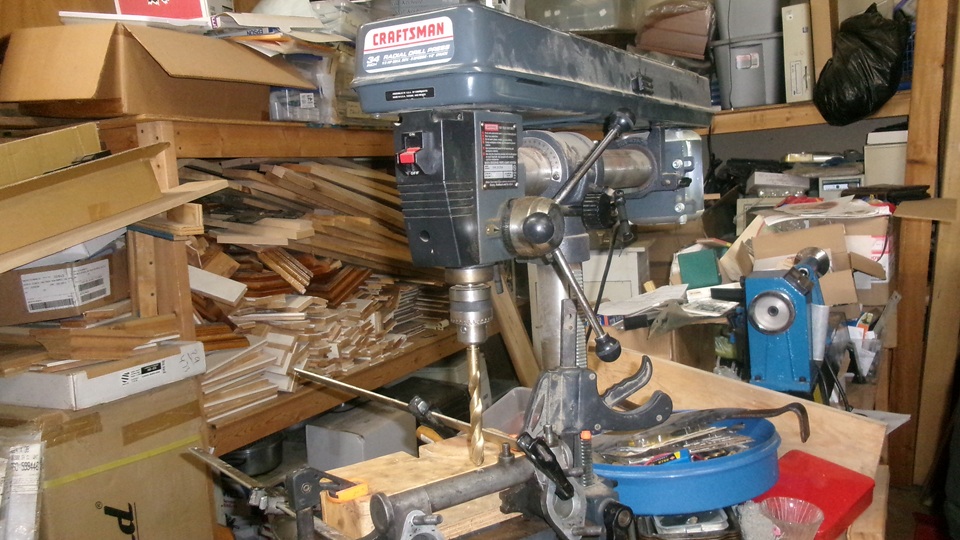
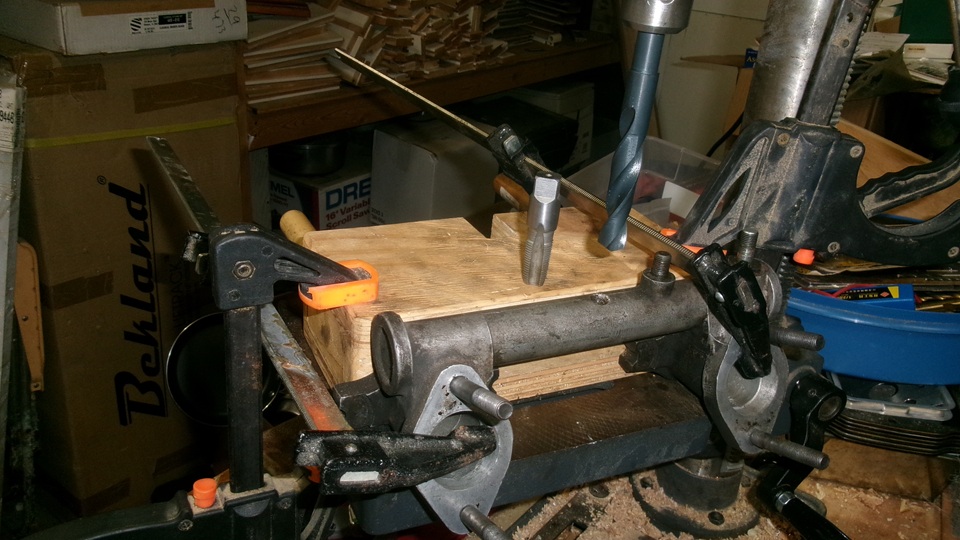
Setting it up in the drill press with a wood block and four clamps. Then we got to kick ourselves for not having in our possession
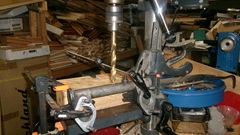
 the required 37/64" drill bit for tap drill for a 3/8" tapered pipe thread. Bummer. Navigator took a short walk to the Napa store to order one, which will be here at 8-am tomorrow. Dead in the water here, but we can work on the front tappet cover.
I know it is possible (just) to R&R the original MGA front tappet cover, but I wanted to check if it might be possible to install the thicker breather cover without removing the exhaust manifold. Well, of course not. At this point, just two bolts to remove the exhaust manifold, swap the front tappet cover, and put it back together.

Friday, November 7, 2025:
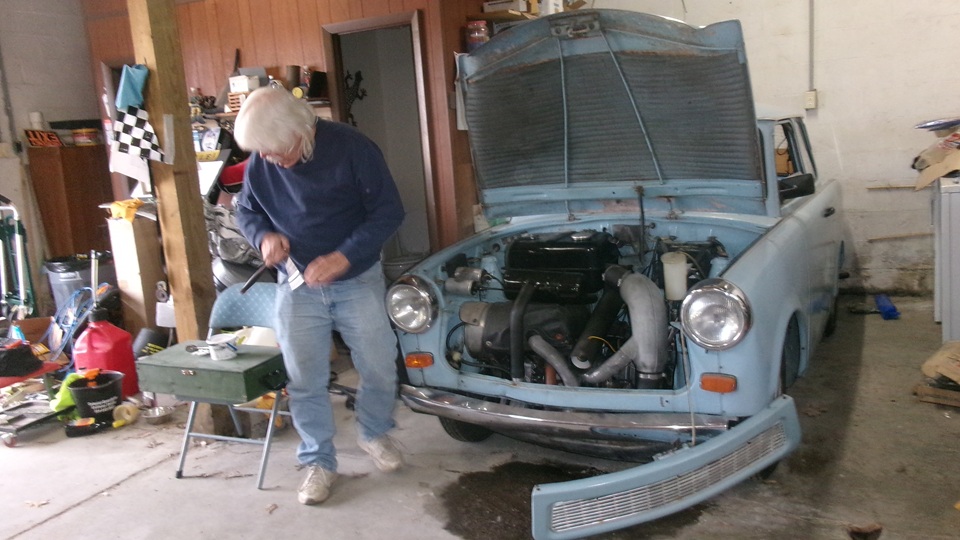
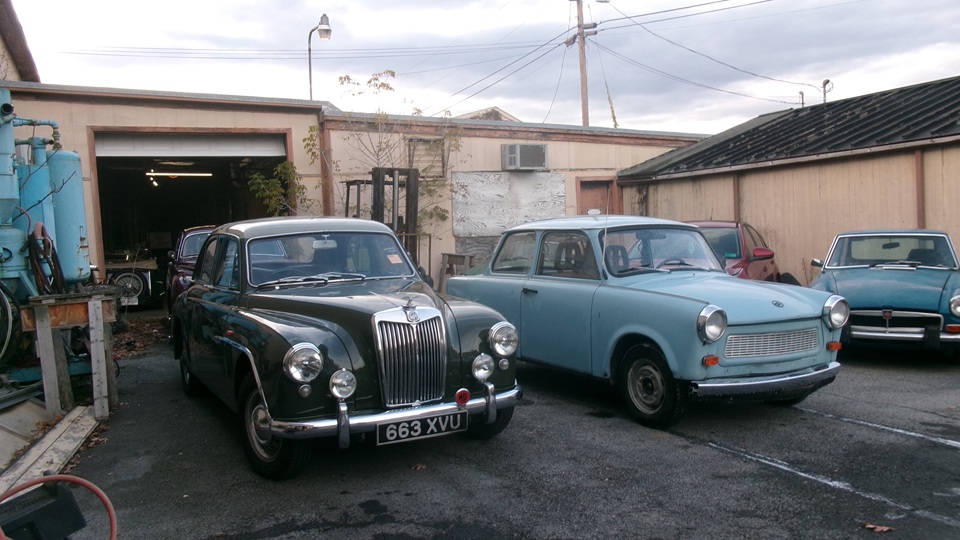
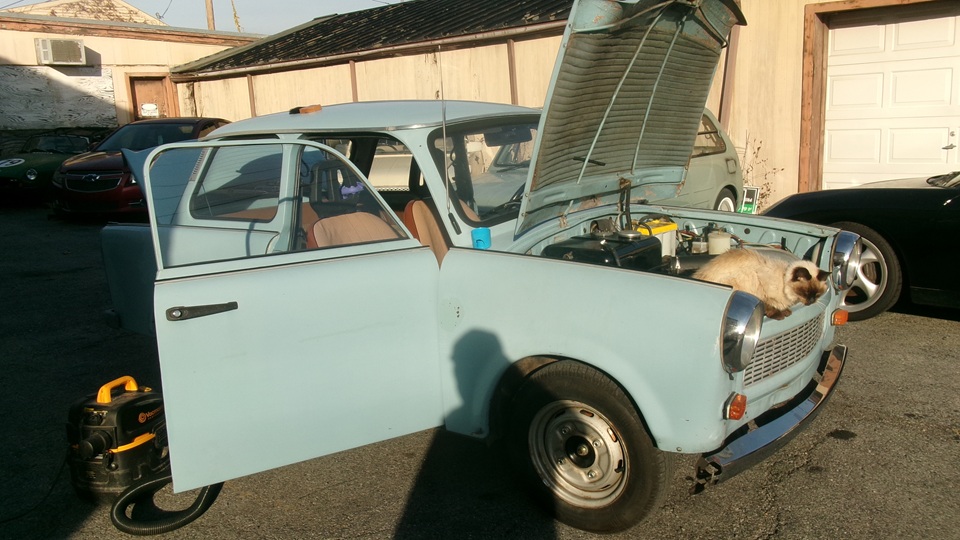
A little time this morning helping clean up the Trabant, spray-glue the bonnet liner, find some hubcaps, mix some extra two-cycle
 fuel, pack in the travel ware, and get it loaded on the flat bed trailer for it's week end trip to Washington, DC for the Trabant Drive Weekend. Navigator walked to Napa to pick up the special drill bit. When the Trabant entourage was on the road we could get back to work on that intake manifold.
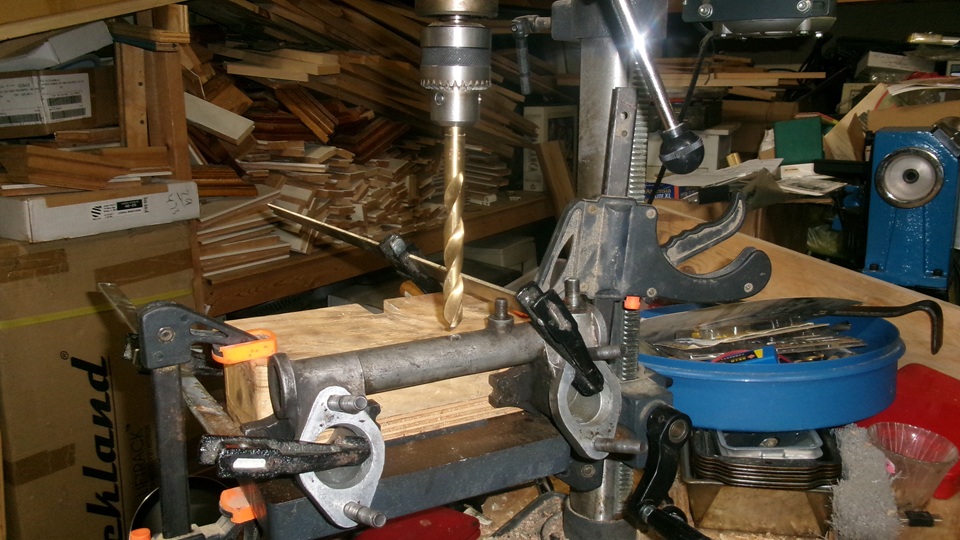
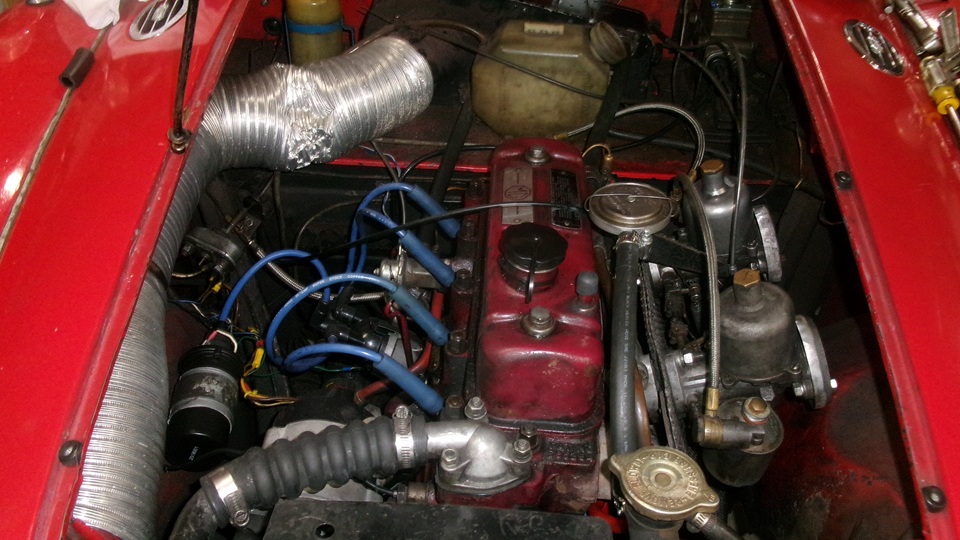
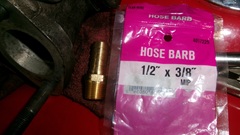
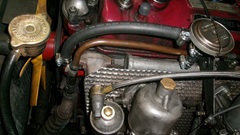
Grab the new drill bit, and off to the drill press. Drill the hole, tap the pipe thread, and install the hose barb. All of this was more troublesome than it sounds, but the job got done. Down to the shop to bolt the manifold in place, and slap the PCV valve on top for show-and- tell.

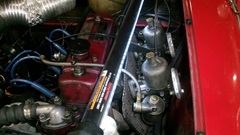
Before we forget, change the fuel metering needles from HB to #5 to match the change from 18G to 18GA engine configuration. Reinstall the carburetors, and clamp the hoses on the new PCV valve. Say goodbye to the old breather hose that used to connect the valve cover to the front air cleaner, install a vacuum cap on the valve cover vent port, and stow or throw the old MGA front tappet cover and draft pipe. With some more time in service, we will experience how much the PCV valve parts may interfere with regular maintenance around the valve cover heater return pipe, control cables bracket, carburetor linkages and carburetor tuning.


Michael Crews recently asked me, "Why do you want a PCV valve"? That's tough question, as it goes against my natural instinct to Keep It Simple, and this was a lot of work to make it more complex. That will have to be a discussion for another time.
Saturday, November 8, 2025:
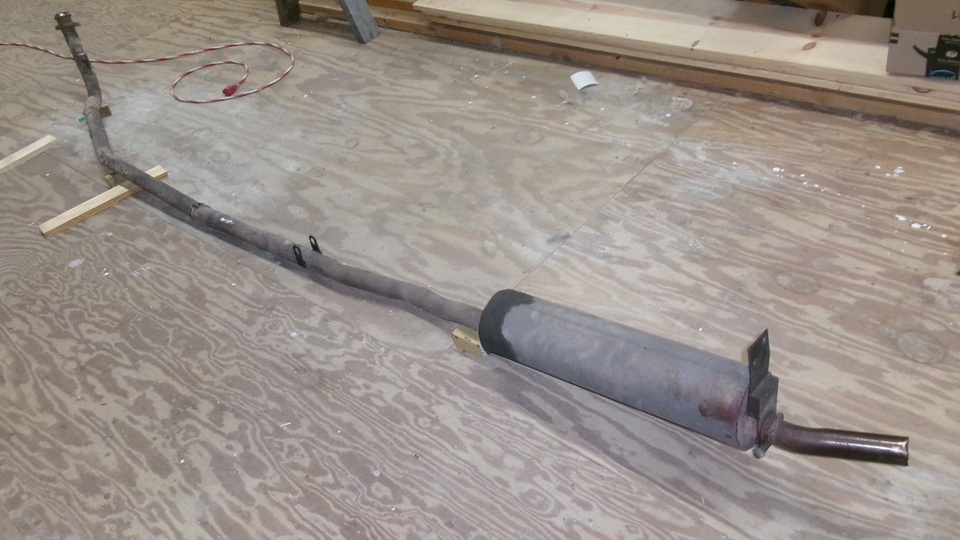
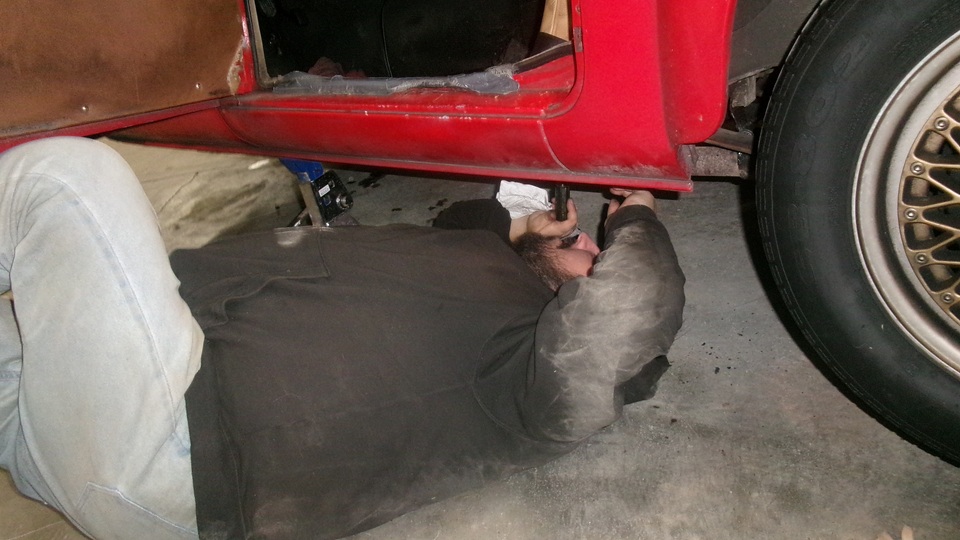
I finally got to sleep in, and late breakfast. Back to the garage by mid day to install the exhaust pipe and muffler. The car was
 already up on the left side, sitting firmly on a jack stand, 14-inches from the floor. It only took one suggestion to grab a larger jack stand to set it up to 16", and what a huge difference that extra 2" makes. Pull out a new donut seal and stick it on the front end of the pipe. Turn pipe on side to slide it under the car, then set it upright again. Put a creeper stool under the muffler for near correct height. Elliot was under the front of the pipe to align it with exhaust manifold while I placed the floor jack roughly under the center of gravity to hold the whole pipe and muffler assembly up negating he weight. Then I could hold and align the pipe while Elliot was positioning the front triangle plate and getting three nuts on it loosely. He's a veteran at that chore by now. Victory number 1.
Then it was a good time for Elliot's first battle at installing the rear hanger. Loosen the pipe clamp first so not to fight the alignment. Then lie on back looking straight upward while inserting the first short 1/4-inch bolt through the frame hanger, align the holes and push the rear hanger over the first bolt, and install a lockwasher and nut. If you have ever done this, you would understand the difficulty getting your hands into the tight spaces. and the importance of having free running threads. Nudge the pipe a little to align the second hole to install the second bolt in similar manner. Leave all of the bolts finger tight while assembling the front end and center hanger. Crawl out, stretch, relax for a moment while I pick up the new donut seal from the floor and hand it Elliot. Apparently it fell off while we were sliding the pipe under the car. Well,at least there were only three loose nuts on the front flange, as now you get to take it part to install the donut seal, and put it back together again. So he did. Another lesson from the School Of hard Knocks, which you will likely never forget. With all the bolts still loose, jack up the center of the pipe to install the last horizontal bolt in the center hanger assembly. Easy Peasy.
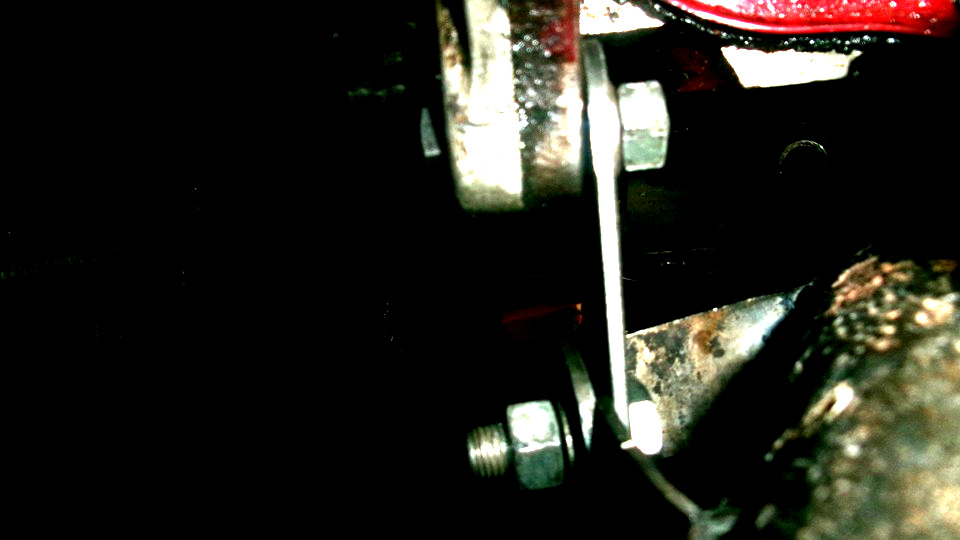
One more piece,needing to install, the new horizontal strap from lower bellhousing bolt to the down pipe L-bracket, just two bolts, but I think this is also Elliot's first try at this little chore. The strap attaches to front side of the engine rear plate extending due left. The strap goes inside of the down pipe L-bracket, with the bolt head also inside pointing rearward through the strap and bracket, with a large flat washer, lockwasher and hex nut on the back end. Having this loosely assembled, Elliot was reporting a large wedge shape gap between the strap and L-bracket, which was confusing him, thinking the bracket was welded on crooked. But the bracket was not changed during welding. So I crawled underneath for a look.
The new strap is 1/8" thick, while the L-bracket is 16 gauge, only half as thick. Another simple solution, just tighten the inboard bolt first, and the thinner L-bracket will twist to conform to the plane of the heavier strap. Another Easy Peasy, and everything ends up perfectly straight.
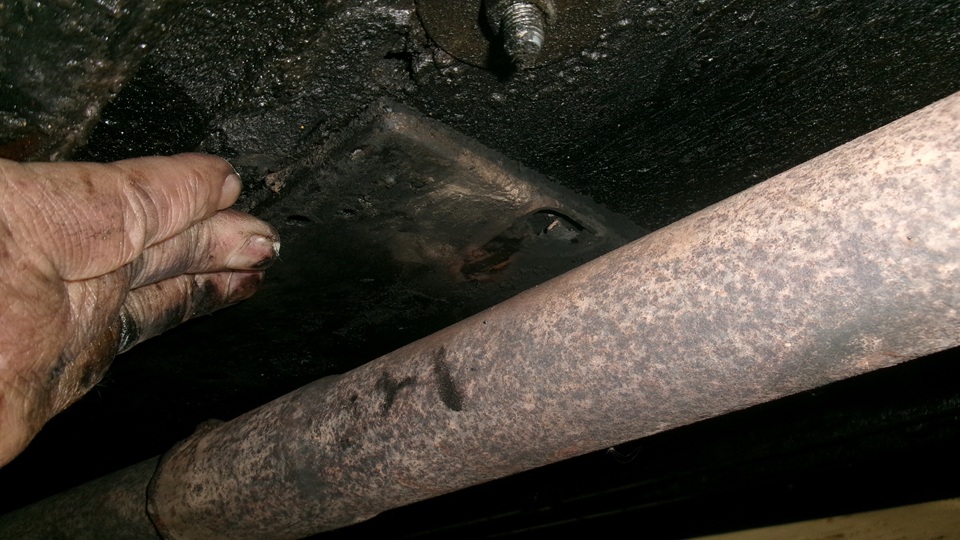
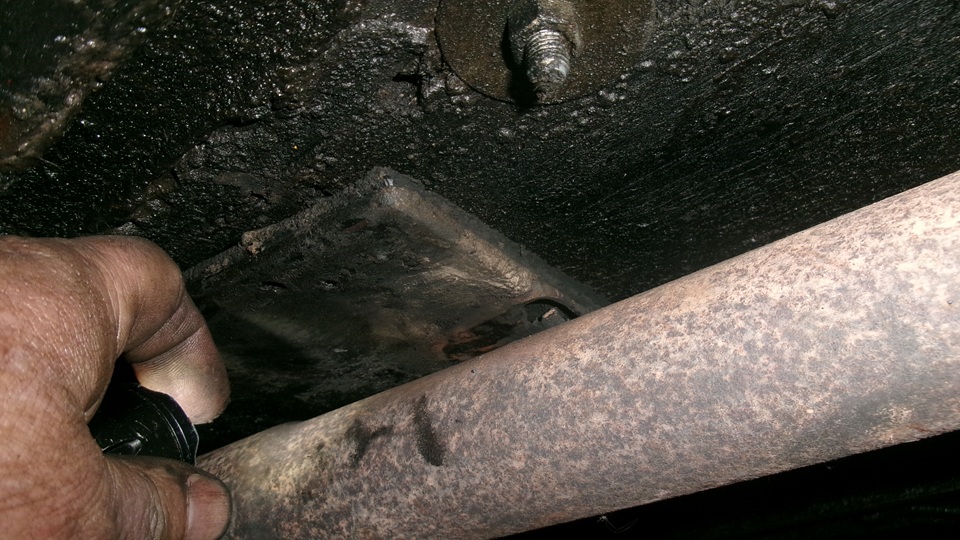
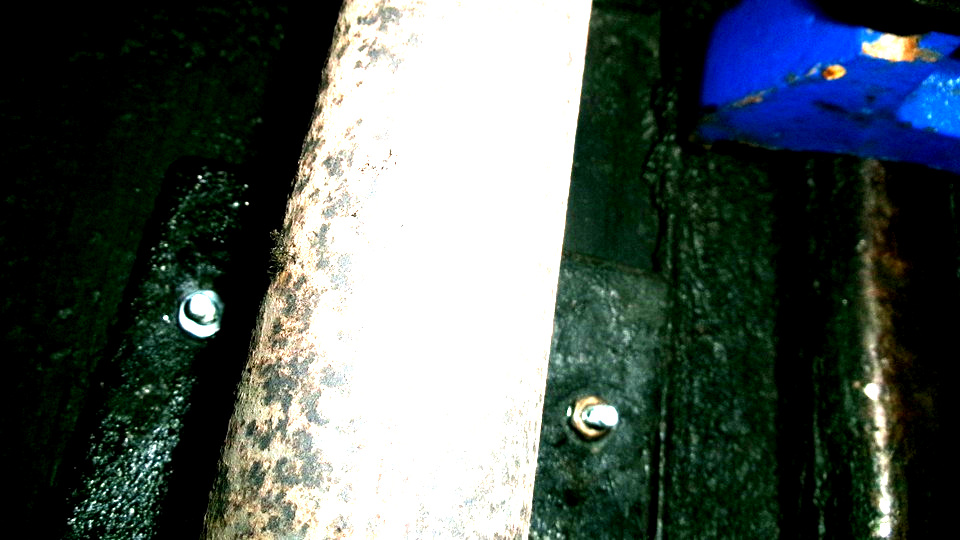
With the exhaust system finished I wanted to look to see what the pipe had been rubbing on to wear the hole in the top of the pipe. First I couldn't find my nice smooth weld on top by feel alone, but I knew it was about 15 inches ahead of the center hanger, so I used the tape measure.

 What I found there was the aft end of the floorboard heat shield lying on top of the pipe because only the front two screws were still holding while the rest of the screws had pulled out of the plywood. That will be easy to fix, intending to drill through and use #10 machine screws with flat washers and hex nuts, but not today.
Sunday, November 9, 2025:
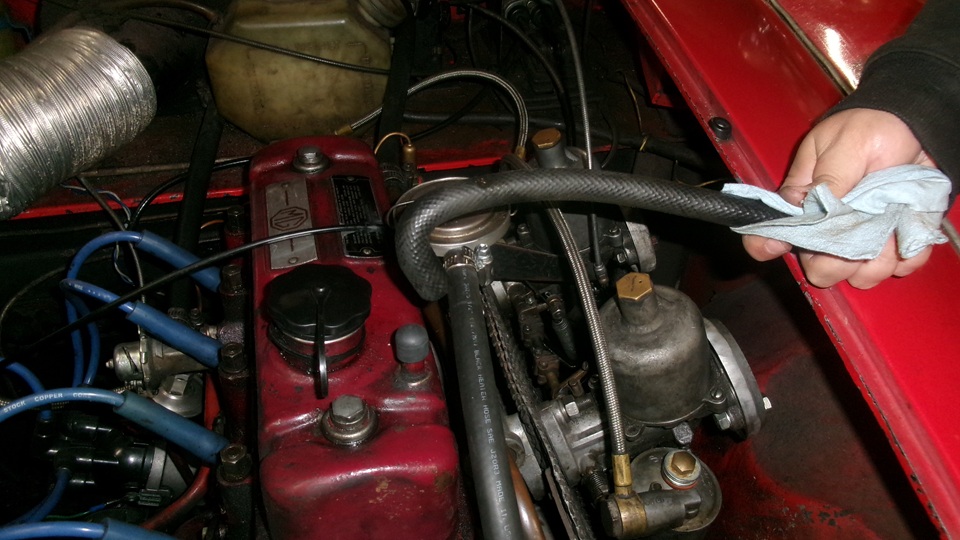
Put the air cleaners back on, and see how it may run with the new PCV valve. First no fire, which turned out to be a disconnected points wire on the distributor. But in the process I damaged the terminal end of the coil HT wire where it plugs into the distributor cap, and took a little time to fix it.When it did fire up it seemed to be running lean, so I began fiddling with fuel mixture and got it more screwed up. Back to basics, mixture nuts all the way up then back down two turns, and then it was running much better. Turn the idle speed back just a little, a side effect of the PCV breathing a bit into the intake manifold.

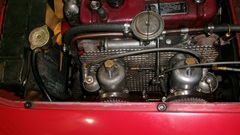

After a little fine tuning it was idling well, so we quite while we were ahead. I temporarily opened top of the PCV valve and lifted the rubber diaphragm a bit to verify good vacuum underneath. Also removing oil filler cap while running does increase idle speed, so the PCV system is indeed pulling air through the crankcase. After half hour running, shut down and check under the car, no drips on the he floor, which was one of the primary reasons for installing the PCV system. Score one for the good guys. And it is not going to foul up the air filter when there is no breather hose connected to the air cleaner. Pack away loose parts and tools, and call it a good day. The Trabant on the trailer made it back home by 7-pm. Must be some good stories there.
Monday, November 10, 2025:

If we did nothing else today, it was time to reattach the exhaust heat shield to the driver side floorboard. Remember, this was the part that had been loose and thumping around for a long time, long enough to wear a hole in the exhaust pipe that we had just welded up. If we put some screws in it now, we won't have to buy another one after it falls off. So we dug out some screws that might be long enough, drilled through the floor while avoiding the seat track mounting, and screwed it together with half a dozen #10 screws with flat washes up top and hex nuts underneath. That should hold it for another 30 years
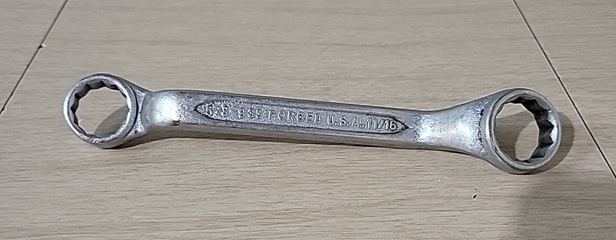
In the evening I was shopping on line, trying to find a replacement for a small wrench that had been missing for few months, which I did. -- Then it struck me to search for a different wrench that had been missing a lot longer. It was from a set of short
| |
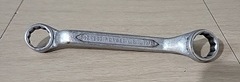
5/8 INDESTTRO SELECT 11/16
5/8 933 FORGED U.S.A. 11/16
|
offset box end wrenches, 35 years ago I was helping my oldest daughter Teresa (when she was 17) replace a leaf spring on an old Camaro . It was an access problem where this was the only wrench I had that could get into the tight spot, but it wasn't long enough for sufficient leverage. So I bit the bullet, sacrificed the tool, cut one end off, and put a pipe on the wrench for longer handle. That did the job, and we did get the new leaf spring installed. Alas,the wrench I cut in late 1987 was already a vintage tool out of production since the late 60's, and I have never been able to find a replacement for it, until now. Reading brand name and part numbers from the remaining three wrenches, we were able to find the part number for the missing wrench. Then it ws a short internet search to find one offered on eBay for $3.97 plus $5.72 for shipping. Wow! I can't believe I am going to replace the wrench that has been missing for 35 years.
Tuesday, November 11, 2025:
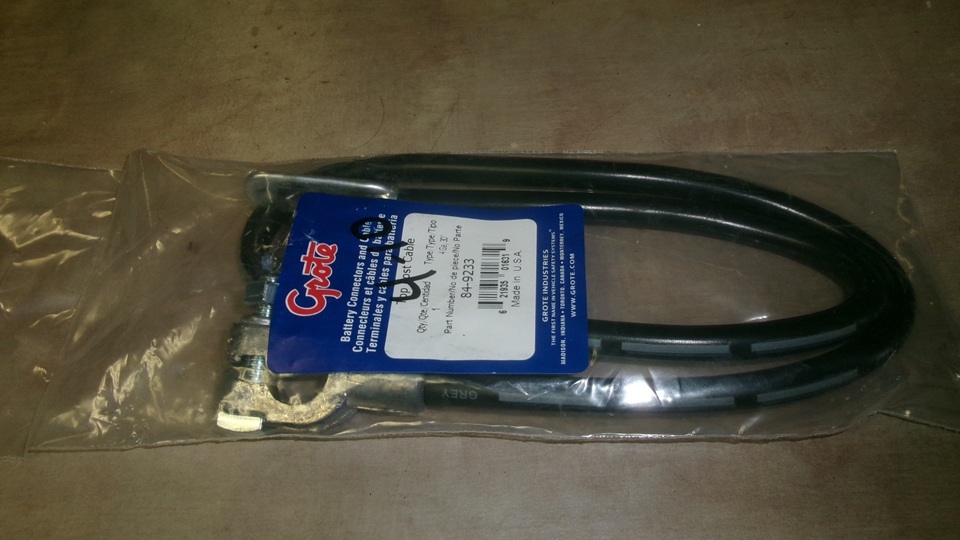
Continuing yesterday's saga, I was searching for and ordering more stuff last evening, but it got too late for same day shipping, so arrival date would slip from Friday to Monday, and I didn't want to wait hat long. So I signed up for a 30-day free trial of Amazon Prime membership, and the arrival date changed to Thursday. Cool. So I ordered nine items from Amazon, including a 30-inch battery ground cable and a box of 5/16-24 KEP nuts, 100 pieces. All said and done, and payment complete, it turned out that the last two items were not shipping from an Amazon Fulfillment Center, but would ship from different third party locations with later delivery dates (still free shipping). Well those later items are for spare parts, not urgent, so we'll settle for that.
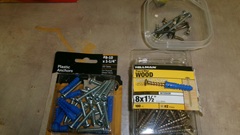 Then we got the MGA out for a cold after dusk run to Walmart for minor supplies, including some plastic anchors and wood screws to fix loose house door hinges. This would be first trip out of the garage after installing the PCV valve related parts, repairing the exhaust system, and reattaching the heat shield. Happy to report no more exhaust leaks, and the dull rattling noise has been banished. It started without choke, only needing a tiny pull for fast idle until it warmed up. Otherwise it runs just fine with the new PCV valve and correct matching fuel metering needles. Bully! After the 10 mile run in town, it will sit for a couple days, so we can check again to see if the PCV valve will banish the oil drips .(fingers crossed).
Wednesday, November 12, 2025:
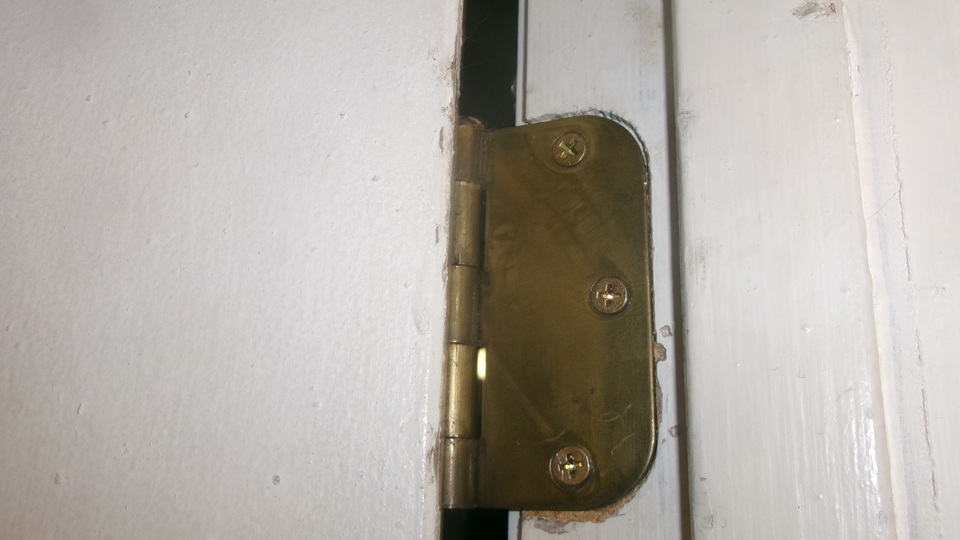
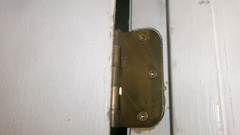
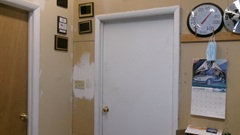
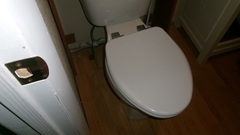
Having a couple more days to wait, we like to find something useful to do. So we took the opportunity to install 9 plastic anchors and18 new brass screws to repair the saggy door hinges. Success there too, now the door opens and closes with one finger. Also replaced a broken toilet seat, all of these jobs being way easier than working on the car.
Thursday, November 13, 2025:
Tracking info was spot on as he Amazon order arrived in four separate packages, all in one stop. One of those items came from a different Fulfillment Center, being shipped FedEx to arrive on 2nd day (a few hours later) along with the Amazon truck delivery. Unfortunately one item (battery cable) was coming from an independent 3rd party and was shipped via USPS, scheduled for 3 to 7 days delivery. So much for Amazon Prime. Apparently it only applies to items shipped from an Amazon fulfillment Center (in stock in the Amazon warehouse). The stubby box wrench I ordered one day earlier from eBay was shipped on 2nd day after order, also via USPS with 3-7 days anticipated delivery, and I don't think we will still be here a week later, so may have to leave that one behind.
Friday, November 14, 2025:
Unwrapping yesterday's deliveries, all seems to be in order, and we were packing spare parts away in the Magic Trailer. Then checking tracking info for the last two parts, I see the battery cable has just arrived mid day today via USPS. Whoopee. Another glimmer of hope that the last wrench from eBay might likewise arrive three days after shipping, hopefully tomorrow.
While we were playing with spare parts and new tools, our host Michael Crews and another friend were on a short road trip to Roanoke, Virginia to check out some vintage British cars for sale. This is from the now closed shop Union Jack (owner deceased) in Roanoke, Virginia. There are currently 72 cars listed for sale via internet auction bidding, such auction to close in two weeks. The cars are located in Troutville and Montvale and Roanoke, Virginia. There are actually many more cars available but not yet listed separately,. Some may be less than complete cars, but there are likely enough parts available to put together complete cars. If interested check www.woltz.com.
Saturday, November 15, 2025:

Checking messagers and tracking information. We have collected the battery cable that came in yesterday. The last wrench in transit seems to be taking the long way around, and wil not arrive before Monday earliest, and we don't want to wait another 2 to 3 days, so it seems to be time to get back on the road. Clean up the place, say goodby to the cats and to our host Michael, and we depart. Heading for Lexington,South Carolina, but got tired driving and stopped near Fort Mill, SC. Check back tomorrow.
|
 What I found there was the aft end of the floorboard heat shield lying on top of the pipe because only the front two screws were still holding while the rest of the screws had pulled out of the plywood. That will be easy to fix, intending to drill through and use #10 machine screws with flat washers and hex nuts, but not today.
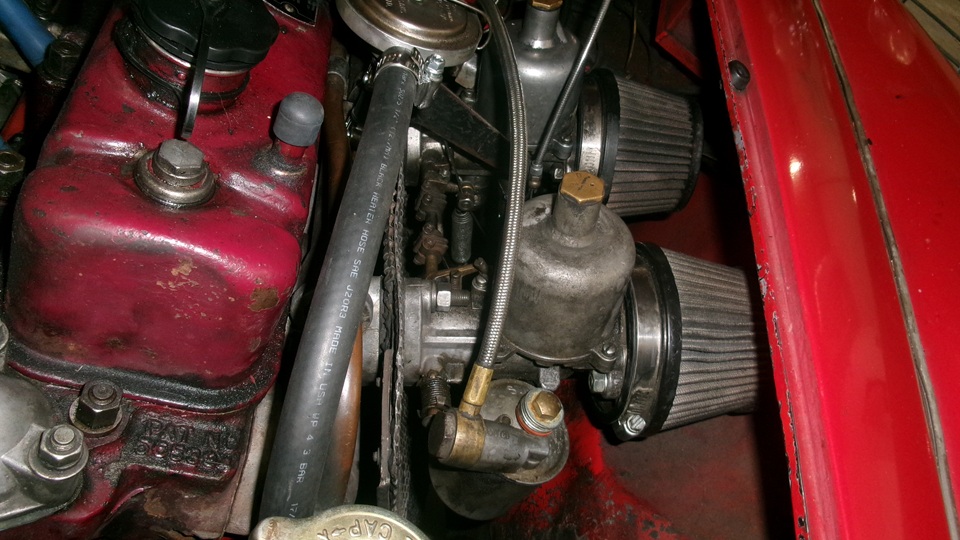

 Then we got the MGA out for a cold after dusk run to Walmart for minor supplies, including some plastic anchors and wood screws to fix loose house door hinges. This would be first trip out of the garage after installing the PCV valve related parts, repairing the exhaust system, and reattaching the heat shield. Happy to report no more exhaust leaks, and the dull rattling noise has been banished. It started without choke, only needing a tiny pull for fast idle until it warmed up. Otherwise it runs just fine with the new PCV valve and correct matching fuel metering needles. Bully! After the 10 mile run in town, it will sit for a couple days, so we can check again to see if the PCV valve will banish the oil drips .(fingers crossed).