The MGA With An Attitude
WATER PUMP Rebuild #1 - MGA Twin Cam - TC-305A
On 9/9/2019, Mick Anderson wrote:
"In the Twin Cam water pump what is the purpose of the circlip Part Number AEH529 (item 21 in the SPL)? What would happen if you left it out"?
That would be the large circlip just forward of the rear bearing.


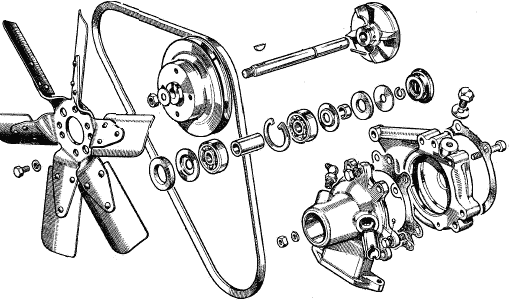
DO NOT REMOVE THE LARGE CIRCLIP. The large circlip holds the rear bearing in the housing, preventing the entire inner works assembly from moving forward.
Consider the assembly sequence, and how the bearings work. The rear bearing goes into the housing first, placed against the shoulder in the housing, to be secured in place by the large circlip, preventing fore/aft motion of the rear bearing. This will ultimately retain position of the spindle.
Then assemble onto the spindle the parts aft of the rear bearing, Dust cover, Collar, Felt washer, Dust cover, and Circlip. Push the spindle in from the back until all of these parts bump up against the rear bearing inner race (determining final location of the spindle).
Install more parts from the front, Distance piece, Front Bearing, Dust cover, Felt washer, then the Spindle key, Fan pulley, Lockwasher, and Nut (or possible flat washer and lock nut). The pulley serves as the front dust cover, touching the front felt washer. One detail that is not obvious is that the central hub of the front pulley must bear against the front dust cover and front bearing inner race, so you can tighten the nut to secure all of the internal parts onto the spindle. Either the pulley will have a small central protrusion, or there would be a short collar (with a keyway) missing from the illustrations. The pulley is not free floating on the shaft, it must pull down tight.
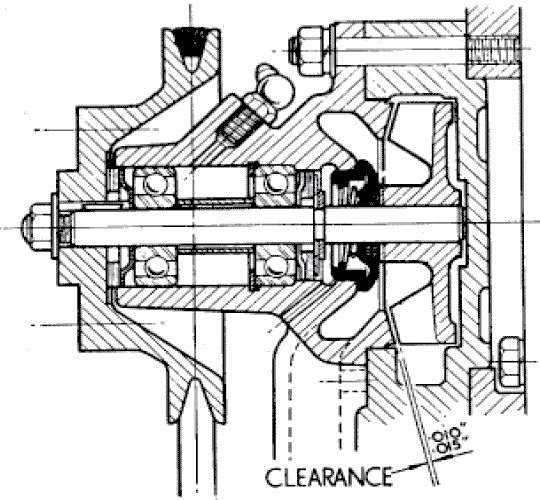
The front bearing is not axially located in the housing, but it is axially secured on the spindle. Everything on the spindle is clamped securely between the small rear circlip and the front nut so it all turns as a single part. That assembly is positioned and held in place in the housing by the large circlip at the rear bearing.
Finally install the rear seal and the vane (water impeller) and the cross pin to secure the vane. Specification is for 0.010 to 0.015 clearance between the vane and housing. If the holes for the pin were not pre-drilled, you can position the vane before cross drilling the hole. If the holes are pre-existing, then you may adjust length of the rear collar to get the required clearance for the vane.
Now for a bit more information that was not requested.
For this early version of the water pump the bearings are slip fit on the spindle and in the housing, so it is field serviceable. It can be disassembled and reassembled with hand tools, so given the correct rebuild kit you might do it on the side of the road (if required). This unit may have a grease fitting or an oil plug. Remove the plug to inject oil and replace the plug. Some may have had an oiler with a spring loaded lift cap, just lift the cap to add oil.
With the grease fitting, if you inject too much grease it can push grease past the felt washers, leaking out the front and/or possibly blowing out the rear seal which would allow coolant to leak past the seal. There should be a drain port in bottom immediately forward of the rear seal. If the drain was clogged with grease, leaking coolant might go forward through the bearings, which could cause failure of the bearings.
When bearings fail first, it will commonly make rumbling noise well in advance of ultimate failure. When bearings do fail the resulting misalignment and movement of the spindle will then causes seal failure, so you lose the coolant. If the seal fails first it will most likely lose the coolant before bearing failure. If you add coolant and continue to drive it when leaking, then coolant contamination will ultimately ruin the bearings. That is, bearing failure causes seal failure, and seal failure causes bearing failure, so bearings and seals need to be replaced at the same time.
Later in production (or some aftermarket replacement parts) the water pump design changed to a one-piece cartridge bearing. Those are commonly pre-packed with grease and sealed for life. In that case, "sealed for life" means that you can't grease it, and when it fails it is end of life. But in the modern world labor is more expensive, so tradition has changed to replacement rather than rebuild (also trending toward zero maintenance).
|