The MGA With An Attitude
Installing FENDER PIPING -- BD-115
At 08:20 PM 4/15/06, Chris Lake wrote:
>"We have come to the time of the restoration of installing the fender piping. .... Would you please be able to provide some advice ...."


Before fiddling with piping you should have all alignment of body panels finished. Unfortunately this means you have to loosen the bolts to install the piping, so there may be some work to retaining the desired fender alignment in the process.
For the front fender, leave the bottom edge of the fender attached to the sill. Also leave tight the bottom bolt in the vertical line of bolts inside the kick panel area to retain the preset height of the fender. Also (to begin with) leave a few bolts (at least one) secure at the front of the fender to maintain alignment there until you get along to working in that vicinity a little later. Loosen all of the other bolts in the kick panel area and along the top of the fender enough to open a gap between the panels sufficient to insert the web of the piping. Gravity acting on the fender will help to open the gap.
Start installation of piping near the windscreen post, and proceed progressively forward from there. For the roadster there is a discontinuity in the joint where the fender steps out to go around the windscreen post. Here the piping aft of the post will be a separate short piece. You can cut and install that piece first, but leave the bolts there a little loose to allow subsequent installation of piping ahead of the post.
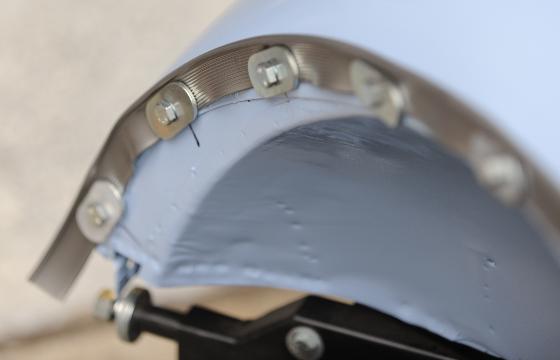
Only a masochist would attempt to punch round holes in the piping and remove each bolt. Instead cut a "U" shape in the piping web. As a matter of convenience, a squared off "U" cut out is acceptable. Look closely at the distance between the top corner of the body parts and the top of each bolt. When cutting the notch in the piping leave as much web as possible above the bolt, such that the web will touch or nearly touch the top side of the bolt when installed. This is to keep as much surface area as possible of the web to reduce the tendency for the web to squeeze out of the joint as the bolts are tightened. You may cut two or three notches in advance, but don't get too far ahead, as it is tricky to guess exactly where the web will lie when finally get to working a few bolts farther up the line.
Take a close look at the cross sectional shape of the piping.. The word "piping" is a bit of a misnomer. That word originates with a different form of packing trim such as is used around the cockpit trim rails. There the piping is formed with a piece of fabric wrapped around a round cord in the form of a "pipe" or thin wall tube. The fender packing is molded as one piece more in the form of a "T' with a flat underside, crowned on top, and terminating at the sides with a thin and flexible edge.
When you place this special molded packing piece in the joint and pull things properly together, the thin edges should lay down securely against the body surfaces on both sides with a bit of a preload. This is accomplished by pressing down on the top of the packing to push the web farther down into the joint as the bolts are tightened. This results in the wings of the "T" flexing with a bit of resilience to lay securely in contact with the body parts with a bit of spring tension.
You will need to hold the piping top in firm contact with the body as the bolts are progressively tightened to hold the piping in place. To prevent the piping from locally bulging upward, hold it down very firmly right over the bolt during final tightening of the bolt. If final tightening should result in a bulge of the piping at this point, loosen the bolt, press the piping down again, and re-tighten the bolt. Repeat as necessary to assure there will be no bulge when finished. This is one of those very minor appearance item which can make the difference between a professional looking show car or an amateur looking bodge. People will be looking at this for years to come, so it pays to take enough time and care to get it right.
Do not tighten the bolt to maximum torque until you have progressed one or two bolts farther along the line. Then go back a couple of positions and snug up the prior bolts as you go. You will in essence be working with two or three bolts at any one time. As you progress closer to the front of the fender you can loosen the last few bolts in front as you approach. By that time the bolts previously installed will be retaining alignment, and the front end of the fender should require no more than a little nudge into place as the last bolts are tightened to finish the job.
Installing piping for the rear fender is a similar procedure. Here you will need to remove the shut face panel, which requires removal of the latch striker and rubber door buffers. Again leave the bottom edge of the fender attached to the sill, and leave the last few bolts at the rear secure until you will be working in that area near the end of the job.
Start at the front adjacent to the door post. Trim the bottom edge of the piping web to fit above the door post and make notches in the web for the first few bolts. As you set the first part of the piping in place an tighten the first bolts, reinstall the shut face plate to determine trim and fit of the piping at the front end. The piping should come about flush at the front of the joint but should not protrude so much as to leave a grossly exposed tab.
Once the front end of the piping is finished, work progressively along the rear fender joint as described above for the front fender. When approaching the back you can loosen the last few bolts as required to finish the run. Final alignment may again call for a slight nudge at the back end of the fender as the last few bolts are secured.
For suitable results you pretty much need the wider piping, and thicker is also better. The main body flange and the fender flange are intended to be flat and parallel. Tightening the bolts too much will compress the web of the piping causing the fender flange to deform. This can result in deformed fender along the piping joint, and piping being squeezed out of the joint. Wider and thicker piping causes less problems. Certainly use the original type wide oval washers.
Do not over tighten the bolts. Each bolt could have thousands of pounds of tension, but each bolt carries only about one pound of the panel weight. Tighten the bolts just enough so they won't rattle loose. You can do that easily with a 1/4" drive ratchet handle and your finger tips. You could do it with a nut driver if there was enough space to use one. When the helical spring lockwasher goes flat, that's tight enough.
When you have given your best effort to this job you might be very proud to have a show car appearance. If it's not perfect you might still realize that it may be better than the original factory installation. If you are not entirely satisfied with the end result, you will know who you have to complain to and coerce into fixing it. In that case you should keep in mind that it is likely easier to do it right the first time than to have to do it over again for final improvement.
At 09:28 AM 5/20/06, Doug Sjostrom wrote:
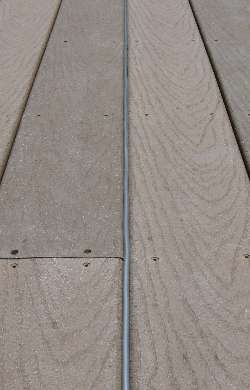
"To get the coil kinks out of new fender beading I place it into the cracks between two deck planks and let the hot sun work its stress relieving magic."
For those without a wood deck, any two straight boards lying in the sun might do as well.
After my 2007-2008 body sill replacement job, I have further photos and notes on fender piping installation here: RT-623A.
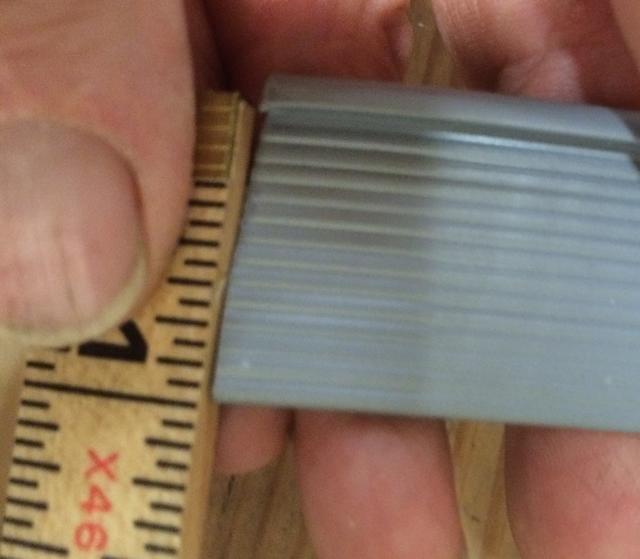
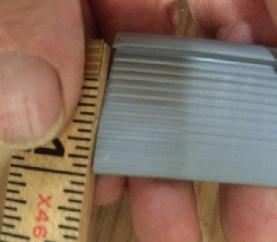
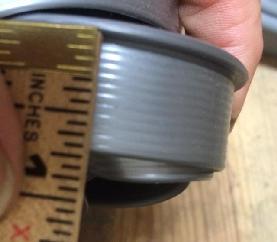
 The correct piping will be silver-gray in color, thick enough to be fairly stiff, and tall enough to cover most of the width of the fender bolt flanges. When a bolt is tightened the flange comes to bear against the flat of the piping holding the piping and the fender securely in place. Some incorrect aftermarket piping is darker in color, somewhat thinner and flexible, and shorter in height.
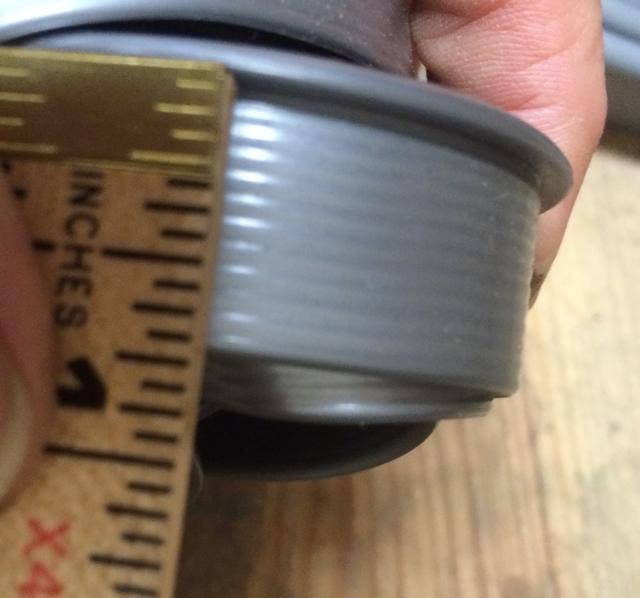
Addendum September 2011:
Garry Kemm in Victoria, Australia, found one piece of NOS BMC piping which measures 0.260 inch wide and 1.0 inch deep overall including bead. AND it has the holes pre-punched.
Correct piping is currently being sold by Bob West in the UK and others who buy from him. However, current replacement piping is usually supplied off the roll, not having pre-punched holes for individual applications. OEM piping was cut to fit individual applications and did have pre-punched holes (making for lots of different parts numbers and huge inventory problems).
On 3/1/2014, Ian Moodie in Scotland wrote:
"I received a roll of wing piping from Moss's Bradford branch and was disappointed to discover it is inferior to the piping I hoped it would replace, particularly after having been told at the time of order that Bob West used the same piping. The upright of the T is 17mm in comparison to 22mm for my car's original piping. In addition the supplied piping looks far less substantial in cross section to that in your photo".
Addendum September 2011:
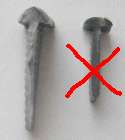
This is a good picture of "the wrong stuff". This is the type of piping being sold by Moss Motors since three paint jobs back on my car (sometime prior to 1998), and most recently also provided by Scarborough Faire. Too narrow, too thin, too soft, and guaranteed to turn black with exposure to the environment.
Addendum August 22, 2019:
On Aug 22, 2019 Jim Cheatham in Amelia, VA, USA wrote:
"I used fender welting from Bob West in England. His is the best and the closest to the original Ive seen. The flange on Bob Wests is almost a full 1 where Mosss is not quite 3/4.
|