The MGA With An Attitude
At 07:10 PM 4/24/2009 -0600, Mel in Huntington Beach, CA, wrote:
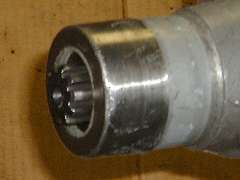
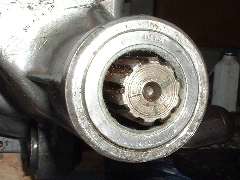
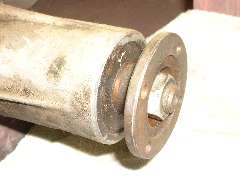
The early type external seal is the trickiest to change. It is crimped into an external groove in the tail housing. Easiest way I know to remove it is to use a grinder with cut-off disc to grind away the indented spots to free it from the groove, and then knock it off. This is easy enough to do with gearbox on work bench, but tougher for access in the car (although I have done it once). You may be able to get a pipe wrench on it to rotate it around the housing for better access to the crimped spots. To install the new one, position it over the end of the housing, put a flat board behind it, and tap on the board with a 2-pound hammer. Be careful to keep it going straight in the process. If you hit directly on the metal seal housing it will likely dent in local spots and deform the shell. Being somewhat superstitious about such things, I tend to apply a little RTV sealant between the shell and the tail housing to be sure it won't leak at that joint. Once fully seated to the shoulder on the housing, use a hammer and punch to indent the shell into the groove in the housing in two or three places. The later type internal seals are generally easier. You have to pry the old seal out of the housing while the splined shaft is still in place. A hooked seal puller or a hook fixture on a slide hammer may work. Another way is so drill a hole in the face of the seal shell fairly close to the outer perimeter, screw in a big wood screw or sheet metal screw, and pull with a slide hammer or pry bar. Installing the new seal is a cinch; just tap it in evenly with a flat face hammer until it is flush with the end of the housing. When replacing the rear flange on the later style gearbox you might consider putting a dab of RTV sealant on the lockwasher during reassembly, as it might leak oil through the splines. Installation of propshaft is reverse of removal. With the later 2-piece propshaft be sure the cross axis of the two universal joints are oriented parallel. See here: http://chicagolandmgclub.com/driveline00/0404/drshafts.html. If not, undo the packing nut, pull the front yoke off the spline, rotate it to be parallel with the rear yoke and reassemble it. The 4-hole bolt pattern on the propshaft flange(s) is a rectangle, not square, so it only goes one of two ways 180 degrees apart (either way is fine). Be sure to use self-locking nuts on these bolts (5/16-24-UNF). Common Nylok nuts (aircraft nuts) work okay but may be good for only a couple of times before needing to be replaced. Original nuts were all-steel stiff-nuts. These can be re-used several times, as long as there is some prevailing torque (cannot turn with your fingers). There are other types of self-locking nuts. I would not recommend regular free-spinning hex nuts with lockwashers, but if you feel so inclined, be sure to use new lockwashers every time. |