The MGA With An Attitude
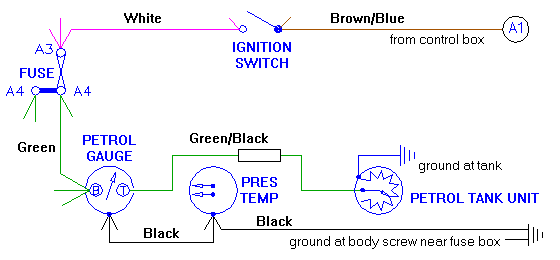
SPECIAL NOTES ON PETROL GAUGE WIRING - FG103
To function properly the petrol gauge must have power and ground at the gauge, and it is very sensitive to incorrect resistance in the circuit from the gauge through the tank unit and on again to ground.
First the easy fix -- ground the tank:
Once upon a time I installed a non-stock fuel pump on my MGA, one that hooked up to the fuel lines with rubber hoses. All was fine for a long time. Several years later my fuel gauge readout started to drift upward very slowly and gradually over time, until it wouldn't budge from the full mark until it was down to 3 gallons in the tank. Then it decided to stay permanently on the full mark, even when the tank was empty.
It turned out that the fuel tank wasn't grounded well enough. You know, the tank that's mounted with rubber packing in the suspension bands, and a rubber hose in the filler pipe, and maybe a rubber hose to the fuel pump. The only ground connection for the fuel sender unit was through the steel fuel line between the tank and the fuel pump, where that line is fastened to the frame with a couple of "P" clips. Well the "P" clips were gradually getting dirtier and rustier until with the resistance in the ground circuit added to the resistance of the sender unit, the gauge was reading too high. Easy enough to diagnose, when I put a jumper wire from the steel fuel line on the tank to ground on the frame the gauge went to "E" like it should (less than 1/2 gallon of fuel in the tank).
I took the sender unit out of the tank just long enough try it with a ground jumper wire and to measure the resistance. The sender unit measures 70 ohms when the tank is full and 0 ohms when the tank is empty. With the gauge wire hooked up and a jumper wire from the sender to ground everything works dandy, with a nice smooth gauge motion from empty to full and back as the sender arm is moved up and down. So I just put it back together and added a ground wire from one mounting screw of the sender unit to the ground screw right nearby on the frame.
For future reference, all you MGA folks out there should make a note somewhere that the MGA fuel sender unit should read 70 ohms with a full tank and 0 ohms when empty. If you take the wire off of the sender unit and touch it to ground, the gauge should read exactly on the "E". With about 70 ohms of resistance the gauge needle should be pointing at the "F".
Then the tougher fix -- recalibration:
Recently a Morgan owner posted a note about adjusting the fuel gauge, recommended against trying it, said it took him a month of fiddling to get it back near the original mode of operation. But I'm a crafty little devil, so I might try it anyway. The gauge gets power from the ignition switch and the controlling wire goes to ground via the sending unit in the tank. Also the gauge must be grounded. The sending unit varies the resistance to control the current. All this is very standard stuff, except, .....
Inside the gauge there are two magnetic coils. One is wired from power to case ground and pulls the needle towards the F side of the gauge. The other is wired from power to the sending unit and tugs the needle in the other direction, supposedly pulling it all the way to the E mark with an empty tank. The mechanism is supposed to be adjustable by way of slightly moving the fixed current coil inside of the gauge, thereby affecting the magnetic balancing effect. The Morgan guy said it was a major bitch to get it anywhere near right.
[Wishful thinking mode ON]
If I ever get around to trying it, I have my own approach. I have already bought the gasket kit for the sending unit. I would run it dry or drain the tank, then add one gallon of gas at a time, map the position of the gauge needle for each gallon. Then (after removing the gas again) remove the gauge and the sender unit from the car and mount them in a bench jig in the proper orientation and with a battery to power it. Then move the sender arm a little at a time to make the gauge repeat each of the previously mapped 1-gallon increments, and map the position of the sender arm for each step. Then having a good reference to where the sender arm should be for E, 1/4, 1/2, 3/4, and F, it should be easy enough to adjust the gauge accordingly while still on the bench. For instance, position the sender unit arm where it should be for a tank half full, and then adjust the position of the coil inside the gauge to make it read "1/2".
[Wishful thinking mode OFF]
There is also an easier way to calibrate the gauge if you think you can trust the sending unit to be working properly. You will need a couple of small resistors, one about 70 ohms and the other about 35 ohms. Disconnect the tank wire from the back of the gauge and install a jumper wire from the T terminal to the case ground. This should make the gauge go to Empty. Replacing the jumper with a 70 ohm resistor should make the gauge go to Full, and using the 35 ohm resistor should make it go to 1/2. If the gauge isn't giving those readings with the specified resistance, then you might try moving the adjustable coil inside the gauge. I suspect this would be a lot easier done with the gauge removed from the car and hooked up independently to a battery.
Follow these links for details about Fuel gauge function and Fuel gauge calibration.
Have fun tinkering.
|