The MGA With An Attitude
LOW OIL PRESSURE, Investigation and Cures -- OF-102A
At 12:45 PM 8/12/2009 -0400, you wrote:
>>"I reset the idle to 1000 and the oil pressure drops below 20 psi".
Not good.
>>"It stays above 20 psi at 1100 rpms. It seems to be real sensitive to rpms. When I barely touch the throttle the oil pressure will change accordingly".
That's normal. When the pressure relief valve is closed at low speed the pressure is almost linearly proportional to engine speed.
>>"Do you think the check valve could be stuck open"?
 Oil pressure is a function of flow volume and resistance to flow. Flow volume is generated by the oil pump. Resistance to flow is due to small clearances in the crankshaft bearings. Oil pump failure is due to internal wear. This happens gradually over a very long period of time, not in sudden step fashion. If you had 40 psi last month and 20 psi now, it is most likely not a problem with the oil pump.
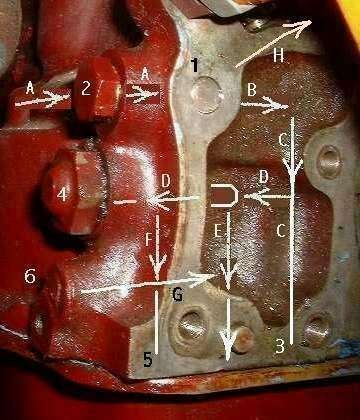
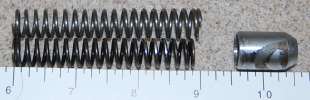
 The pressure relief valve can sometimes stick in the open position. It is not common but does happen sometimes. Symptoms would be very low pressure (less than 20 psi) at idle speed, but full oil pressure (50-60 psi normal relief pressure) by 2500 rpm. Since this is one of the easier things to investigate it can be a good idea to check this before doing more complex things. The PR valve resides within the large acorn shape plug on the left rear corner of the engine, item 4 in this picture.
This assembly is somewhat difficult for access with other things in the way, such as carburetor heat shield and exhaust manifold. If you are a bit of a contortionist you may be able to R&R the big screw plug without removing anything else. Otherwise remove carburetors and heat shield for easier access. Find more information about function and maintenance of the Pressure relief valve here: OF-111
If the PR valve appears to be functioning properly, the next investigation will require removing the oil pan. See here: OF-106
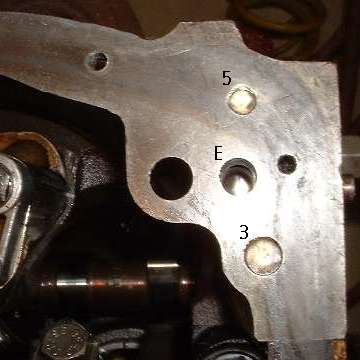 As soon as you get the pan removed, the first thing to check is condition of plugs and port 3, 5, and E in this picture. OF-101A. If plug 3 is missing you will have very low oil pressure (near zero) at all times. If hole E was plugged you would have excessively high oil pressure with cold oil or any time the engine is above idle speed. Plug 5 missing might not cause any problem, as it is a low pressure port and may be covered by the pan gasket.
With pan removed, three nuts will release the oil pump for removal (and maybe a bit of muscle if it might be stuck). For oil pump inspection and testing see here: OF-107
Given a good oil pump, correct block plugs and functioning PR valve, the next suspect is worn crankshaft bearings, especially connecting rod bearings. From underneath you can un-bend lock tabs and remove connecting rod bearing caps one at a time for inspection of the bearing shells and bearing journals on the crankshaft. Remove only one bearing cap at a time. Above all, never mix up the bearing caps, as they are inevitably bored slightly off center from the split line and will change size if you swap them to different con-rods. Result then would be some loose bearings and some seized bearings.
The journals must be smooth as glass with a near mirror finish. If you can feel any imperfections with your finger tip the crankshaft needs to be reground (which requires removal of the engine for disassembly). The bearing shells should have complete coverage of the soft white metal. If you can see any copper or steel showing through the white metal the bearings are worn through and need to be replaced. One loose con-rod bearing can cause about 20 psi drop of oil pressure. Two or more loose con-rod bearings can cause very low pressure at idle speed (10 psi) and less than 40 psi at road speed (never opening the PR valve).
Main bearings are more difficult for access. The center main is not too bad, requiring a large fine threaded bolt or pipe plug for pulling out the bearing cap. Condition of bearing journal and bearing shells is same as for the con-rod bearings, requiring smooth journal and all white metal on the shells. If the center bearing looks good, chances are the front and rear bearings will also be good. If the center bearing is bad or marginal, then it will be time to change all of the main bearings.
To remove the front bearing cap requires removal of the two bottom screws in the timing cover. Then front and rear bearing caps can be pulled using a threaded plug or large bolt and a big lever (crow bar). Removing the front and rear caps will damage the bottom edge cork seals and paper gasket on the engine end plates. A bit of gasket sealer can substitute for the paper gasket during reassembly, but new cork seals should be installed.
Remove and replace only one main bearing cap at a time, keeping the others in place to secure the crankshaft. When a bearing cap is removed the bottom half bearing shell usually comes out with the bearing cap. Otherwise the shell may be stuck to the journal with oil film only and is easy to remove. Note that the bearing shells have a tab on one end to prevent rotation in the housings. The top half bearing shell can be removed by tapping on the plain end with a flat blade screwdriver to rotate the shell about the journal. Once the tab end is exposed you can pinch it against the journal with some force, then rotate the crankshaft to pull the bearing around and out of the cradle in the engine block. Installation of a new bearing shell is the reverse of removal. Place bearing shell against the crankshaft journal and rotate crankshaft to rotate the new bearing shell into place.
Some care is due for installation of the cork seals on the front and rear main caps. Press the cork seals firmly into place in the slots, then trim flush with a razor knife and apply a bit of sealant before installing the oil pan. Installation of gasket and oil pan is standard practice, first assuring that the flange is flat and there is no protrusion of metal around the bolt holes (tap down with flat face hammer if needed).
|
